
Table of Contents
- 1. Marcil Technologies LLC Perpetual End-User License Agreement
- 2. Xpede.NET Quick Tips and Hints
- 3. Administration (System Settings)
- 4. Administration (Adding new users and assigning privileges)
- 5. Administration (Change User Passwords)
- 6. Launch Xpede.NET (User)
- 7. Preferences (E-mail Notifications)
- 8. Restricting projects, phases, and tasks
- 9. Shortcuts
- 10. Timesheet Templates
- 11. Entering timesheets
- 12. Entering schedules
- 13. Entering expense claims
- 14. Resource Inquiry
- 15. Project Manager and Division Leader Inquiry
- 16. Project Manager Approvals
- 17. Team Leader Inquiry
- 18. Project Schedule Inquiry
- 19. Team Approvals
- 20. Alternate Approver
- 21. Timesheet Report
- 22. Timesheet Status Report
- 23. Expense Claim Report
- 24. Project Summary Report
- 25. Project Detail Report
- 26. Project Progress Summary Report
- 27. Project Progress Detail Report
- 28. Project P&L Summary Report
- 29. Project P&L Detail Report
- 30. Cost Transactions Report
- 31. Resource Utilization Report
- 32. Scheduled Utilization Report
- 33. Project Schedule Report
- 34. Skill Load Report
- 35. Resource Load Report
- 36. Schedule Analysis Report
- A. Timesheet Report Configuration Options
- B. Timesheet Status Report Configuration Options
- C. Expense Claim Report Configuration Options
- D. Project Summary Report Configuration Options
- E. Project Detail Report Configuration Options
- F. Project Progress Summary Report Configuration Options
- G. Project Progress Detail Report Configuration Options
- H. Project P&L Summary Report Configuration Options
- I. Project P&L Detail Report Configuration Options
- J. Cost Transactions Report Configuration Options
- K. Resource Utilization Report Configuration Options
- L. Scheduled Utilization Report Configuration Options
- M. Project Schedule Report Configuration Options
- N. Skill Load Report Configuration Options
- O. Resource Load Report Configuration Options
- P. Schedule Analysis Report Configuration Options
- Q. Version and Contact Information
List of Tables
- 3.1. System Settings
- 8.1. Chooser Restrictions
- 9.1. Available Shortcuts
- A.1. Timesheet Report Sorting Options
- A.2. Timesheet Report Restriction Options
- A.3. Timesheet Report Details
- A.4. Timesheet Report Grouping Options
- B.1. Timesheet Status Report Sorting Options
- B.2. Timesheet Status Report Restriction Options
- B.3. Timesheet Status Report Details
- B.4. Timesheet Status Report Grouping Options
- C.1. Expense Claim Report Sorting Options
- C.2. Expense Claim Report Restriction Options
- C.3. Expense Claim Report Details
- C.4. Expense Claim Report Grouping Options
- D.1. Project Summary Report Sorting Options
- D.2. Project Summary Report Restriction Options
- D.3. Project Summary Report Details
- D.4. Project Summary Report Grouping Options
- E.1. Project Detail Report Sorting Options
- E.2. Project Detail Report Restriction Options
- E.3. Project Detail Report Details
- E.4. Project Detail Report Grouping Options
- F.1. Project Progress Summary Report Sorting Options
- F.2. Project Progress Summary Report Restriction Options
- F.3. Project Progress Summary Report Details
- F.4. Project Progress Summary Report Grouping Options
- G.1. Project Progress Detail Report Sorting Options
- G.2. Project Progress Detail Report Restriction Options
- G.3. Project Progress Detail Report Details
- G.4. Project Progress Detail Report Grouping Options
- H.1. Project P&L Summary Report Sorting Options
- H.2. Project P&L Summary Report Restriction Options
- H.3. Project P&L Summary Report Details
- H.4. Project P&L Summary Report Grouping Options
- I.1. Project P&L Detail Report Sorting Options
- I.2. Project P&L Detail Report Restriction Options
- I.3. Project P&L Detail Report Details
- I.4. Project P&L Detail Report Grouping Options
- J.1. Cost Transactions Report Sorting Options
- J.2. Cost Transactions Report Restriction Options
- J.3. Cost Transactions Report Details
- J.4. Cost Transactions Report Grouping Options
- K.1. Resource Utilization Report Sorting Options
- K.2. Resource Utilization Report Restriction Options
- K.3. Resource Utilization Report Details
- K.4. Resource Utilization Report Grouping Options
- L.1. Scheduled Utilization Report Sorting Options
- L.2. Scheduled Utilization Report Restriction Options
- L.3. Scheduled Utilization Report Details
- L.4. Scheduled Utilization Report Grouping Options
- M.1. Project Schedule Report Sorting Options
- M.2. Project Schedule Report Restriction Options
- M.3. Project Schedule Report Details
- M.4. Project Schedule Report Grouping Options
- N.1. Skill Load Report Sorting Options
- N.2. Skill Load Report Restriction Options
- N.3. Skill Load Report Details
- N.4. Skill Load Report Grouping Options
- O.1. Resource Load Report Sorting Options
- O.2. Resource Load Report Restriction Options
- O.3. Resource Load Report Details
- O.4. Resource Load Report Grouping Options
- P.1. Schedule Analysis Report Sorting Options
- P.2. Schedule Analysis Report Restriction Options
- P.3. Schedule Analysis Report Details
- P.4. Schedule Analysis Report Grouping Options
IMPORTANT - READ CAREFULLY: This End-User License Agreement ("EULA") is a legal agreement between You (either an individual person or a single legal entity, who will be referred to in this EULA as "You") and Marcil Technologies LLC (the "Licensor") for the software technology that displays this EULA, including any associated media, printed materials and electronic documentation (the "Software"). The Software also includes any software updates, add-on components, web services, and/or supplements that the Licensor may provide to You or make available to You after the date You obtain Your initial copy of the Software to the extent that such items are not accompanied by a separate license agreement or terms of use. By installing, copying, downloading, accessing or otherwise using the Software, You agree to be bound by the terms of this EULA. If You do not agree to the terms of this EULA, do not install, access or use the Software. By installing, copying, downloading, accessing or otherwise using the Software, You agree to be bound by the terms of this EULA. If You do not agree to the terms of this EULA, Licensor is unwilling to license the Software. In such event, You may not install, copy, download or otherwise use the Software.
Grant of License. Subject to the payment of the applicable license fees, and subject to the terms and conditions of this Agreement, Licensor hereby grants to You a non-exclusive, non-transferable right to use one copy of the specified version of the Software and the accompanying documentation (the "Documentation").
Installation and Use. If You have purchased a single-user license, You may install, use, access, display, run or otherwise interact with one copy of the Software on a single computer, workstation or terminal. If You have purchased a multi-user license, the Software may reside only on a single local area network or wide area network, and the Software can only be used at any time by no more than the number of users for which the multi-user license has been purchased. The Software may reside on multiple servers or workstations on the network, as long as the multi-user limit is not violated. If You have also purchased a multi-company license, the Software may be used by You and Your affiliates for the maximum number of companies for which the multi-company license has been purchased. The number of users and where the Software may reside is still limited in accordance with the multi-user license You have purchased. "Affiliate" is defined as an entity controlled by or under Your common control. Use of the Software that reduces the number of users directly accessing or using the Software (sometimes called "multiplexing" or "pooling") does not reduce the number of user licenses required. The Software is licensed as a single product. Its component parts may not be separated for use on more than one computer.
Upgrades. If the Software is labeled as an upgrade, You must be properly licensed to use a product identified by Marcil Technologies LLC as being eligible of the upgrade in order to use the Software. Software labeled as an upgrade replaces and/or supplements (and may disable) the Software that formed the basis for Your eligibility for the upgrade. You may use the resulting upgraded Software only in accordance with the terms of this EULA. If the Software is an upgrade of a component of a package of software programs that You licensed as a single product, the Software may be used and transferred only as part of that single product package and may not be separated for use on more than one computer.
Backup Copy. After installation of one copy of the Software pursuant to this EULA, You may keep the original media on which the Software was provided by Marcil Technologies LLC solely for backup or archival purposes. If the original media is required to use the Software on the computer, You may make one copy of the Software solely for backup or archival purposes. Except as expressly provided in this EULA, You may not otherwise make copies of the Software or the printed materials accompanying the Software.
Support Services. Marcil Technologies LLC may provide You with support services related to the Software ("Support Services"). Use of Support Services is governed by the Marcil Technologies LLC policies and programs described in the user manual, in "online" documentation, and/or in other Marcil Technologies LLC provided materials. Any supplemental software code provided to You as part of the Support Services shall be considered part of the Software and subject to the terms and conditions of this EULA. With respect to technical information You provide to Marcil Technologies LLC as part of the Support Services, Marcil Technologies LLC may use such information for its business purposes, including for Software support and development. Marcil Technologies LLC will not utilize such technical information in a form that personally identifies You and is subject to the confidentiality guidelines as set forth in this agreement.
Termination. This license terminates automatically and without notice to You if You fail to comply with the terms of this Agreement. You may terminate this license at any time. Upon termination by either party, You must destroy all copies of the Software in Your possession.
Restrictions. You may not sell, lease license, rent, loan or otherwise transfer, with or without consideration, the Software. You shall not permit any third party (other than third parties under contract with You which contains nondisclosure obligations no less restrictive than those set forth herein) to use the Software in any form and shall use all reasonable efforts to ensure that no improper or unauthorized use of the Software is made. You may not transfer any of the rights granted to You under this Agreement. You may not reverse engineer, decompile, or disassemble the Software, except and only to the extent that such activity is expressly permitted by applicable law notwithstanding this limitation. You may not modify, or create derivative works based upon, the Software in whole or in part. You may not copy the Software or Documentation except as expressly permitted by Marcil Technologies LLC. You may not remove any proprietary notices or labels on the Software. All rights not expressly set forth hereunder are reserved by Marcil Technologies LLC. Marcil Technologies LLC reserves the right to periodically conduct audits upon advance written notice to verify compliance with the terms of this Agreement.
Intellectual Property Rights. All title and intellectual property rights in and to the Software (including but not limited to any images, photographs, animations, audio, text, and "applets" incorporated into the Software), the accompanying printed materials, and any copies of the Software are owned by Licensor or its suppliers. This EULA grants You no such rights to use such content. If this Software contains documentation that is provided only in electronic form, You may print one copy of such electronic documentation. You may not copy the printed materials accompanying the Software.
Export Restrictions. You acknowledge that the Software is subject to U.S. export jurisdiction. You agree to comply with all applicable international and national laws that apply to the Software, including the U.S. Export Administration Regulations, as well as end-user, end-use and destination restrictions issued by U.S. and other governments.
Applicable Law. This Agreement is governed by the laws of the State of North Dakota, USA, without regard to its conflict of laws principles and the parties submit to the exclusive jurisdiction of the state and federal courts located in Cass County, North Dakota, USA for any suite or legal proceeding of any kind related to this Agreement or the Software. If You are located outside the United States or Canada, any dispute, claim or controversy related to this Agreement or the Software will be resolved by arbitration in accordance with the rules of the International Chamber of Commerce, using a single arbitrator selected in accordance with those rules. The judgment of the arbitrator will be final and binding on all parties and may be entered in any court of competent jurisdiction.
Limited Warranty. For the sixty (60) days following delivery of the Software to You, Marcil Technologies LLC warrants the physical media of the Software to be defect-free and Marcil Technologies LLC warrants that the Software will substantially conform to the documentation, if the Software is used on the computer hardware and with the operating system for which it was designed. Your only remedy in the event of a defect in the media or Software is repair or replacement of the media or Software. The foregoing Limited Warranty is void if failure of the Software has resulted from accident, abuse, misapplication, abnormal use or a virus. Any replacement Software will be warranted for the remainder of the original warranty period or thirty (30) days, which ever is longer.
Warranty Disclaimer. Except for the limited warranty set forth herein, the Software is provided "AS IS". To the maximum extent permitted by applicable law, Licensor disclaims ALL WARRANTIES, EITHER EXPRESS OR IMPLIED, INCLUDING BUT NOT LIMITED TO IMPLIED WARRANTIES OF MERCHANTABILITY, FITNESS FOR A PARTICULAR PURPOSE, AND NONINFRINGEMENT WITH RESPECT TO THE SOFTWARE AND THE ACCOMPANYING DOCUMENTATION. WITHOUT LIMITING THE FOREGOING PROVISIONS, LICENSOR MAKES NO WARRANTY THAT THE SOFTWARE WILL BE ERROR-FREE OR FREE FROM INTERRUPTIONS OR OTHER FAILURES OR THAT THE SOFTWARE WILL MEET YOUR REQUIREMENTS. SOME STATES AND JURISDICTIONS DO NOT ALLOW LIMITATIONS ON IMPLIED WARRANTIES, SO THE ABOVE LIMITATION MAY NOT APPLY TO YOU. The foregoing provisions shall be enforceable to the maximum extent permitted by applicable law.
Limitation on Remedies. Your exclusive remedy for any breach of the foregoing Limited Warranty is as set forth in this Section 12. You are not entitled to any damages, including but not limited to consequential damages, if the Software does not meet Licensor's Limited Warranty, and, to the maximum extent allowed by applicable law, even if any remedy fails of its essential purpose.
Limitation of Liability. Under no circumstances and under no legal theory, whether in tort, contract, or otherwise, shall Licensor or its suppliers be liable to You or to any other party for any special, incidental, indirect, or consequential damages whatsoever (including, but not limited to, damages for loss of profits or confidential or other information, for business interruption, for personal injury, for loss of privacy, for failure to meet any duty including of good faith or of reasonable care, for negligence, and for any other pecuniary or other loss whatsoever) arising out of or in any way related to the use of or inability to use the Software, the provision of or failure to provide support services, or otherwise under or in connection with any provision of this EULA, even in the event of the fault, tort (including negligence), strict liability, breach of contract or breach of warranty, and even if Licensor has been advised of the possibility of such damages.
Limitation of Remedies. IN NO EVENT WILL LICENSOR BE LIABLE FOR ANY DAMAGES IN EXCESS OF THE LIST PRICES LICENSOR CHARGES FOR A LICENSE TO THE SOFTWARE, EVEN IF LICENSOR SHALL HAVE BEEN ADVISED OF THE POSSIBILITY OF SUCH DAMAGES.
Complete Agreement. This EULA contains the complete agreement between the parties with respect to the subject matter hereof, and supersedes all prior or contemporaneous agreements and understandings whether written or oral. You agree that any varying or additional terms contained in any purchase order or other written notification or document issued by you in relation to the Software licensed hereunder shall be of no effect. The failure of Marcil Technologies LLC to exercise any of its rights under the EULA or upon any breach of the EULA shall not be deemed a waiver of those rights or of the breach.
No Marcil Technologies LLC dealer, agent, or employee is authorized to make any amendment to this EULA unless such amendment is signed by a duly authorized representative of Marcil Technologies LLC.
All questions regarding this EULA shall be directed to Marcil Technologies LLC, 3003 32nd Avenue South, Suite 210 B, Fargo, ND 58103, Attention: General Counsel.
Revised February 2008
Login:
The Allow Automatic Login option can be removed to prevent all users from seeing this option. This option may need to be hidden if some users will be using shared or public computers. This can be changed by the Xpede.NET administrator in the System Settings window.
Xpede.NET can be disabled for all users during times of maintenance. This option is set in the Web.config file with the property XpedeUnavailableToUsers
Main Menu:
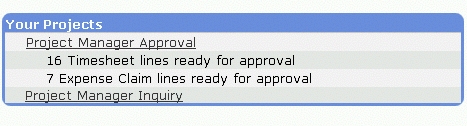
The Your Projects section only appears if you are a Project Manager or a Division Leader. This section will also appear if you have access to inquire on or approve timesheets and/or expense claims.
Only unapproved timesheet and expense claims can be edited in Xpede.NET.
If you mouse over the Timesheet Batch, the batch's date range is shown.
If you mouse over the Expense Claim Batch, the batch's planned posting date is displayed.
Administration:
Resources can be internal (employees) or external (subcontractors).
All columns can be sorted in ascending or descending order to quickly find relevant information.
Timesheet Entry:
The Hours Billable field can be removed from the timesheet entry window for all users. This can be changed by the system administrator in the System Settings window.
A green arrow next to each line signifies the project, phase, and task combination is not an existing shortcut. By clicking on the green arrow, the timesheet shortcut will be added.
A red arrow next to each line signifies the project, phase, and task combination is an existing shortcut. By clicking on the red arrow, the timesheet shortcut will be removed.
Comments can be copied and pasted to other comment fields by using Ctrl C to copy and Ctrl V to paste.
The No Task option can be removed from the task chooser for all users by the administrator in the System Settings window.
Expense Claim Entry:
A green arrow next to each line signifies the project, phase, and task combination is not an existing shortcut. By clicking on the green arrow, the expense claim shortcut will be added.
A red arrow next to each line signifies the project, phase, and task combination is an existing shortcut. By clicking on the red arrow, the expense claim shortcut will be removed.
An account and vendor must exist on the expense claim line in order to save the line.
The account and vendor will only display if the user has access to "Enter for Others" or "Enter for Teams".
Comments can be copied and pasted to other comment fields by using Ctrl C to copy and Ctrl V to paste.
The No Project option can be removed from the project chooser for all users by the administrator in the System Settings window.
The No Task option can be removed from the task chooser for all users by the administrator in the System Settings window.
If segment replacement is set up in Project Accounting, segment replacement will be used when the account is automatically selected. See the Project Accounting manual for more information about segment replacement.
Project Manager Inquiry:
If the configuration options are altered, you can save your new configuration if you wish to use the same view again.
Project Manager Approvals/Team Approvals:
If there are more than 200 transaction lines to approve, the user will be prompted to restrict the number of lines down. If there are 200 or less transaction lines, all the lines to approve will display. The threshold of 200 can be changed by the Xpede.NET Administrator in the System Settings window.
If the configuration options are altered, you can save your new configuration if you wish to use the same view again.
Reports:
The Employee Signature line will only print if the option in the System Settings window is marked AND the report is restricted to one timesheet or expense claim AND/OR the report is restricted to only one resource.
When using the 'SSRS' option for reports, the Xpede.NET SSRS reports must be deployed to the reports server before the reports can be accessed via Xpede.NET.
Report configuration privileges are only validated when using 'Stylesheet' type reports.
Preferences:
The E-mail Address will default from the Resource Maintenance window in Project Accounting. Any changes to the e-mail address in Xpede.NET will update the e-mail address in Project Accounting.
A user with access to approve timesheets and expense claims for all resources will not necessarily receive submission e-mail notifications. To receive notifications, the resource must be set up as a team leader of a team with all resources assigned.
E-mail notifications will only be sent if both the sender and receiver of the e-mail have an e-mail address.
Miscellaneous:
Do not use the browser's Back button when navigating in Xpede.NET. Unexpected errors can occur and your transaction may not be saved correctly.
The label on the No Task option can be changed in the System Settings window by the administrator.
If you receive CDO error messages when attempting to e-mail, contact the Xpede.NET Administrator to change the Relay Restrictions on your default SMTP Virtual Server to "All except the list below".
The tab and enter keys both work to navigate through the chooser windows.
The version of Xpede.NET can be found by mousing over the Help link.
Resource Management must be registered in order to use the project scheduling windows and reports. For more information, contact Marcil Technologies.
The System Settings window allows you to customize specific characteristics of Xpede.NET. Refer to each option for specific details.
Launch Internet Explorer or Netscape and enter the Internet address in the web address field. The web address will look similar to this:
http://web server/virtual folder or http://IP Address/virtual folder
The Xpede.NET Login window will open.
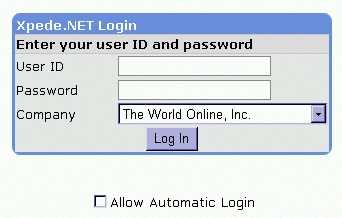
The first time you enter the Xpede.NET Login window, enter "ADMIN" as the User ID and "access" as the Password. Logging in as ADMIN allows you to add and modify Xpede.NET users, set up and modify user access, and change the system settings.
Select the company you want to use. If you want the system to "remember" your login password, mark the Allow Automatic Login option. Choose Log In to open the Administration window.
We suggest you change the password of the admin user, which can be accomplished by clicking on the Change Administrator Password link. The password must be at least 6 characters long.

The most recently used User Name and Company will default into the Xpede.NET Login window. 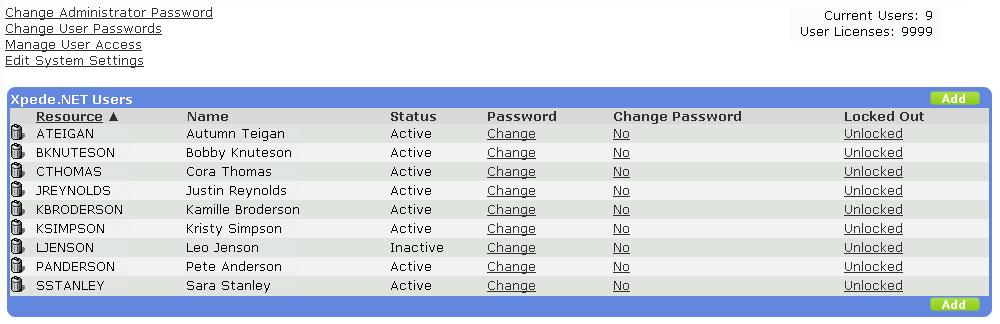
Click on the Edit System Settings link in the upper left corner. The System Settings and Configuration window will display.

Expand the tree view to display all of the options. After making changes, click Save. Click Cancel to discard any changes and return to the previous window.

Click on the underlined option to display a description. 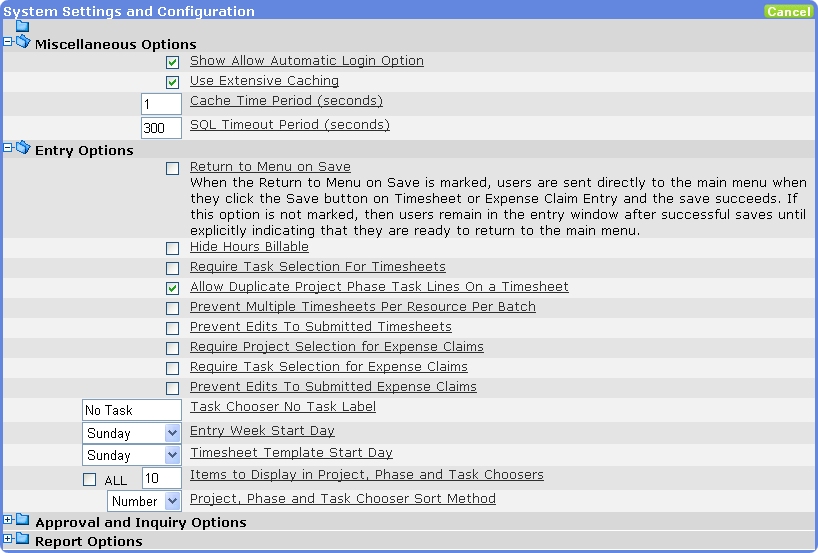
Table 3.1. System Settings
Option Description Show Allow Automatic Login Option
Indicates whether to display the checkbox for automatic login on the login page. It is convenient for users to have the option to click a link that automatically logs them in. However, if users check this box then an MD5 hash of their password is stored in their cookies. It is very difficult to recover a password from this hash. The primary risk in providing this convenience is if an unauthorized user is able to gain access to a computer, which has logged into Xpede.NET with this checkbox checked. This will allow the unauthorized user to log into the system as the last user who successfully logged in. If the automatic login is allowed, users who may enter time on public terminals should be instructed not to check the "Allow Automatic Login" checkbox. The checkbox is marked by default. Use Extensive Caching
When the Use Extensive Caching option is marked, then the results of many often-executed database queries are stored in ASP. Net's cache, decreasing the required traffic between the web server and database server. Data remains in the cache for five minutes; five minutes after an item is added to the cache it is cleared, and the next request for that data item will be retrieved from the database, then saved for another five minutes. Cache activity may be monitored by setting TraceDataCache to "1" in the system diagnostics section of web.config. When the Use Extensive Caching option is unmarked, cache use will be cut dramatically, but not entirely. Cache Time Period (seconds)
Determines the length of time data is stored in cache. The default setting is 300 seconds (5 minutes). If this setting is reduced, this increases server/network traffic and therefore can reduce Xpede.NET's performance. If this setting is increased, the server/network traffic is reduced, but will reduce the "real-time" updates. For example, if the setting is set to 600 seconds (10 minutes), the list of projects will remain static in Xpede.NET (per user), so in the meantime, if a new project is created in Project Accounting, a user that already accessed the project list in Xpede.NET within the last 10 minutes will not see the new project until the next time the project list is cached. SQL Timeout Period (seconds)
Determines the length of time a specific query will be allowed to run before returning data from the server. The default setting is 300 seconds (5 minutes). For example, if you select to run a report for a range of projects that has a large amount of transactions, it takes time for the SQL server to return the data. If the timeout period elapses, the report will timeout and not return the data. Return to Menu on Save
When the Return to Menu on Save is marked, users are sent directly to the main menu when they click the Save button on Timesheet or Expense Claim Entry and the save succeeds. If this option is not marked, then users remain in the entry window after successful saves until explicitly indicating that they are ready to return to the main menu. Hide Hours Billable
If the Hide Hours Billable option is marked, then the Hours Billable field in timesheet entry will not display. This is only regarding the Timesheet Entry Window; through the Approval Window, project managers can always see and edit this value. If the field is hidden, the value of Hours Billable is always updated to be the value entered for Hours Worked. Require Task Selection For Timesheets
If the Require Task Selection For Timesheets option is marked, the No Task selection option is removed from the Task Chooser window requiring the user to select a task when entering timesheets. If the option is unmarked, the No Task selection option is available for the user to select. Allow Duplicate Project Phase Task Lines On a Timesheet
If Allow Duplicate Project, Phase, and Task Lines on a Timesheet is marked, a user will be able to enter multiple lines with the same Project, Phase, and Task combination on a timesheet. If it is unmarked, they will have to have unique Project, Phase, and Task combinations on their timesheet. Prevent Multiple Timesheets Per Resource Per Batch
If the Prevent Multiple Timesheets Per Resource Per Batch option is unmarked, then all relevant batches appear in the batch chooser window. All current restrictions, such as team, still apply. If the Prevent Multiple Timesheets Per Resource Per Batch option is marked, then all relevant batches appear in the batch chooser EXCEPT the batches where the resource the timesheet is being entered for already has a timesheet saved or posted. All of the other current restrictions still apply. Prevent Edits to Submitted Timesheets
If Prevent Edits to Submitted Timesheets is marked, timesheets cannot be edited once submitted and saved. Timesheets can only be edited if rejected or unsubmitted in Project Accounting. If the option is unmarked, timesheets can still be edited after submission. Prevent Edits to Submitted Expense Claims
If Prevent Edits to Submitted Expense Claims is marked, expense claims cannot be edited once submitted and saved. Expense Claims can only be edited if rejected or unsubmitted in Project Accounting. If the option is unmarked, expense claims can still be edited after submission. Require Project Selection for Expense Claims
If the Require Project Selection For Expense Claims option is marked, the No Project selection option is removed from the Project Chooser window requiring the user to select a project/phase/task. If the option is unmarked, the No Project selection option is available for the user to select. Require Task Selection for Expense Claims
If the Require Task Selection For Expense Claims option is marked, the No Task selection option is removed from the Task Chooser window requiring the user to select a task when entering expenses. If the option is unmarked, the No Task selection option is available for the user to select. Task Chooser No Task Label
This setting allows you to customize the label on the Task Chooser's No Task button. If the default value of 'No Task' is changed, then the No Task button's label is changed to the value. Entry Week Start Day
Indicates which day of the week the view in timesheet entry begins. The default value is Sunday, but for organizations whose timesheet batches run Mon-Sun, users will find timesheet entry much more expedient if this Timesheet Entry Week Start Day is set to Monday. Timesheet Template Start Day
Indicates which day of the week the view in timesheet template entry begins. The default value is Sunday, but for organizations whose timesheet batches run Mon-Sun, users will find timesheet entry much more expedient if this Timesheet Template Start Day is set to Monday. Items to Display in Project, Phase and Task Choosers
If the All checkbox is marked, the entire list of projects, phases, and tasks will appear on one page in the corresponding choosers when accessed via Timesheet Entry or Expense Claim Entry. If the All checkbox is not marked, the number entered in the text field will be the amount of selection items shown per page in the choosers. Project, Phase and Task Chooser Sort Method
If the selection option is Number, the project, phase, and task choosers within Timesheet Entry and Expense Claim Entry will be sorted by Number. If the selection option is Name, the choosers will be sorted by Name. Schedule Number
The control number is used as an incremental unique identifier for project schedules. Enter and View Schedules For Managed Projects Only
If the option is marked, resources with access to Project Schedule Entry and Project Schedule Inquiry as well as the related reports can only create and view schedules for projects that are the project manager to. If this option is unmarked, resources with access to Project Schedule Entry and Project Schedule Inquiry as well as the related reports can create and view schedules for all projects regardless of who is the project manager. Restrict Schedule Dates
If the option is marked, schedule dates must equal to or between the Start and Due Dates of the schedule's project. If unmarked, any dates can be entered for the schedule. Hide Timesheet Detail
If Hide Timesheet Detail is marked, timesheet options and details will not display in the approval and inquiry screens. If unmarked, timesheet options and details will display. Hide Expense Claim Detail
If Hide Expense Claim Detail is marked, expense claim options and details will not display in the approval and inquiry screens. If unmarked, expense claim options and details will display. Project Manager Approval Skip Selection Threshold
When a project manager enters the line approval window all the lines are displayed. However, if there are a lot of lines to display then the page may take a long time to load, and possibly time out without displaying any lines. In order to prevent this timeout there is a threshold such that if the number of lines to display is greater than the threshold then the project manager is prompted to choose selection criteria in order to restrict the number of lines shown. The best threshold value is environment dependent, but should probably be between 50 and 1000. Team Approval Skip Selection Threshold
When a team leader enters the approval window all the documents are displayed. However, if there are a lot of lines to display then the page may take a long time to load, and possibly time out without displaying any lines. In order to prevent this timeout there is a threshold such that if the number of documents to display is greater than the threshold then the team leader is prompted to choose selection criteria in order to restrict the number of documents shown. The best threshold value is environment dependent, but should probably be between 50 and 1000. Resource Restriction Display Method
If the selected option is Number, the Resource restriction in the Resource Inquiry, Team Leader Inquiry, Project Manager Inquiry, Approval Search Criteria (Team Approval), and the Approval Line Search Criteria (Project Manager Approval) windows will display a list of resource numbers. If the selected option is Name, the Resource restriction will display a list of resource names. Project Restriction Display Method
If the selected option is Number, the Project restriction in the Team Leader Inquiry, Project Manager Inquiry, and the Approval Line Search Criteria (Project Manager Approval) windows will display a list of project numbers. If the selected option is Name, the Project restriction will display a list of project names. Show Signature Line on Timesheet and Expense Claim Reports
If Show Signature Line On Timesheet and Expense Claim Reports option is marked, an employee signature line will appear on both the timesheet and expense claim reports. If it is unmarked, no signature line will appear on the reports. Restrict Project Reports to Managed Projects Only
If Restrict Project Reports to Managed Projects Only option is marked, you can only access reporting information for projects for which you're a project manager. If it is unmarked, you can accessing reporting information for all reports. Reports Style
Xpede.NET offers two styles of reporting. Choose 'Style Sheets' for built-in reporting, or choose 'SSRS' to print reports using SQL Server Reporting Services. Reports Location
Xpede.NET will load its reports from the URI specified in the value. The URI can be an absolute physical path accessed through the file system or a URL of an Internet location. For Stylesheets: Xpede.NET appends the name of a specific report when it accesses this property, so be sure to include a final '\' or '/', depending on the URI type. By default this is the physical path of the reports folder of the Xpede.NET web application, for example, c:\inetpub\wwwroot\xpede\stylesheets\ or http://localhost/stylesheets/Xpede.NET/. For SSRS: Only include the server location of the reports. Do not include in the URI the actual folder or subfolders that the reports reside in on the reports server, for example, http://localhost/reportserver Reports Folder
SSRS Only: Enter the folder location where the SSRS reports reside on the reports server. Include subfolders if applicable. Examples: ProjectAcct/Xpede.NET or Xpede.NET User Name
SSRS Only: Enter the User Name for the network credential that will be used to access SSRS reports on the report server. Password
SSRS Only: Enter the Password for the network credential that will be used to access SSRS reports on the report server. Domain
SSRS Only: Enter the Domain for the network credential that will be used to access SSRS reports on the report server. Timesheet Report
Depending on the output types pdf, html, and csv when using Style Sheets, Xpede.NET appends -fo,-html, and -csv respectively to the name of the master style sheet. For example, the value timesheet-master for pdf report will be timesheet-master-fo.xsl. Timesheet Status Report
Depending on the output types pdf, html, and csv when using Style Sheets, Xpede.NET appends -fo,-html, and -csv respectively to the name of the master style sheet. For example, the value timesheet-master for pdf report will be timesheet-master-fo.xsl. Expense Claim Report
Depending on the output types pdf, html, and csv when using Style Sheets, Xpede.NET appends -fo,-html, and -csv respectively to the name of the master style sheet. For example, the value timesheet-master for pdf report will be timesheet-master-fo.xsl. Project Summary Report
Depending on the output types pdf, html, and csv when using Style Sheets, Xpede.NET appends -fo,-html, and -csv respectively to the name of the master style sheet. For example, the value timesheet-master for pdf report will be timesheet-master-fo.xsl. Project Detail Report
Depending on the output types pdf, html, and csv when using Style Sheets, Xpede.NET appends -fo,-html, and -csv respectively to the name of the master style sheet. For example, the value timesheet-master for pdf report will be timesheet-master-fo.xsl. Project Progress Summary Report
Depending on the output types pdf, html, and csv when using Style Sheets, Xpede.NET appends -fo,-html, and -csv respectively to the name of the master style sheet. For example, the value timesheet-master for pdf report will be timesheet-master-fo.xsl. Project Progress Detail Report
Depending on the output types pdf, html, and csv when using Style Sheets, Xpede.NET appends -fo,-html, and -csv respectively to the name of the master style sheet. For example, the value timesheet-master for pdf report will be timesheet-master-fo.xsl. Project P&L Summary Report
Depending on the output types pdf, html, and csv when using Style Sheets, Xpede.NET appends -fo,-html, and -csv respectively to the name of the master style sheet. For example, the value timesheet-master for pdf report will be timesheet-master-fo.xsl. Project P&L Detail Report
Depending on the output types pdf, html, and csv when using Style Sheets, Xpede.NET appends -fo,-html, and -csv respectively to the name of the master style sheet. For example, the value timesheet-master for pdf report will be timesheet-master-fo.xsl. Cost Transactions Report
Depending on the output types pdf, html, and csv when using Style Sheets, Xpede.NET appends -fo,-html, and -csv respectively to the name of the master style sheet. For example, the value timesheet-master for pdf report will be timesheet-master-fo.xsl.
Before you can use Xpede.NET, you need to set up the users that will be using Xpede.NET and the privilges for each user. Resources are first created in the Resource Maintenance window in Maril Technologies Inc Project Accounting and then added to Xpede.NET by the Xpede.NET administrator. Most likely this information will only need to be set up once, but you may need to refer back to this section if you need to make changes or add new Xpede.NET users.
Launch Internet Explorer or Netscape and enter the Internet address in the web address field. The web address will look similar to this:
http://web server/virtual folder or http://IP Address/virtual folder
The Xpede.NET Login window will open.
The first time you enter the Xpede.NET Login window, enter "ADMIN" as the User ID and "access" as the Password. Logging in as ADMIN allows you to add and modify Xpede.NET users, set up and modify user access, and change the system settings.
Select the company you want to use. If you want the system to "remember" your login password, mark the Allow Automatic Login option. Choose Log In to open the Administration window.
We suggest you change the password of the admin user, which can be accomplished by clicking on the Change Administrator Password link. The password must be at least 6 characters long.
The most recently used User Name and Company will default into the Xpede.NET Login window. Click the Add button and select the resources that you want to add to Xpede.NET. Select to leave the default password of 'access' or choose the option to have the user's password be the same as their User ID. You can unmark the Change Password checkbox so new users will not be required to change their password upon their first successful login to Xpede.NET.
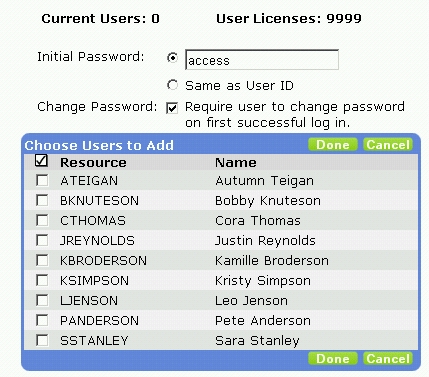
Click Done when you are finished or Cancel to cancel the changes and return to the current list of Xpede.NET users.
To delete a resource, locate the Resource ID in the list and click the Delete icon (trash can). The resource will be deleted in Xpede.NET and will not be able to login. The resource will not be deleted from Project Accounting.
Click Save to save the entries or Cancel to cancel the changes made in the Administration window.
Click the Manage User Access link to assign privileges to the users.
After clicking on the Manage User Access link, the Manage Groups/Users window is opened. The default is to set privileges for Groups. We recommend using Groups to set the majority of privileges.
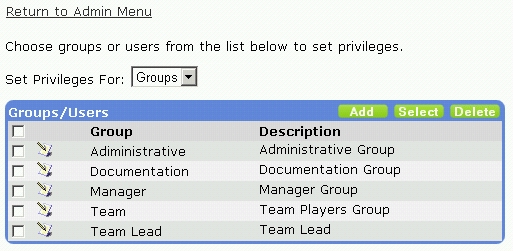
When you are in the Groups view, you have the ability to add groups, edit groups and their descriptions, assign or edit privileges for groups, or delete groups. To add a new group, click the Add button. Click on the edit icon to edit the group members and the description of the group. Select one or more groups by selecting the checkbox next to the group and click the Select button to assign or edit the privilges. Select one or more groups and click Delete to delete groups that are no longer needed.
To add a new group, click the Add button.

Enter the Group Name and Description. The Group Name is limited to 25 characters and the Group Description is limited to 50 characters. The Group Name field is a required field; the Description field is not a required field.
Once you enter the Group Name and Description, click on Save. If you click on Cancel, the Group information entered will not be saved and the administrator will be returned to the Main User Access window. After clicking on Save, the available users are displayed along with the Group Information in the Manage Group Members window.
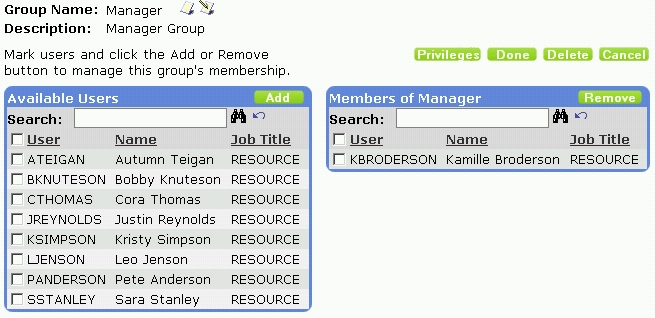
The Group Name and Description may be edited at this time by clicking on the edit icon. After edits are made, click on the Save button. To cancel changes to the Group Name or Description, click on Cancel.
Select the users to be part of the Group by clicking on the checkboxes to the left of the users or select all users by clicking on the checkbox to the left of the User field. Click on Add to add the users to the group.
As before in the User listing window, clicking on User, Name, or Job Title in the user window or in the Member window, will change the listing to either ascending or descending order.
Users can be removed from Groups by clicking on the checkbox to the left of the specific user or the checkbox to the left of the User field and clicking on the Remove button.
Once Users are added to the group, you have the ability to manage the group's permissions by clicking the Privileges button, return to the Main User Access window by clicking the Done button, delete the group by clicking the Delete button, or cancel changes to the group by clicking the Cancel button.
Clicking on Privileges will open the Manage Permissions window.
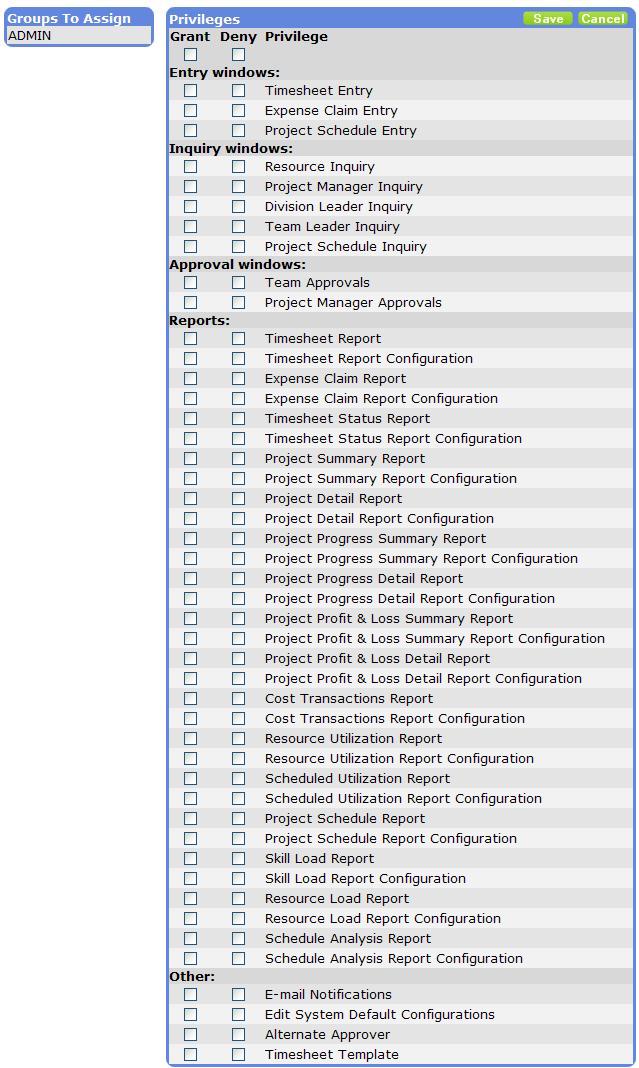
The group(s) selected to assign privileges to is displayed on the left. Check the boxes to grant or deny privileges for the groups selected. Clicking the boxes directly below Grant / Deny will mark and unmark all the privileges available. Not checking a box is inherently denied. Specifically checking Deny for a specific privilege will override a Grant made for the User if the User is part of another group.
Click on Save to save the privileges and return to the Main User Access window. Click on Cancel to cancel the selection of privileges and return to the Main User Access window.
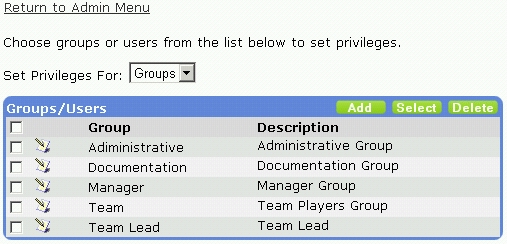
To delete a group, mark the checkbox next to the group(s) to be deleted and click the Delete button. You will receive a confirmation message asking if 'Are you sure you want to delete the selected groups?'. Click Yes or No. Once the group is deleted, a message will confirm the number of groups deleted - '1 group(s) deleted.'.
Change the Set Privileges For: drop-down to Users to edit privileges for a specific user.
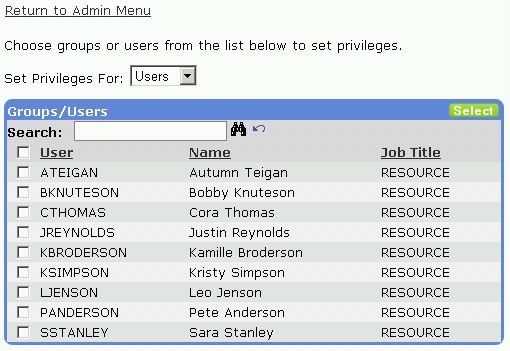
By clicking on the column headings (User, Name, and Job Title), the order of the listing will be changed to either ascending or descending order. The checkbox to the left of the column heading User will mark or unmark all Users. The checkbox to the left of the individual users will select or unselect the specified Users. More than one user may be selected at one time.
After a User is selected, click on the Select button to open the Privileges window.
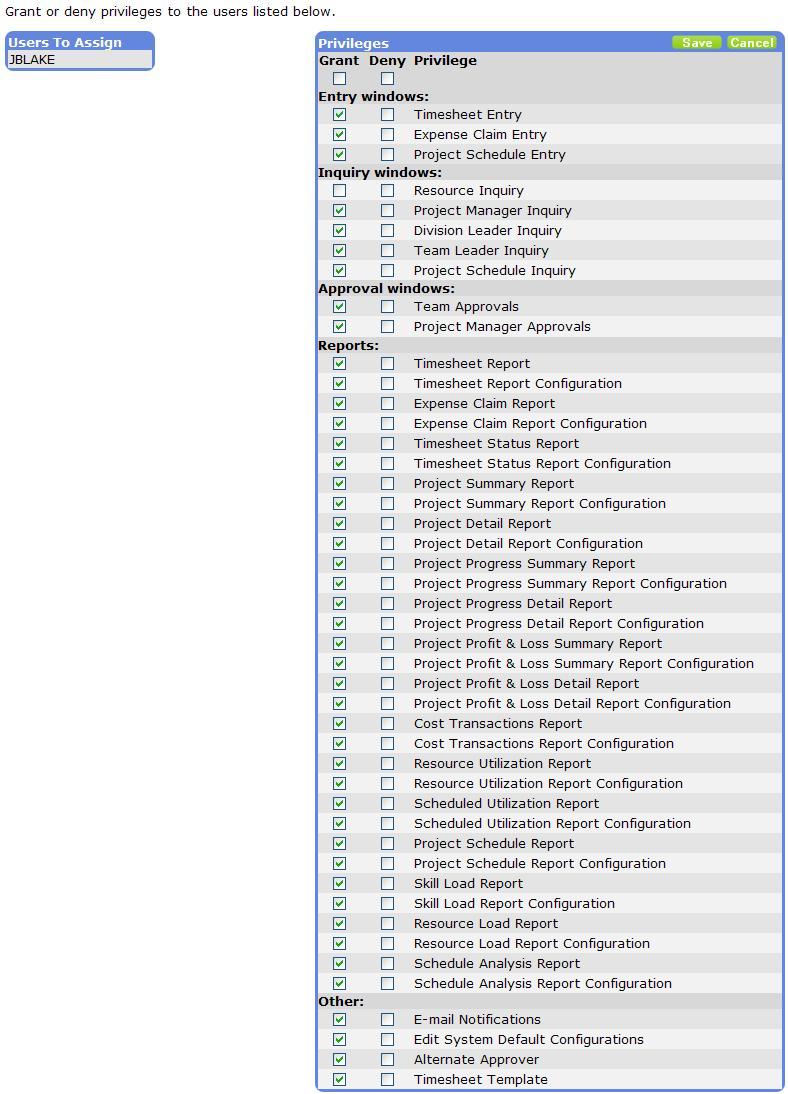
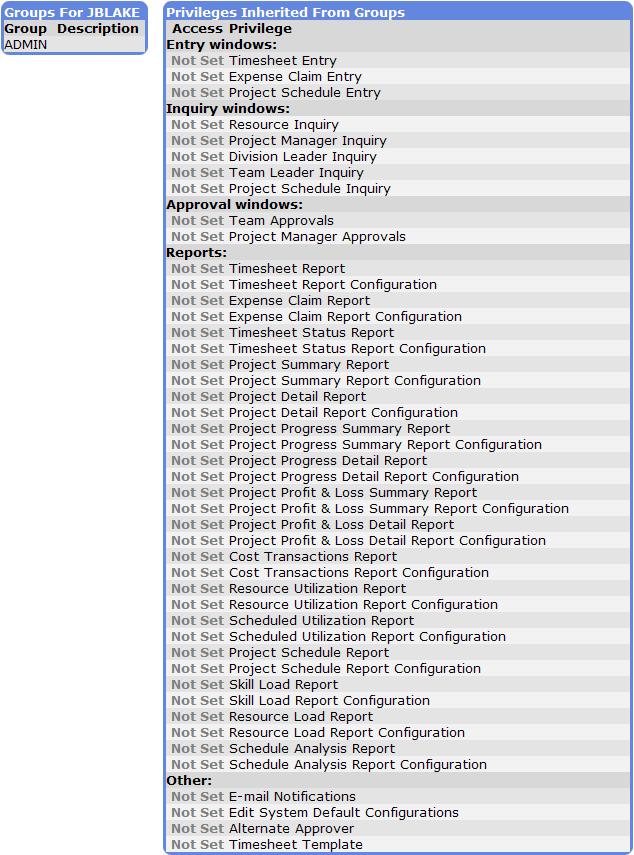
Change the Set Privilege For drop down to Users and click on Select to set privileges for Users. Groups that the User are part of are listed further down the screen. The privileges inherited from the group are also displayed. The specific User privileges granted or denied override group privileges granted or denied for the user.
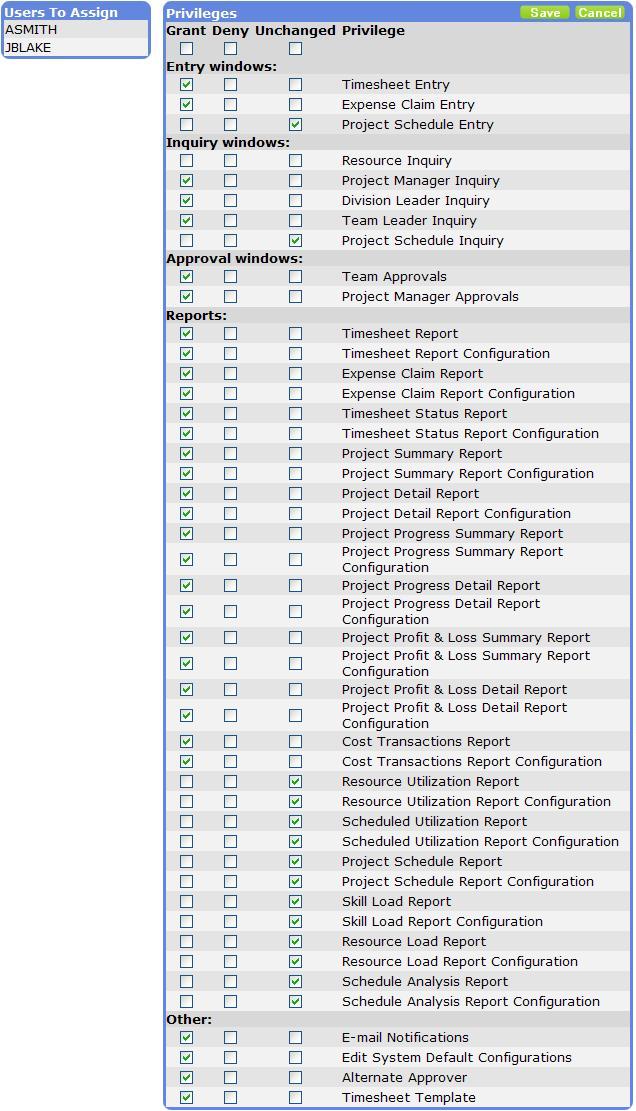
More than one user may be selected at a time. If more than one User is selected, the Unchanged column will appear if there are differences between the privileges already assigned to the selected users. If the selected users' privileges are identical, then the Unchanged column will not appear. Once privileges are set or changed, click on Save to save the privilege selections or Cancel to cancel the changes. The administrator will be returned to the Main User Access window.
Log in to Xpede.NET as ADMIN to access the Administration window.
Click the Change User Passwords link and select the resources to update. Select to leave the new password of 'access' or choose the option to have the user's new password be the same as their User ID. You can unmark the Change Password checkbox so users will not be required to change their password upon their next successful login to Xpede.NET.
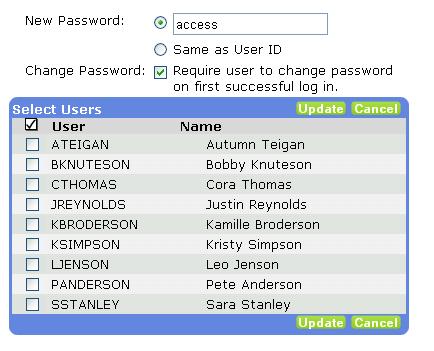
Click Update when you are finished or Cancel to cancel the changes and return to the Administration window.
Before you can access Xpede.NET, must have a user name and password. Only active resources will have the ability to login to Xpede.NET.
| Upon logging into Xpede.NET, you may be required to change your password from the default set by the Xpede.NET administrator. Your new password cannot be the same as your previous password. |
Launch Internet Explorer or Netscape and enter the Internet address in the Address field. The web address will look something like this:
http://web server/virtual folder or http://IP Address/virtual folder
The Xpede.NET Login window will open:
Enter your User ID and the Password that was given to you by the Xpede.NET Administrator.
Select the company you want to use. If you want the system to "remember" your login password and the last company you logged into, mark the Allow Automatic Login option.
The Allow Automatic Login option may not be available if the administrator disabled the option in the System Settings window.
The most recently used User ID and Company will default into the Xpede.NET Login window. Choose Log In.
Use the Preferences window to change your password, enter or edit an e-mail address, select a date format, select your e-mail notification options, or select an alternate approver.
To enter user information:
On the Main Menu, select Preferences.
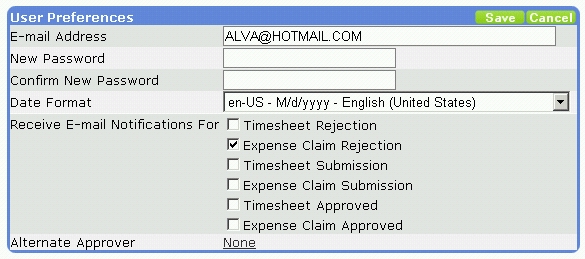
Enter or edit your e-mail address.
The e-mail address you enter will be saved to WorkforceROI Project Accounting. This e-mail address is the address for the sender using the e-mail functionality throughout Xpede.NET.
Change your password by entering a new password and confirming it by entering your new password again in the Confirm New Password field. Your password must be at least 6 characters long.
Select a date format. Changing the Date Format will affect how dates are entered and displayed in Xpede.NET.
Choose if you want to receive timesheet and expense claim notifications via e-mail.
If you are a project manager or a team leader and want to receive e-mail notifications relating to time and expenses for your projects or resources, mark the checkboxes for Timesheet Submission and/or Expense Claim Submission. In order to receive submission notifications, you must have an e-mail address entered. The sender must also have an e-mail address.
Mark the checkboxes for Timesheet Rejection and/or Expense Claim Rejection if you wish to receive e-mail notifications if one of your timesheets or expense claims has been rejected by either a project manager or team leader. Mark the Timesheet Approved and/or Expense Claim Approved checkbox to receive an e-mail notification when your timesheet or expense claim has been approved by either a project manager or a team leader. An e-mail address is required to receive submission, rejection, and approved e-mail notifications.
E-mail notifications can only be received for submitted timesheets or expense claims if the e-mail recipient is a team leader or project manager. If you are set up to approve for all, you still must be set up as a project manager or a team leader to receive e-mail notifications. A resource who is both a project manager and a team leader will receive only one submission e-mail notification per transaction. For example, resource A is project manger of project 1 and also team leader for resource B and resource C. When resource B submits their timesheet for work performed on project 1, one e-mail notification will be sent to resource A. If a resource resubmits their timesheets or expense claims, the notification sent will reflect that the time or expense was resubmitted.
The Timesheet Submission and Expense Claim Submission checkboxes will only be displayed if one of the following conditions is true for the user logged into Xpede.NET:
The user is a team leader, has access to approve timesheets or expense claims, and the Team Approvals option is enabled in Xpede.NET.
The user is a project manager and the Project Approvals option is enabled in Xpede.NET.
Team Approvals or Project Approvals can be disabled in Xpede.NET by modifying the System Settings window, which can be accessed by the Xpede.NET Administrator.
If you are an approver, you will have an Alternate Approver option. Refer to the Alternates chapter for additional information.
Save your entries.
If e-mail notifications are not sending, contact your Xpede.NET Administrator to modify the AutomaticEmailEventLogging setting in the web.config file. By default, e-mails that are older than 10 days will be removed from the e-mail log file. This setting is the same for all companies and can be modified by the Xpede.NET Administrator by editing the DaysToKeepLog field in the xsmMailQueue table in the XPEDE database.
Xpede.NET restricts choosers to display information specific to a project, phase and task in the Xpede.NET Timesheet Entry and Expense Claim Entry windows. The information populated in the Project Roster Maintenance window of WorkforceROI Project Accounting will restrict the project lookups for resources in Xpede.NET. For example, if user A is assigned to Projects A and C, the project lookup window for resource A will display only these two projects. If you have job titles assigned to the project rosters, the project choosers will display that project for only the resources that are assigned to those job titles.
The following table displays what information will be displayed in the choosers for each project type.
Table 8.1. Chooser Restrictions
| Project Type | Lookup | Initial Data |
|---|---|---|
Time and materials with no estimate | Phase | All |
| Task | TM and None | |
Time and materials with an estimate | Phase | Estimated |
| Task | Estimated | |
Fixed Price with an estimate | Phase | Estimated |
| Task | Estimated | |
Fixed Price Plus with no estimate | Phase | All |
| Task | TM | |
Fixed Price Plus with an estimate | Phase | Estimated |
| Task | Estimated and TM |
| If project rosters do not exist, the resource will be able to view and select from all open projects. |
| Fixed Price projects without posted estimates will not be available in the project choosers. |
| In Project Accounting, you can manually enter a project roster to restrict the project chooser for time and materials projects with no estimate. |
A phase is required when you enter an estimate in WorkforceROI Project Accounting. A task is not required, but adds another level of detail if desired. When an estimate is used, the phase and task choosers in Xpede.NET will display only the phases and tasks entered on the estimate. All phases and tasks will be displayed if an estimate is not entered and posted for a time and materials project.
Estimated tasks and time and materials task types for fixed price + projects are displayed in the task lookups since time and materials tasks cannot be entered on an estimate.
If a pay code has been assigned to a task, but you are not assigned to a pay code, that task will not be displayed in the task lookup.
Shortcuts are project, phase, task, and/or item combinations each resource can set up to allow for streamlined data entry when entering timesheets and expense claims. Shortcuts are useful when you need to enter timesheets or expense claims for the same project, phase, task, and/or item combination on a regular basis. You can simply select the shortcut you have created instead of entering the project, phase, task, and/or item each time you are entering a transaction.
To create shortcuts:
Open the Shortcut Manager window by selecting Shortcuts from the Main Menu.

There are no required fields in the Shortcuts window. You can create shortcuts for any combination of projects, phases, tasks, and/or items. However, they must be selected in the project, phase, task, and item order. Shortcuts apply for the user logged into Xpede.NET. If a task is not chosen when creating a shortcut, the user should not expect that the same shortcut chosen in Timesheet Entry or Expense Claim Entry will automatically choose the No Task option (when available) for the transaction line. If the user defines a shortcut without a task, the No Task option in the Shortcuts window only means that a task was not defined for that shortcut line. If a project is closed in Project Accounting, all shortcuts relating to that project will be removed from Xpede.NET Select the Click Here for a New Shortcut link to add a new shortcut.
Enter the project, phase, task, and/or item combination you want to select when entering transactions.
Choose the type of transaction(s) which you want the shortcut to be available. Choose Both if you want the shortcut available for timesheets and expense claims. Choose Timesheet if you want the shortcut available only in Timesheet Entry. Choose Expense Claim if you want the shortcut available only in Expense Claim Entry.
Shorcut lines cannot have an item and also have the transaction type of Timesheet. The user will be prompted to change the transaction type if this combination is present. To save the shortcuts, click Done. To delete a shortcut, click on the Delete icon next to the corresponding shortcut.
Shortcuts will display according to the chooser that is currently active. Refer to the following table for details. In addition, if a project has a posted estimate, only shortcuts that match estimated phases and tasks will be available to select.
Table 9.1. Available Shortcuts
| Chooser | Available Shortcuts |
|---|---|
Project | Timesheets: All shortcuts with a project |
| Expense Claims: All shortcuts with a project that contain no item, or contain an item that matches the previously selected expense item in the entry screen | |
Phase | Timesheets: All shortcuts with only a phase |
| Timesheets: All shortcuts with the selected project and a phase | |
| Timesheets: All shortcuts with the selected project, a phase and a task | |
| Expense Claims: All shortcuts with only a phase that contain no item, or contain an item that matches the previously selected expense item in the entry screen | |
| Expense Claims: All shortcuts with the selected project and a phase that contain no item, or contain an item that matches the previously selected expense item in the entry screen | |
| Expense Claims: All shortcuts with the selected project, a phase and a task that contain no item, or contain an item that matches the previously selected expense item in the entry screen | |
Task | Timesheets: All shortcuts with only a task |
| Timesheets: All shortcuts with the selected project, a phase and a task | |
| Timesheets: All shortcuts with the selected phase, without a project and with a task | |
| Expense Claims: All shortcuts with only a task that contain no item, or contain an item that matches the previously selected expense item in the entry screen | |
| Expense Claims: All shortcuts with the selected project, a phase and a task that contain no item, or contain an item that matches the previously selected expense item in the entry screen | |
| Expense Claims: All shortcuts with the selected phase, without a project and with a task that contain no item, or contain an item that matches the previously selected expense item in the entry screen | |
Item | Expense Claims: All shortcuts with an item. |
Timesheet templates are set up to speed timesheet data entry for projects, phases, and tasks that are typically repeated from timesheet to timesheet.
To create a timesheet template:
Open the Timesheet Template Entry window by selecting Timesheet Template from the Main Menu.
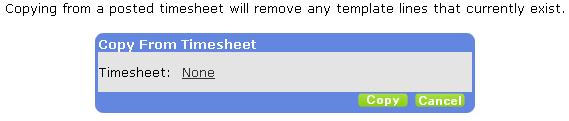
A timesheet template can only be created and edited for the user logged into Xpede.NET. Timesheet templates are only entered for seven days. When copied into a new timesheet, the template will repeat if the batch is longer than seven days. Copying a posted timesheet will remove any existing template lines that the user may have previously added. Select the Click Here for a New Template Line link to add a new template line.
Select the project, phase, and task that you would like to add to your template.
Hours Worked, Hours Billable, and Comments are not required to save a timesheet template line. Finish the template line by clicking on the Done button in the lower frame of the window. Choose the Cancel button to clear the line and to start over. Choose the Delete icon to delete the template line.
Save the entire template by clicking on the Save button in the upper frame of the window. You can cancel any changes since the last save by clicking on the Cancel button. You can also delete the entire template by clicking on the Delete button in the upper frame.
A user can also copy previously posted timesheet lines to their template. Click Copy to open the Copy From Timesheet window. Next, choose a posted timesheet and click the Copy button.
By using timesheets, time spent by each resource on each project can be closely monitored. A resource selects project, phase, and task combinations and enters the hours for each day spent on the project. In Xpede.NET you must submit your timesheets in order to approve them, regardless if approval levels are used.
| To delete an entire timesheet, select the timesheet from the Main Menu and then click the Delete button. To delete a timesheet line, select the timesheet from the Main Menu. Then click the Delete icon next to the desired line to delete. |
| You must have batches, resources, projects and phases set up in WorkforceROI Project Accounting before you can enter timesheets in Xpede.NET. If tasks are used when entering timesheets, they must also be set up in WorkforceROI Project Accounting. |
| Submitted timesheets may be unavailable to edit if the 'Prevent Edits to Submitted Timesheets' option is marked in the Xpede.NET System Settings. |
| For detailed information about entering timesheets, refer to the WorkforceROI Project Accounting manual. |
To enter a timesheet:
On the Main Menu, select Create a New Timesheet.
If you have access to enter for other resources, the resource chooser will appear to allow you to select the resource you are entering the timesheet for. The resource chooser will not appear if you do not have access to "Enter for others" or "Enter for teams".
The batch chooser will appear if there is more than one timesheet batch available. If the batch chooser does not appear, only one timesheet batch is available to select and Xpede.NET will automatically choose the batch. An option in the System Settings window is available to prevent users from entering more than one timesheet in a batch. Contact your supervisor to set up a timesheet batch in Project Accounting if the batch chooser appears without any batches.
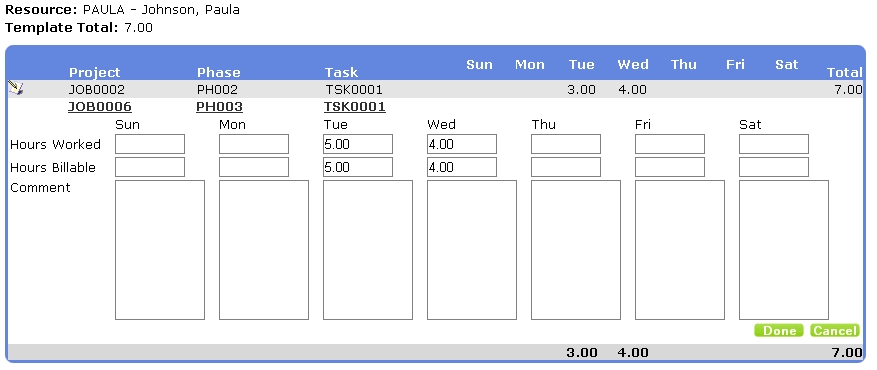
If a timesheet template exists for the logged in user, it will be copied to the timesheet after the batch has been chosen. This process will only occur if the user logged in is entering a timesheet for their self. If the timesheet batch is longer than seven days, each template line will be repeated until all days of the batch have been filled. Select the project, phase, and task in which time is to be recorded against.

If you have shortcuts set up, you can select the shortcut from the Shortcuts list. Enter the number of hours spent working on the selected project, phase, and task. If you are integrated with Payroll, this is the number of hours for which the employee will be paid.
Negative hours worked and hours billed quantities can be entered if a previously posted timesheet needs to be reversed.
The Cost Rate, Charge Rate, and Pay Code fields are viewed if the user that is logged into Xpede.NET has the corresponding checkboxes marked in Resource Detail Maintenance in Project Accounting. The Hours Billable field will not be displayed if the option is marked in the System Settings window. Finish the timesheet line by clicking on the Done button in the lower frame of the window. Begin at step 4 again to enter time towards other project, phase, and task combinations. Choose the Cancel button to clear the line and to start over. Choose the Delete button to delete the timesheet line.
Save the entire timesheet by clicking on the Save button in the upper frame of the window. You can cancel any changes since the last save by clicking on Cancel. You can also delete the entire timesheet by clicking on the Delete button in the upper frame.
To print or e-mail your own timesheet via Xpede.NET reporting:
Select the timesheet from the Main Menu.
Choose the Report button in Timesheet Entry to open the Timesheet Report window. If you do not have a Report button in the Timesheet Entry window, then you do not have access to the Timesheet report. The user viewing the Timesheet Report window below does not have access to the Timesheet Report Configuration.
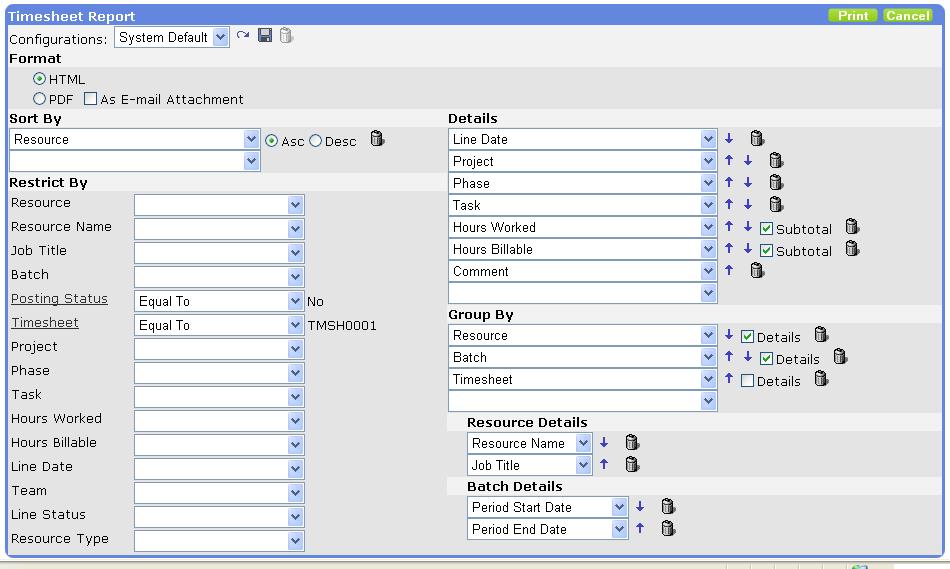
When printing a report from the Timesheet Entry window, the report window will automatically restrict to the timesheet number from the entry window. Choose the Print option to view and print the report in HTML format.
Select the PDF radio button to view the report in PDF format in Adobe Acrobat Reader.
The Timesheet Report can be printed through Adobe Acrobat Reader.
Mark the 'As E-mail Attachment' checkbox to e-mail the report.
Enter the resource's name or e-mail address in the To: or Cc: field or click on the To: or Cc: link to select from a list resources to e-mail the report to. A list of resources that have e-mail addresses in the Project Accounting system will appear here. You can select multiple e-mail addresses from the list.
The Subject line and the Body of the e-mail can be modified to better suit your needs. Select the E-mail button to submit the e-mail or select the Cancel button to close the Report window. Upon successful completion of sending an e-mail, a message will appear stating that the E-mail was submitted for delivery.
To print or export your own timesheet via Reporting Services:
Select the timesheet from the Main Menu.
Choose the Report button in Timesheet Entry to open the Timesheet Report window. If you do not have a Report button in the Timesheet Entry window, then you do not have access to the Timesheet report.
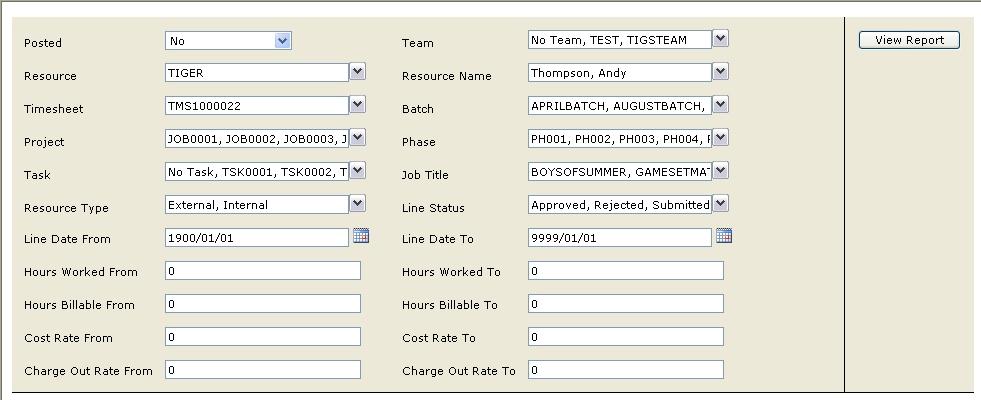
When printing a report from the Timesheet Entry window, the report window will automatically restrict to the timesheet number from the entry window. Choose the View Report option to view the report.
Choose to print the report to the printer, or export to a file.
If Resource Management is registered, you can create project schedules. Use the Create a Schedule window to create a new project schedule or to copy a saved project schedule.
To enter project schedules:
On the Main Menu, select Create a New Schedule.
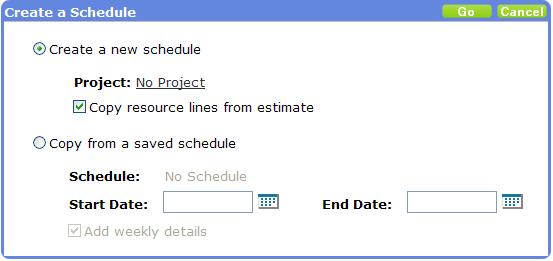
Select to create a new project schedule or to copy a saved schedule.
If you're creating a new project schedule, mark the Copy resource lines from estimate option if you want to use the resource information from the project estimate.
If you're copying a saved project schedule, enter a start and end date for the project schedule. Only project schedules where the system date falls between the start and end date will be displayed.
Mark the Add Weekly Details option if you want to include the weekly details on the project schedule.
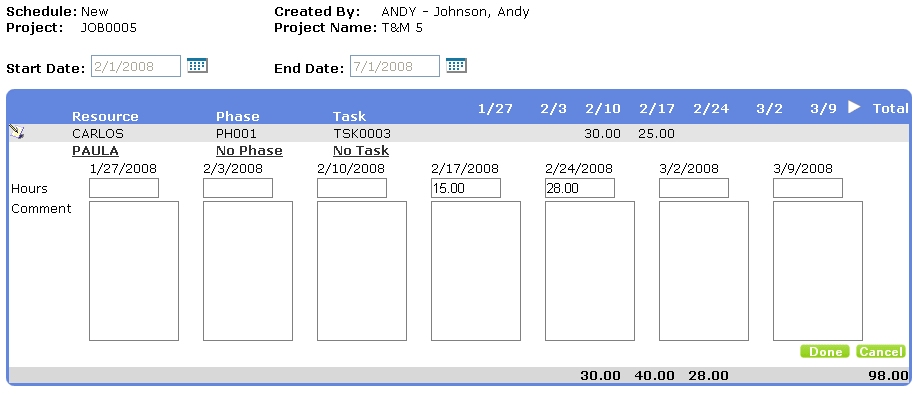
Enter the daily project hours and comment, if applicable.
Finish the project line by clicking the Done button or choose the Cancel button to clear the line entry.
Use the Expense Claim Entry window to enter claims for expenses that resources may incur. Expense claims are used when you want the cost of an item to be applied to the project and reimburse a resource or a credit card vendor for the item cost.
| To delete an entire expense claim, select the expense claim from the Main Menu and then click the Delete button in the Expense Claim Entry window. To delete an expense claim line, select the expense claim from the Main Menu and then click the Delete icon. You cannot delete an expense claim that has approved lines. |
| For reimbursable expenses, you must set up the resources as a Payables Management vendor and attach the vendor to the resource in the Resource Maintenance window. For non-reimbursable expenses, you must set up credit cards in Great Plains by going to Setup>Company>Credit Cards. |
| Submitted expense claims may be unavailable to edit if the 'Prevent Edits to Submitted Expense Claims' option is marked in the Xpede.NET System Settings. |
When expense claims are posted in WorkforceROI Project Accounting, the cost will be applied to the project and a payables transaction will be created for the vendor ID entered on the expense claim. This allows for a resource reimbursement for the cost that the resource paid out of his or her own pocket.
To enter expense claims:
| The Merchant and Reference fields are for informational purposes only. |
| The Account and Vendor are only visible if you can "Enter for Teams" or "Enter for Others". |
On the Main Menu, select Create a New Expense Claim.
The resource chooser will appear to select the resource you are entering an expense claim for if you have access to enter for others. The resource chooser will not appear if you do not have access to "Enter for others" or "Enter for teams".
The batch chooser will appear if more than one batch is available. If the batch chooser does not appear, only one expense claim batch is available. If the batch chooser appears without any batches, contact your supervisor to set up an expense claim batch in Project Accounting.
Select the expense claim date. Accept the default of today's date by hitting enter or clicking the Select button.
Select the expense claim line date. Accept the default of today's date by hitting enter or clicking the Select button.
Select the expense item for which you are entering an expense. Expense items are entered in Project Accounting.
Select the project, phase and task (if applicable) this expense is to be recorded against. If a task is attached to a phase in WorkforceROI Project Accounting, you are still able to select the task when entering an expense claim.
If the expense is not project related, select No Project from the project chooser. The phase and task choosers are skipped if a project is not selected.
If you have shortcuts set up, you can select the shortcut from the Shortcuts list. 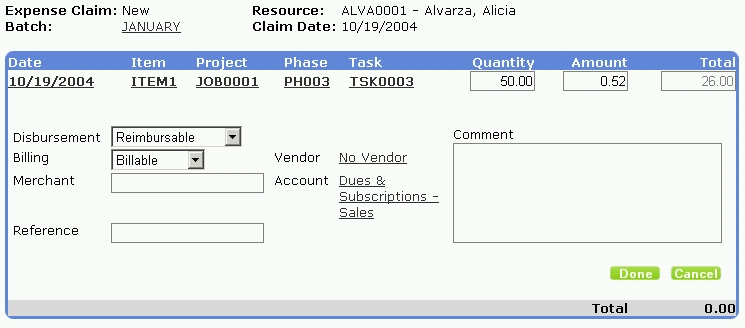
Enter the quantity. A negative quantity can be entered if a previously posted expense claim needs to be reversed.
Either enter the amount or accept the default amount. The default amount is obtained from the Default Cost field for the expense item in the Expense Claim Item Maintenance window in Project Accounting. The amount of decimal places allowed for the item is also specified in the Expense Claim Item Maintenance window. For example, to be able to enter $0.375 as the amount for mileage, the item must be set up to allow at least 3 decimal places.
Specify if the expense claim line is reimbursable or non-reimbursable. Reimbursable expenses are paid to the resource and non-reimbursable expenses are paid to the credit card. The Disbursement type defaults from the Resource Maintenance window in Project Accounting.
Specify if the expense claim line is billable, non-billable or no charge. The Billing type defaults from the Expense Claim Item Maintenance window in Project Accounting.
Finish the expense claim line by clicking the Done button or choose the Cancel button to clear the line entry.
To print or e-mail your own expense claim via Xpede.NET reporting:
Select the expense claim from the Main Menu.
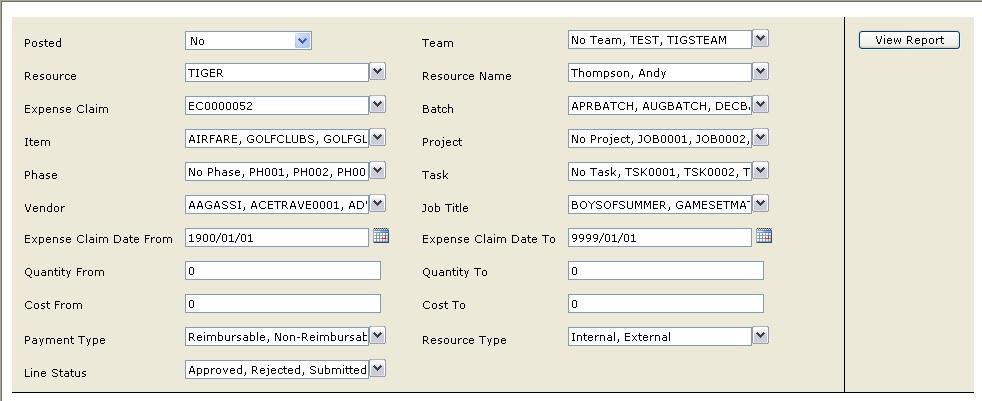
Choose the Report button in the Expense Claim Entry window to open the Expense Claim Report window. If you do not have a Report button in the Expense Claim Entry window, then you do not have access to the Expense Claim report. The user viewing the Expense Claim Report window below does not have access to the Expense Claim Report Configuration.
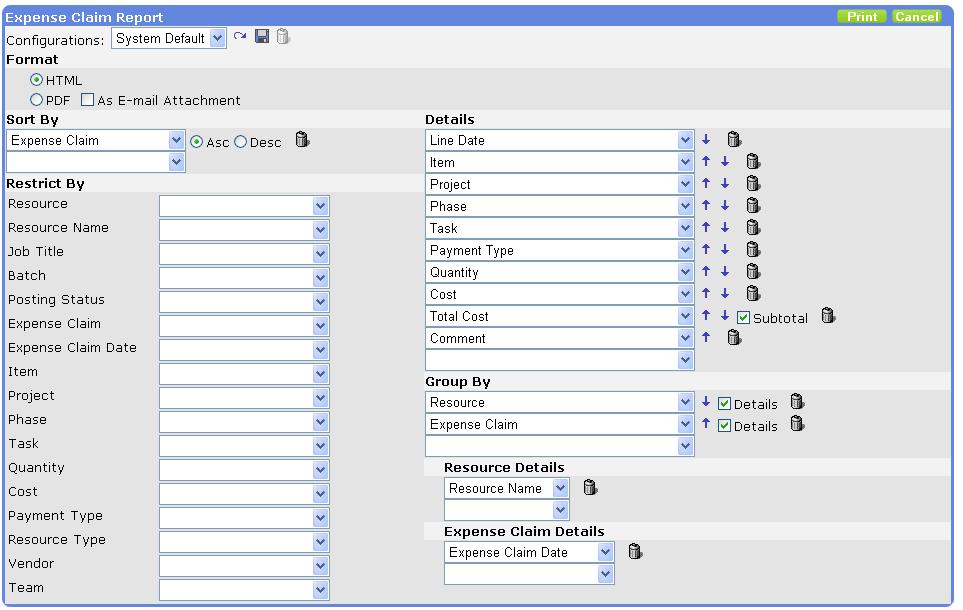
When printing a report from the Expense Claim Entry window, the report window will automatically restrict to the expense claim number from the entry window. Choose the Print option to view and print the report in HTML format.
Select the PDF radio button to view the report in PDF format in Adobe Acrobat Reader.
The Expense Claim Report can be printed through Adobe Acrobat Reader.
Choose the E-mail Report option to e-mail the report.
Enter the resource's name or e-mail address in the To: or Cc: field or click on the To: link or the Cc: link to select from a list of resources to e-mail the report to. A list of resources with e-mail addresses in the Project Accounting system will display. You can select multiple e-mail addresses from the list.
The Subject line and the Body of the e-mail can be modified to better suit your needs. Select the E-mail button to submit the e-mail or select the Cancel button to close the Report window. Upon successful completion of sending an e-mail, a message will appear stating that the E-mail was submitted for delivery.
To print or export your own expense claim via Reporting Services:
Select the expense claim from the Main Menu.
Choose the Report button in the Expense Claim Entry window to open the Expense Claim Report window. If you do not have a Report button in the Expense Claim Entry window, then you do not have access to the Expense Claim report.
When printing a report from the Expense Claim Entry window, the report window will automatically restrict to the expense claim number from the entry window. Choose the View Report option to view the report.
Choose to print the report to the printer, or export to a file.
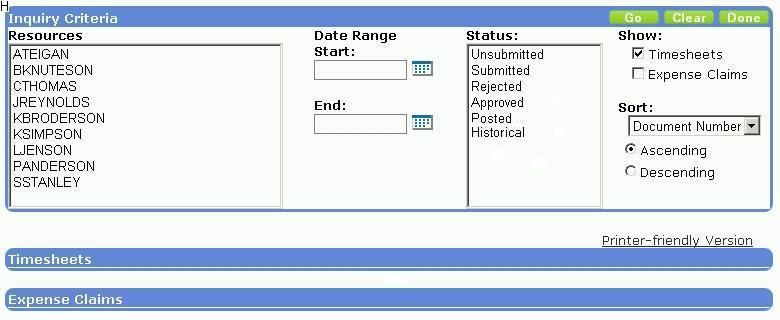
Use the Resource Inquiry window to view timesheets and expense claims you have access to view. The list of resources will only be available if you have access to view timesheets and/or expense claims for other resources.
To view timesheets and expense claims:
Click on the Search... link on the Main Menu, which is located next to Your Timesheets or Your Expense Claims.
Select a specific resource, status, and specify a date range. If criteria is not selected, all timesheets and expense claims for the resources you have access to view for will be displayed.
Click Go.
Select the Printer-friendly Version link to view the inquiry results in a new window that can be easily printed.
Click on a specific timesheet or expense claim number to view the details of the transaction. Unsubmitted, submitted, and rejected transactions will open the corresponding entry window. Approved and posted transactions will open in a report format that can be printed.
When finished, click the Done button.
Use the Project Manager Inquiry window to view all of the information about projects which you are assigned as the project manager or division leader. The Project Manager Inquiry option will only appear when the user logged into Xpede.NET is assigned to a project as a project manager in the Project Maintenance window or if the user logged into Xpede.NET is assigned as a division leader to a division in Division Maintenance window in WorkforceROI Project Accounting.
To view timesheets and expense claims:
Click on the Project Manager Inquiry option on the Main Menu.
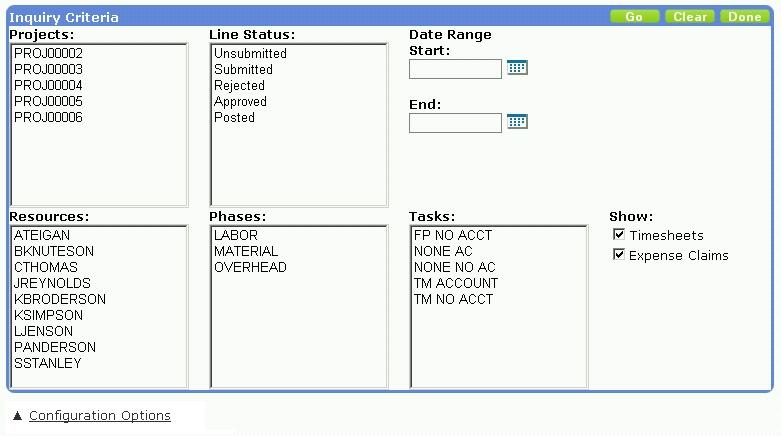
Specify your inquiry criteria. If you do not select any criteria, all the information for each project in which you are a project manager will appear.
To unselect an item, press the control key and click on the item to unselect.
Click on the Configuration Options link to open the Configuration view. In this view, you can modify the fields to display in the inquiry results. By modifying the fields, you can also specify how the inquiry results will be grouped.
Click Go to display the inquiry results.
Expand the tree view to see the inquiry results.
Click on the Printer-friendly Version link to print the results to screen in a format that can be printed to the printer.
Project managers have the ability to approve and reject timesheets and expense claims by project in Xpede.NET. The Project Manager Approvals window allows project managers to approve and reject timesheets and expense claims by line.
The user must be assigned access to Project Manager Approvals in Xpede.NET and be a project manager in order for the Project Manager Approval option to appear.
To approve a timesheet or expense claim by project:
On the Main Menu, select Project Manager Approval.
Click on the Search button to open the Approval Line Search Criteria view. In this view, you can filter the transactions to approve according to project, phase, task, and/or resource.
To Unselect an item in the Approval Line Search Criteria view, hold down the control key while clicking on the item to unselect. Click on the Configuration button to open the Configuration view. In this view, you can modify the fields to display in the results. By modifying the fields, you can also specify how the results will be grouped.
Click the Go button to see the transaction lines requiring approval.
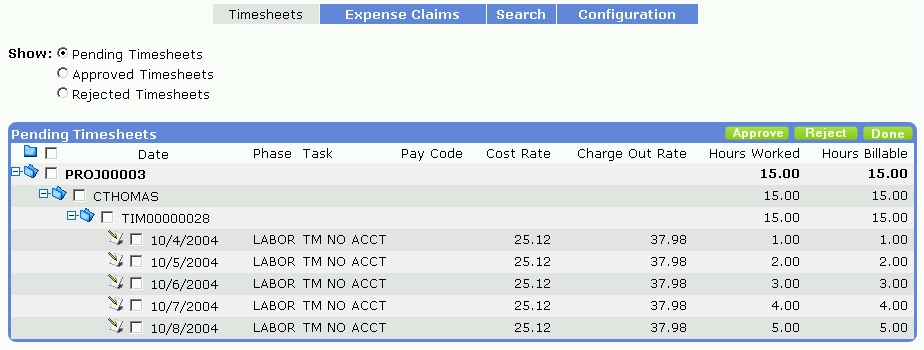
Expand on the tree view to see details on the transactions. Change the Show drop down list to view Pending Expense Claims or Timesheets, Approved Expense Claims and Timesheets, or Rejected Expense Claims and Timesheets.
The entire tree view can be easily expanded and collapsed by clicking on the Expand All/Collapse All folder icon. Italicized lines will display for alternate transactions. Refer to the Alternate Approver chapter for more information. When the tree view is completely expanded in the Timesheets view, you can change the Worked and Billable quantities and the line comment by clicking on the Edit icon, make the changes, and then click the Save icon. You can also click the Undo icon to cancel the changes before they are saved.
The Cost Rate and Charge Rate will display if the user logged into Xpede.NET has access to view them according to the options marked in the Resource Maintenance window in Project Accounting. The Pay Code will display if the 'Integrate with Payroll' option is marked in the Timesheet Setup Options window in Project Accounting. Mark the lines to approve and click the Approve button or mark the lines to reject and click the Reject button. If you mark a line to be rejected, the Rejection Comment window will open where you can enter a comment as to why the line was rejected. Enter the comment and click Reject.
All the lines can be easily marked and unmarked by clicking on the Check All/Uncheck All checkbox icon. 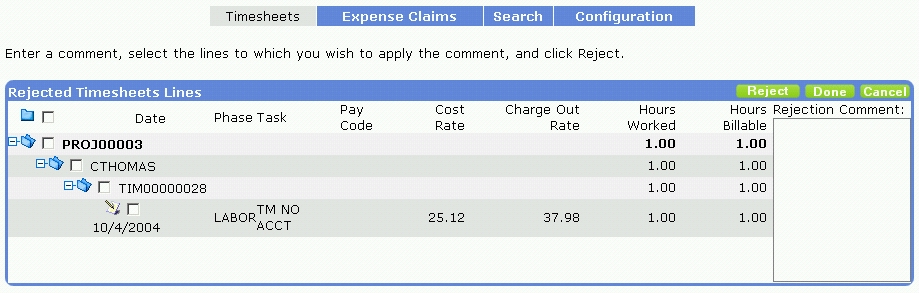
Click the Done button when finished.
Use the Team Leader Inquiry window to view all of the information for resources in which you have access to view. The Team Leader Inquiry option will only appear when the user logged into Xpede.NET is assigned to an access to view timesheets or expense claims for others and has access to the Team Leader Inquiry option in Xpede.NET's User Access window.
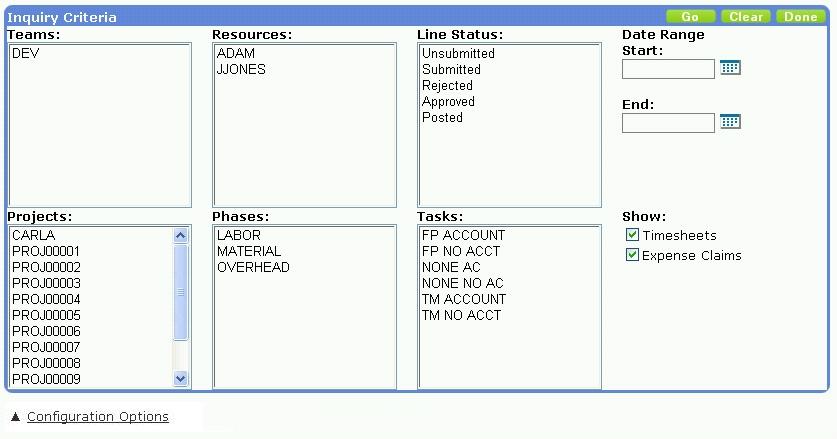
To view timesheet and expense claims:
Click on the Team Leader Inquiry option on the Main Menu.
Specify your inquiry criteria. If you do not select any criteria, all the information for each resource that you have access to view will appear.
To unselect an item, press the control key and click on the item to unselect.
Click on the Configuration Options link to open the Configuration view. In this view, you can modify the fields to display in the inquiry results. By modifying the fields, you can also specify how the inquiry results will be grouped.
Click Go to display the inquiry results.
Expand the tree view to see the inquiry results.
Click on the Printer-friendly Version link to print the results to screen in a format that can be printed to the printer.
Use the Project Schedule Inquiry window to view previously entered schedules. In order to use this inquiry window, you must have access to enter project schedules. Resource Management must also be registered.
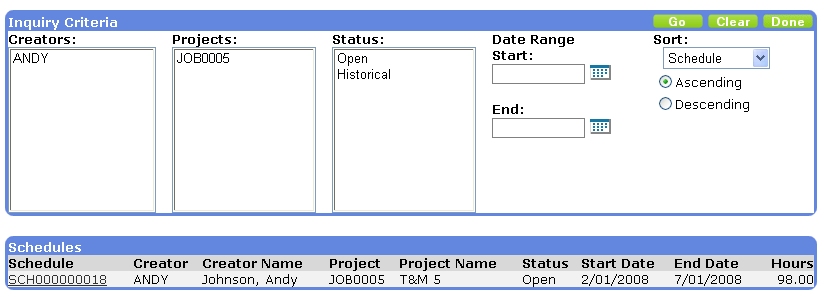
To view project schedules:
Click on the Search... link on the Main Menu next to Your Schedules.
Click Go to display the inquiry results.
Users must have access to the Team Approvals window in Xpede.NET and have approval access in Project Accounting in order to access the Team Approvals window. The Team Approvals window allows you the ability to approve and reject entire timesheets and expense claims or to approve and reject timesheets and expense claims by line.

To approve a timesheet or expense claim:
On the Main Menu, select Team Approval.
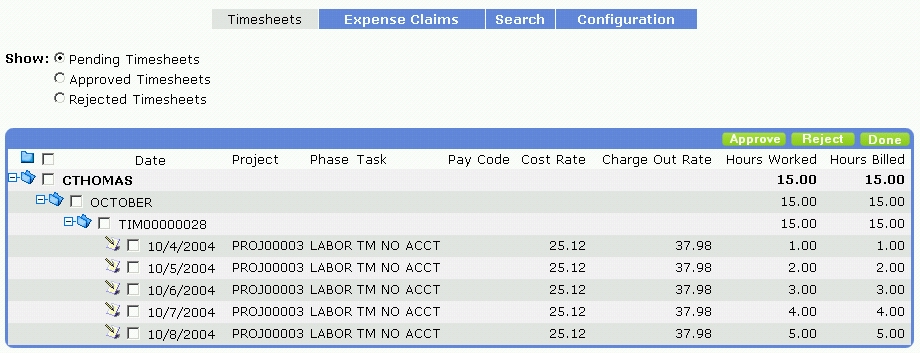
Click on the Search button to open the Approval Line Search Criteria view. In this view, you filter the transactions to approve according to specific information.
To Unselect an item in the Approval Line Search Criteria view, hold down the control key while clicking on the item to unselect. Click on the Configuration button to open the Configuration view. In this view, you can modify the fields to display in the results. By modifying the fields, you can also specify how the results will be grouped.
Click the Go button to see the transaction lines requiring approval.
Expand on the tree view to see the transactions. Change the Show drop down list to view Pending Expense Claims or Timesheets, Approved Expense Claims and Timesheets, or Rejected Expense Claims and Timesheets.
The entire tree view can be easily expanded and collapsed by clicking on the Expand All/Collapse All folder icon. The Pay Code will display if the 'Integrate to Payroll' option is marked in the Timesheet Setup Options window in Project Accounting. Italicized lines will display for alternate transactions. Refer to the Alternate Approver chapter for more information. Mark the lines to approve and click the Approve button or mark the lines to reject and click the Reject button. If you mark a transaction to be rejected, the Rejection Comment window will open where you can enter a comment about why the transaction was rejected. Enter the comment and click Reject.
All the lines can be easily marked and unmarked by clicking on the Check All/Uncheck All checkbox icon. 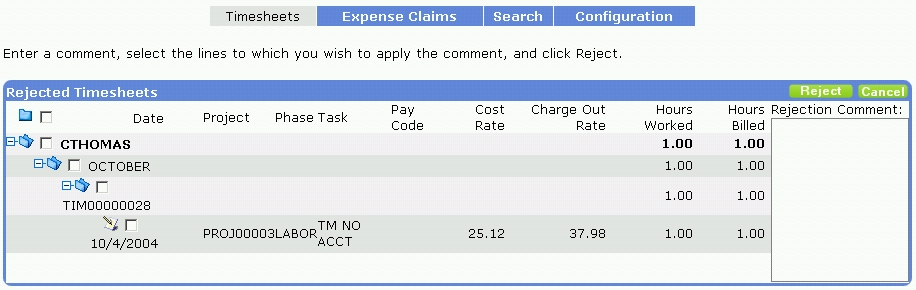
Click the Done button when you are finished.
Assigning an Alternate Approver: Users that have access to approve by either Team Approvals or Project Manager Approvals have the ability to delegate their approval procedure to someone else while they are away from the office. The resource that is assigned as the Alternate Approver will inherit the Permanent Approver's approval access in addition to their current approval access. The Alternate Approver will have the ability to approve, inquire, and report on all the resources and/or projects in which the Permanent Approver does.
From the Main Menu, select Preferences to open the User Preferences window.
Click on the None link to open the Alternate Approver resource chooser. Select a resource to delegate the approval process to. The chooser will only display resources that have been granted access to be an Alternate Approver by the Administrator in the User Access window. When the window is saved, an e-mail will be sent to the Alternate Approver that contains the resources, teams, and projects in which they will be temporarily approving.
As long as an Alternate Approver is assigned, you will be unable to approve transactions in Xpede.NET. The Alternate Approver must be removed by selecting None in the User Preferences window. When a resource is removed from being an Alternate Approver, an e-mail will be sent to them to confirm the removal.
Approving Transactions as an Alternate Approver: When you are assigned as an Alternate Approver, you will receive an e-mail containing the Resources, Teams, and Projects in which you will be temporarily approving. If you normally do not have access to approve, you will now have either the Team Approval link, the Project Manager Approval link or both links available in the Your Projects section on the Main Menu. Refer to the corresponding Team Approvals or Project Manager Approvals chapter for information on those windows.
Along with inheriting approval access, you will also inherit access to inquiry windows and reports. These include Team Leader Inquiry, Project Manager Inquiry, Resource Inquiry, Timesheet Report, Expense Claim Report, and Timesheet Status Report. You will also have additional E-mail Notification options in the User Preferences window. You can mark these options to receive e-mail notifications for when timesheets or expense claims are submitted.
The Timesheet Report enables you to print multiple unposted timesheets with various restrictions, including the ability to restrict by project.
From the Main Menu, select Timesheet Report.
For Style Sheets:

Select to restrict by Resource, Resource Name, Job Title, Batch, Posted Timesheets, Timesheet, Project, Phase, Task, Hours Worked, Hours Billable, Line Date, Charge Out Rate, Cost Rate, Team, Line Status, or Resource Type. Choose either HTML or PDF format to view the report. The HTML version normally prints faster than the PDF format. Mark the 'As E-mail Attachment' checkbox to e-mail the report in PDF format.
If you have access to the Report Configuration section, you can add and remove fields that display on the report. Refer to Appendix A (Timesheet Report Configuration Options) for the available options.
Modify the details on the report by selecting new fields from the drop-down lists, deleting fields by clicking on the Delete icon, and moving fields up and down by clicking on the up and down arrows.
Modify the grouping on the report in the same way. You can also mark the Details checkbox, which will allow you to select corresponding details to print on the same line on the report.
Modify the sorting on the report by selecting new fields to sort by, deleting fields by clicking on the Delete icon, changing the sort order by moving fields up and down using the up and down arrows and also by marking either Asc (ascending) or Desc (descending).
Previously saved configurations can be accessed by clicking on the drop-down list next to Configurations. New configurations that you set up can be saved by clicking on the Save icon at the top of the window.
Select the Print button to view the report in the selected format.
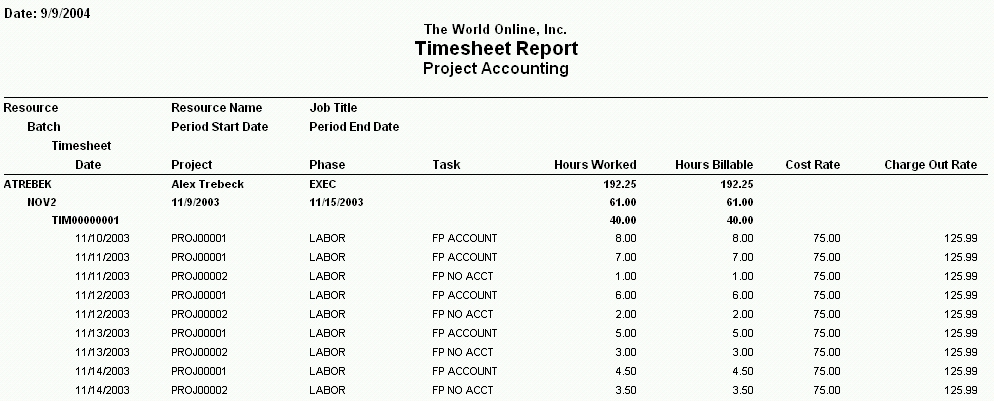
For Reporting Services:
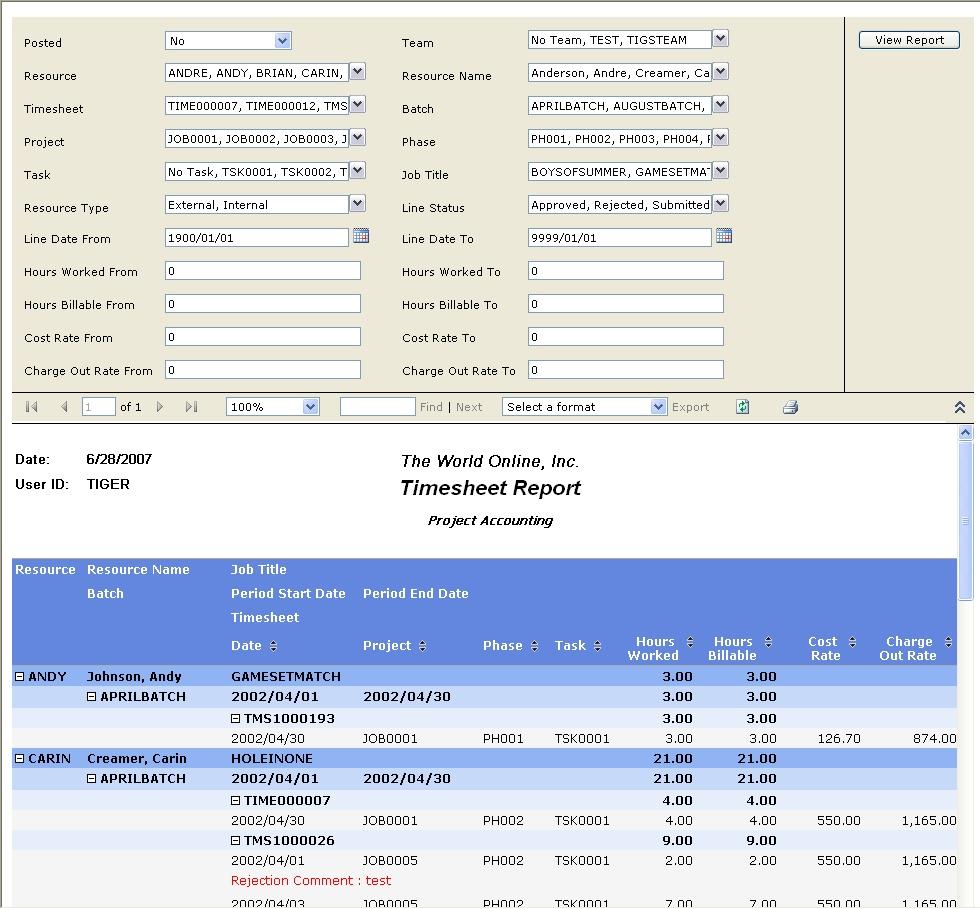
Select to restrict by Resource, Resource Name, Job Title, Batch, Posted Timesheets, Timesheet, Project, Phase, Task, Hours Worked, Hours Billable, Line Date, Charge Out Rate, Cost Rate, Team, Line Status, or Resource Type.
Select the View Report button to view the report.
Reports can be printed to the printer or exported to a variety of different file types.
The Timesheet Status Report enables you to print a listing of unposted timesheets in various statuses, including the missing status, which allows you to see which resources have not yet entered a timesheet for a given batch. If the Prevent Multiple Timesheets Per Resource Per Batch option in the System Settings window is unmarked, the report will assume that every resource is required to only enter one timesheet in the selected batch range. If the Prevent Multiple Timesheets Per Resource Per Batch option is marked, the report will assume that every resource is required to enter a timesheet in every batch, unless there is a team assigned to the batch that the resource is not a member of.
From the Main Menu, select Timesheet Status Report.
For Style Sheets:
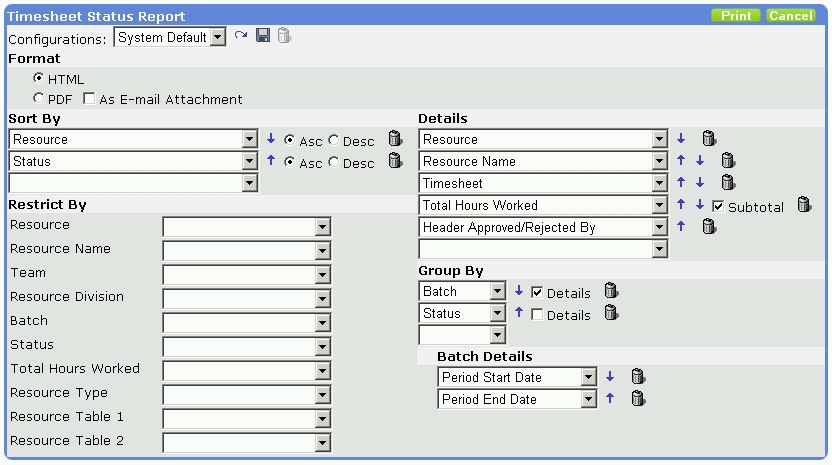
Select to restrict Resource, Resource Name, Team, Resource Division, Batch, Status, Total Hours Worked, Resource Type, Resource Table 1, or Resource Table 2. Choose either HTML or PDF format to view the report. The HTML version normally prints faster than the PDF format. Mark the 'As E-mail Attachment' checkbox to e-mail the report in PDF format.
If you have access to the Report Configuration section, you can add and remove fields that display on the report. Refer to Appendix B (Timesheet Status Report Configuration Options) for the available options.
Modify the details on the report by selecting new fields from the drop-down lists, deleting fields by clicking on the Delete icon, and moving fields up and down by clicking on the up and down arrows.
Modify the grouping on the report in the same way. You can also mark the Details checkbox, which will allow you to select corresponding details to print on the same line on the report.
Modify the sorting on the report by selecting new fields to sort by, deleting fields by clicking on the Delete icon, changing the sort order by moving fields up and down using the up and down arrows and also by marking either Asc (ascending) or Desc (descending).
Previously saved configurations can be accessed by clicking on the drop-down list next to Configurations. New configurations that you set up can be saved by clicking on the Save icon at the top of the window.
Select the Print button to view the report in the selected format.
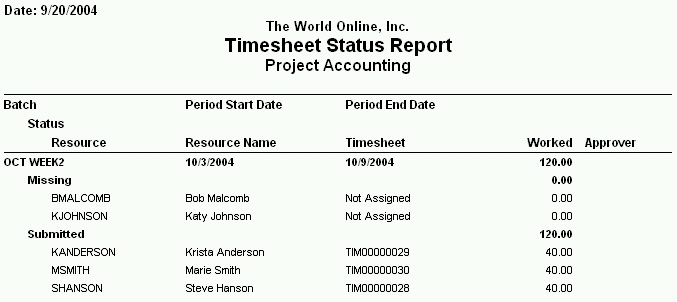
For Reporting Services:
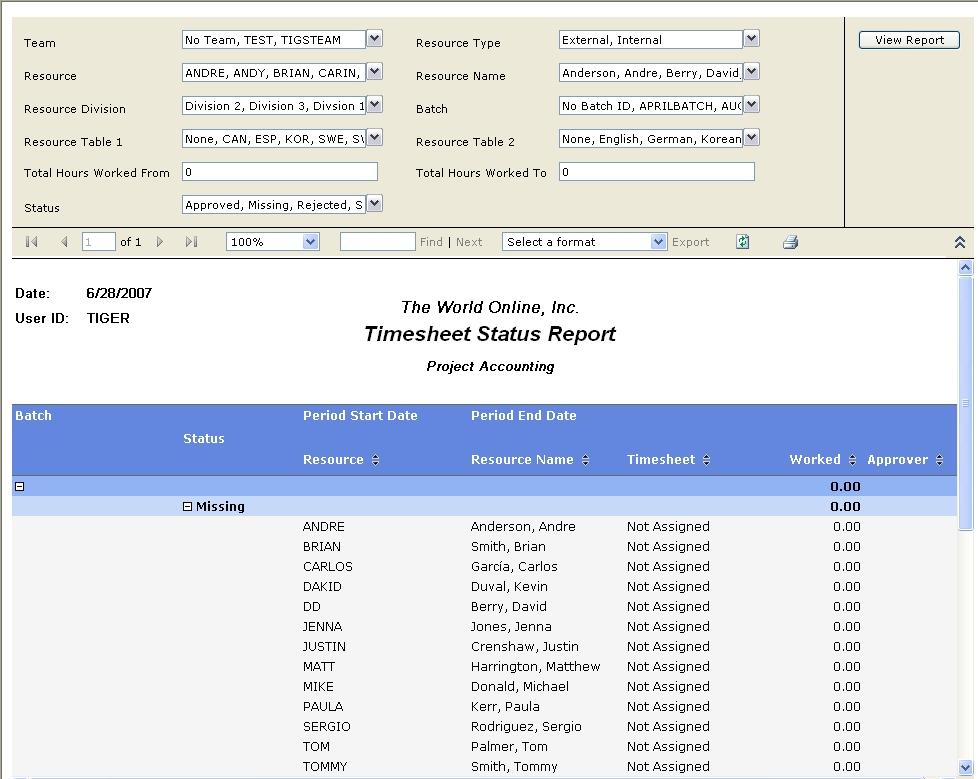
Select to restrict Resource, Resource Name, Team, Resource Division, Batch, Status, Total Hours Worked, Resource Type, Resource Table 1, or Resource Table 2.
Select the View Report button to view the report.
Reports can be printed to the printer or exported to a variety of different file types.
The Expense Claim Report enables you to print multiple unposted expense claims with various restrictions, including the ability to restrict by project.
From the Main Menu, select Expense Claim Report.
For Style Sheets:

Select to restrict by Expense Claim, Resource, Resource Name, Job Title, Batch, Expense Claim Date, Item, Project, Phase, Task, Quantity, Cost, Payment Type, or Resource Type. Choose either HTML or PDF format to view the report in. The HTML version normally prints faster than the PDF format. Mark the 'As E-mail Attachment' checkbox to e-mail the report in PDF format.
If you have access to the Report Configuration section, you can add and remove fields that display on the report. Refer to Appendix C (Expense Claim Report Configuration Options) for the available options.
Modify the details on the report by selecting new fields from the drop-down lists, deleting fields by clicking on the Delete icon, and moving fields up and down by clicking on the up and down arrows.
Modify the grouping on the report in the same way. You can also mark the Details checkbox, which will allow you to select corresponding details to print on the same line on the report.
Modify the sorting on the report by selecting new fields to sort by, deleting fields by clicking on the Delete icon, changing the sort order by moving fields up and down using the up and down arrows and also by marking either Asc (ascending) or Desc (descending).
Previously saved configurations can be accessed by clicking on the drop-down list next to Configurations. New configurations that you set up can be saved by clicking on the Save icon at the top of the window.
Select the Print button to view the report in the selected format.
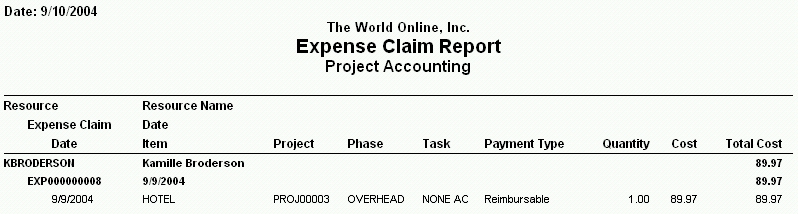
For Reporting Services:
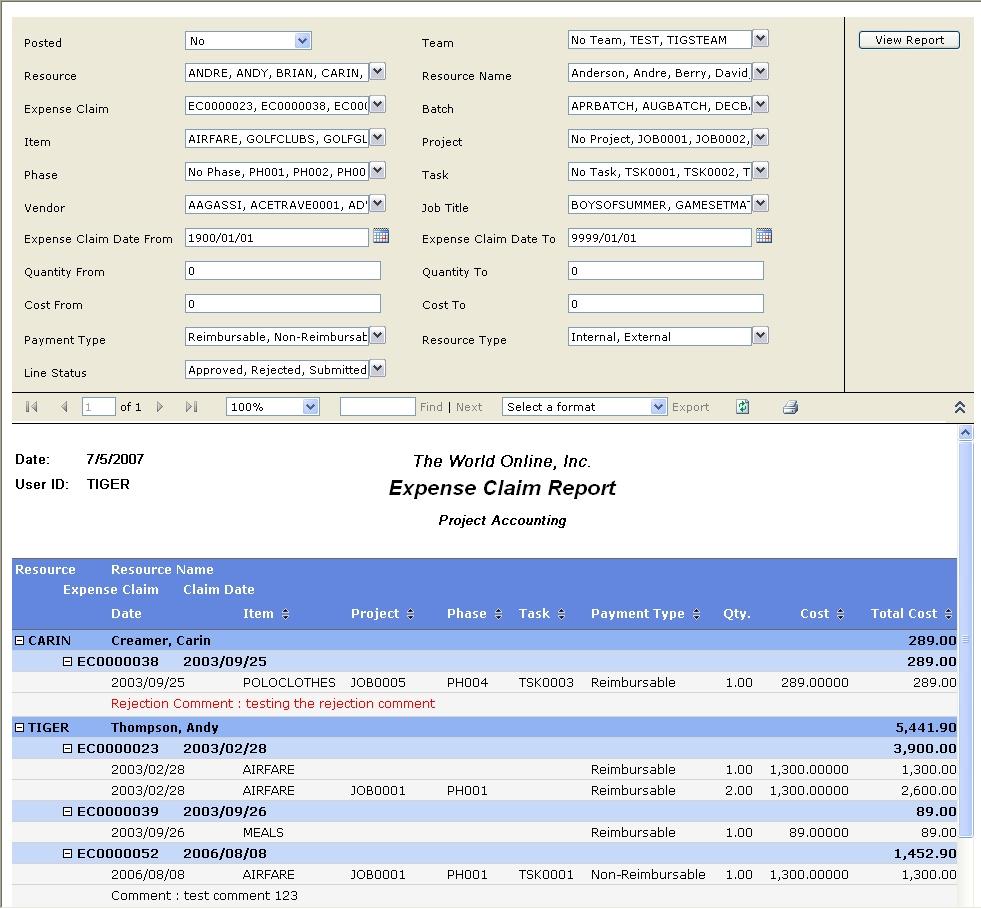
Select to restrict by Expense Claim, Posted, Resource, Resource Name, Job Title, Batch, Team, Expense Claim Date, Item, Project, Phase, Task, Vendor, Quantity, Cost, Line Status, Payment Type, or Resource Type.
Select the View Report button to view the report.
Reports can be printed to the printer or exported to a variety of different file types.
The Project Summary Report displays a one-line total of your projects you have entered including estimated and actual costs, amounts remaining to be billed and written-off amounts.
From the Main Menu, select Project Summary.
For Style Sheets:
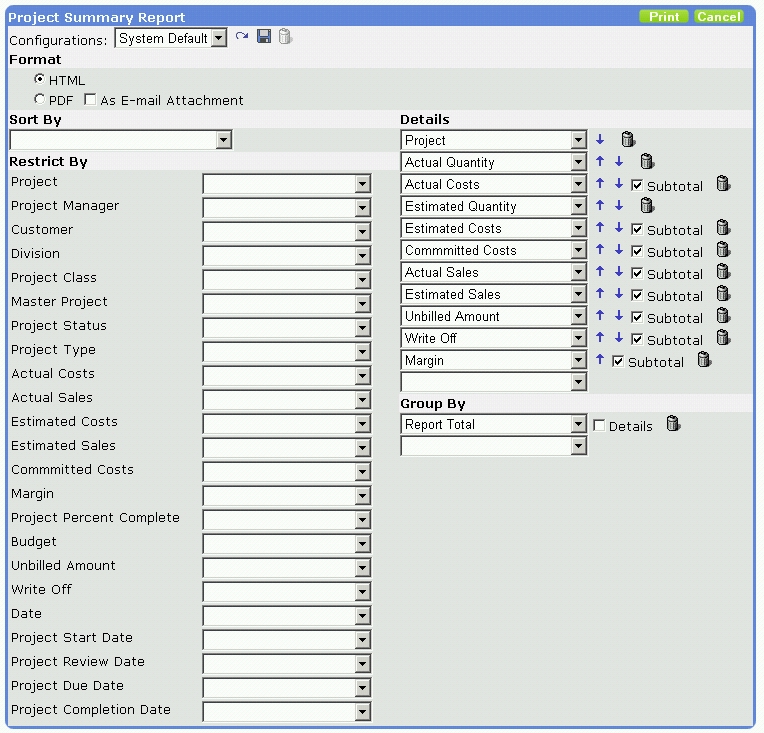
Select to restrict by Project, Project Manager, Customer, Division, Project Class, Master Project, Project Status, Project Type, Actual Costs, Actual Sales, Estimated Costs, Estimated Sales, Committed Costs, Margin, Project Percent Complete, Budget, Unbilled Amount, Write Off, Date, Project Start Date, Project Review Date, Project Due Date, and/or Project Completion Date. Choose either HTML or PDF format to view the report. The HTML version normally prints faster than the PDF format. Mark the 'As E-mail Attachment' checkbox to e-mail the report in PDF format.
If you have access to the Report Configuration section, you can add and remove fields that display on the report. Refer to Appendix D (Project Summary Report Configuration Options) for the available options.
Modify the details on the report by selecting new fields from the drop-down lists, deleting fields by clicking on the Delete icon, and moving fields up and down by clicking on the up and down arrows.
Modify the grouping on the report in the same way. You can also mark the Details checkbox, which will allow you to select corresponding details to print on the same line on the report.
Modify the sorting on the report by selecting new fields to sort by, deleting fields by clicking on the Delete icon, changing the sort order by moving fields up and down using the up and down arrows and also by marking either Asc (ascending) or Desc (descending).
Previously saved configurations can be accessed by clicking on the drop-down list next to Configurations. New configurations that you set up can be saved by clicking on the Save icon at the top of the window.
Select the Print button to view the report in the selected format.
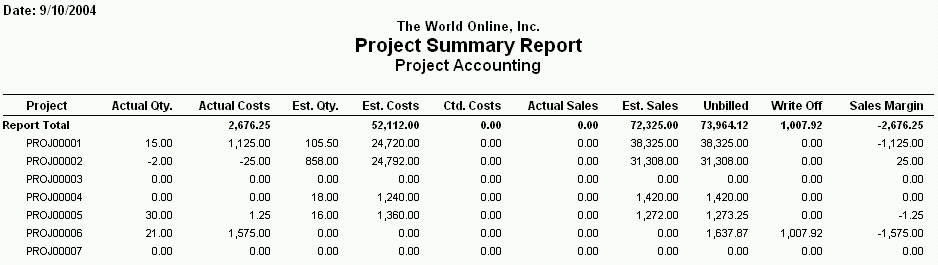
For Reporting Services:
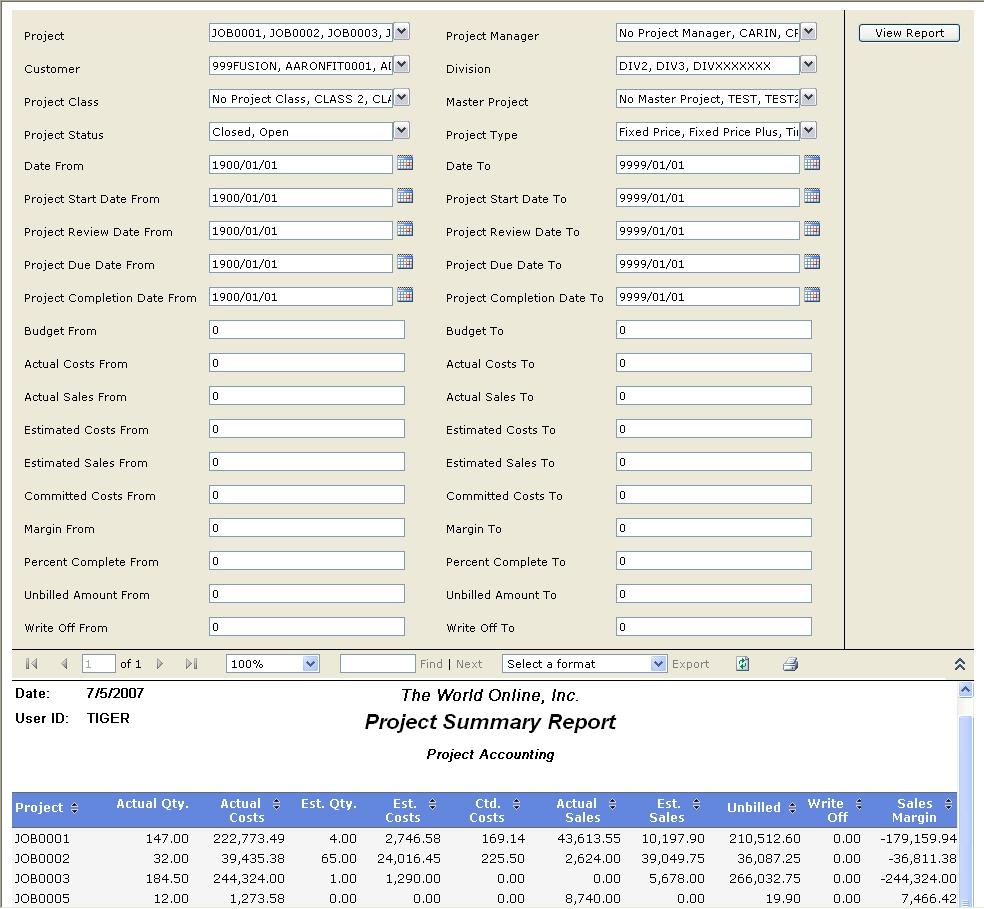
Select to restrict by Project, Project Manager, Customer, Division, Project Class, Master Project, Project Status, Project Type, Actual Costs, Actual Sales, Estimated Costs, Estimated Sales, Committed Costs, Margin, Project Percent Complete, Budget, Unbilled Amount, Write Off, Date, Project Start Date, Project Review Date, Project Due Date, and/or Project Completion Date.
Select the View Report button to view the report.
Reports can be printed to the printer or exported to a variety of different file types.
The Project Detail Report provides you with a report of the actual amounts posted against an estimated phase and task combination.
From the Main Menu, select Project Detail.
For Style Sheets:
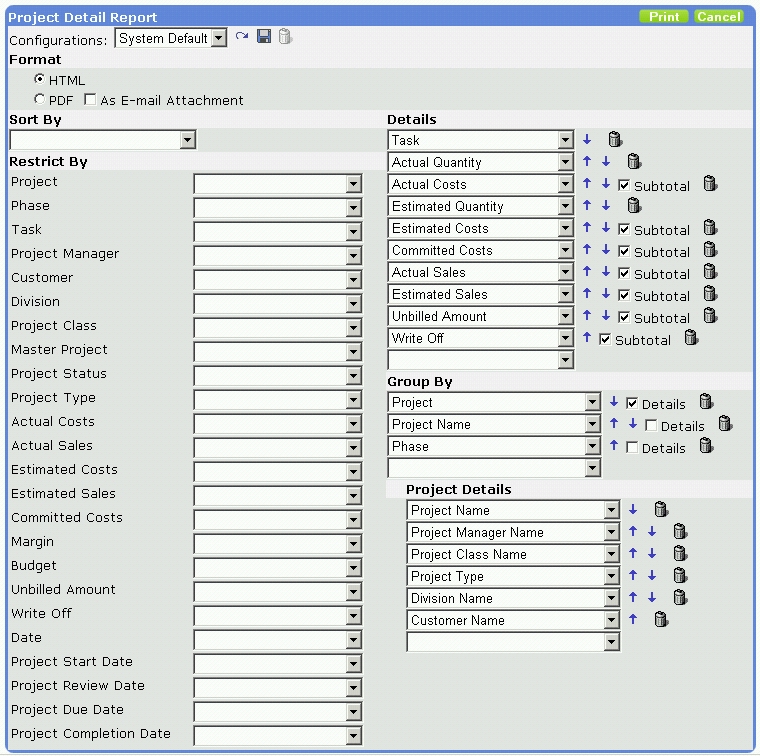
Select to restrict by Project, Phase, Task, Project Manager, Customer, Division, Project Class, Master Project, Project Status, Project Type, Actual Costs, Actual Sales, Estimated Costs, Estimated Sales, Committed Costs, Margin, Budget, Unbilled Amount, Write Off, Date, Project Start Date, Project Review Date, Project Due Date, and/or Project Completion Date. Choose either HTML or PDF format to view the report. The HTML version normally prints faster than the PDF format. Mark the 'As E-mail Attachment' checkbox to e-mail the report in PDF format.
If you have access to the Report Configuration section, you can add and remove fields that display on the report. Refer to Appendix E (Project Detail Report Configuration Options) for the available options.
Modify the details on the report by selecting new fields from the drop-down lists, deleting fields by clicking on the Delete icon, and moving fields up and down by clicking on the up and down arrows.
Modify the grouping on the report in the same way. You can also mark the Details checkbox, which will allow you to select corresponding details to print on the same line on the report.
Modify the sorting on the report by selecting new fields to sort by, deleting fields by clicking on the Delete icon, changing the sort order by moving fields up and down using the up and down arrows and also by marking either Asc (ascending) or Desc (descending).
Previously saved configurations can be accessed by clicking on the drop-down list next to Configurations. New configurations that you set up can be saved by clicking on the Save icon at the top of the window.
Select the Print button to view the report in the selected format.
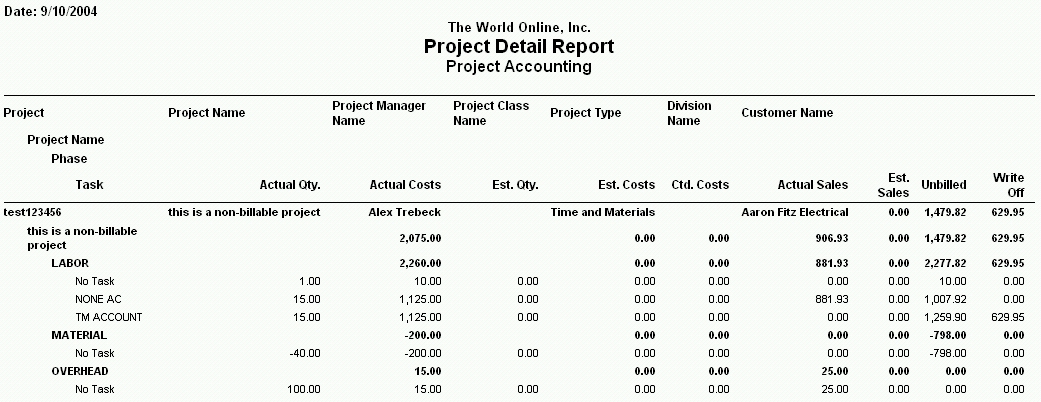
For Reporting Services:
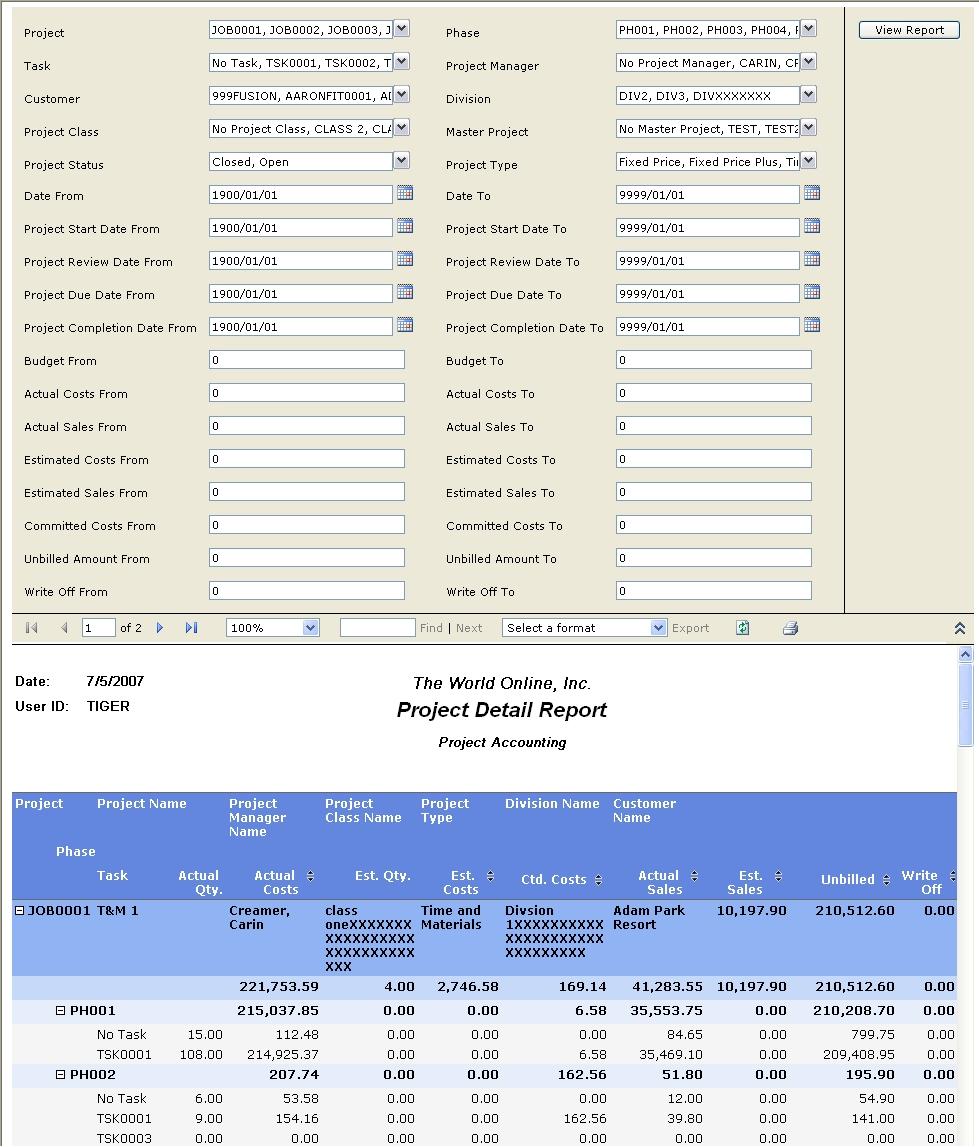
Select to restrict by Project, Phase, Task, Project Manager, Customer, Division, Project Class, Master Project, Project Status, Project Type, Actual Costs, Actual Sales, Estimated Costs, Estimated Sales, Committed Costs, Margin, Budget, Unbilled Amount, Write Off, Date, Project Start Date, Project Review Date, Project Due Date, and/or Project Completion Date.
Select the View Report button to view the report.
Reports can be printed to the printer or exported to a variety of different file types.
The Project Progress Summary Report displays a one line summary of your project's progress. This report is useful to determine how complete your projects, phases, and tasks are and to find out if your project is within its budget.
From the Main Menu, select Project Progress Summary.
For Style Sheets:

Select to restrict by Project, Project Manager, Customer, Division, Project Class, Master Project, Project Status, Project Type, Actual Costs, Actual Sales, Estimated Costs, Estimated Sales, Forecasted Costs, Forecasted Sales, Variance, Percent Complete, Budget, Date, Project Start Date, Project Review Date, Project Due Date, and/or Project Completion Date. Choose either HTML or PDF format to view the report. The HTML version normally prints faster than the PDF format. Mark the 'As E-mail Attachment' checkbox to e-mail the report in PDF format.
If you have access to the Report Configuration section, you can add and remove fields that display on the report. Refer to Appendix F (Project Progress Summary Report Configuration Options) for the available options.
Modify the details on the report by selecting new fields from the drop-down lists, deleting fields by clicking on the Delete icon, and moving fields up and down by clicking on the up and down arrows.
Modify the grouping on the report in the same way. You can also mark the Details checkbox, which will allow you to select corresponding details to print on the same line on the report.
Modify the sorting on the report by selecting new fields to sort by, deleting fields by clicking on the Delete icon, changing the sort order by moving fields up and down using the up and down arrows and also by marking either Asc (ascending) or Desc (descending).
Previously saved configurations can be accessed by clicking on the drop-down list next to Configurations. New configurations that you set up can be saved by clicking on the Save icon at the top of the window.
Select the Print button to view the report in the selected format.
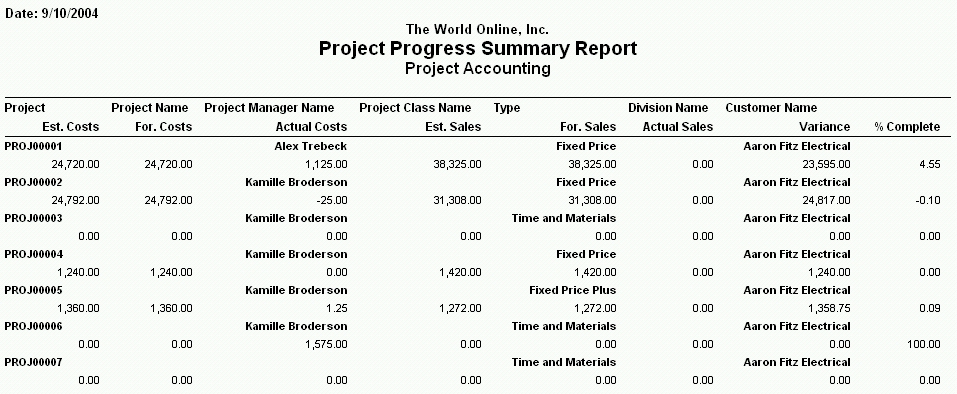
For Reporting Services:
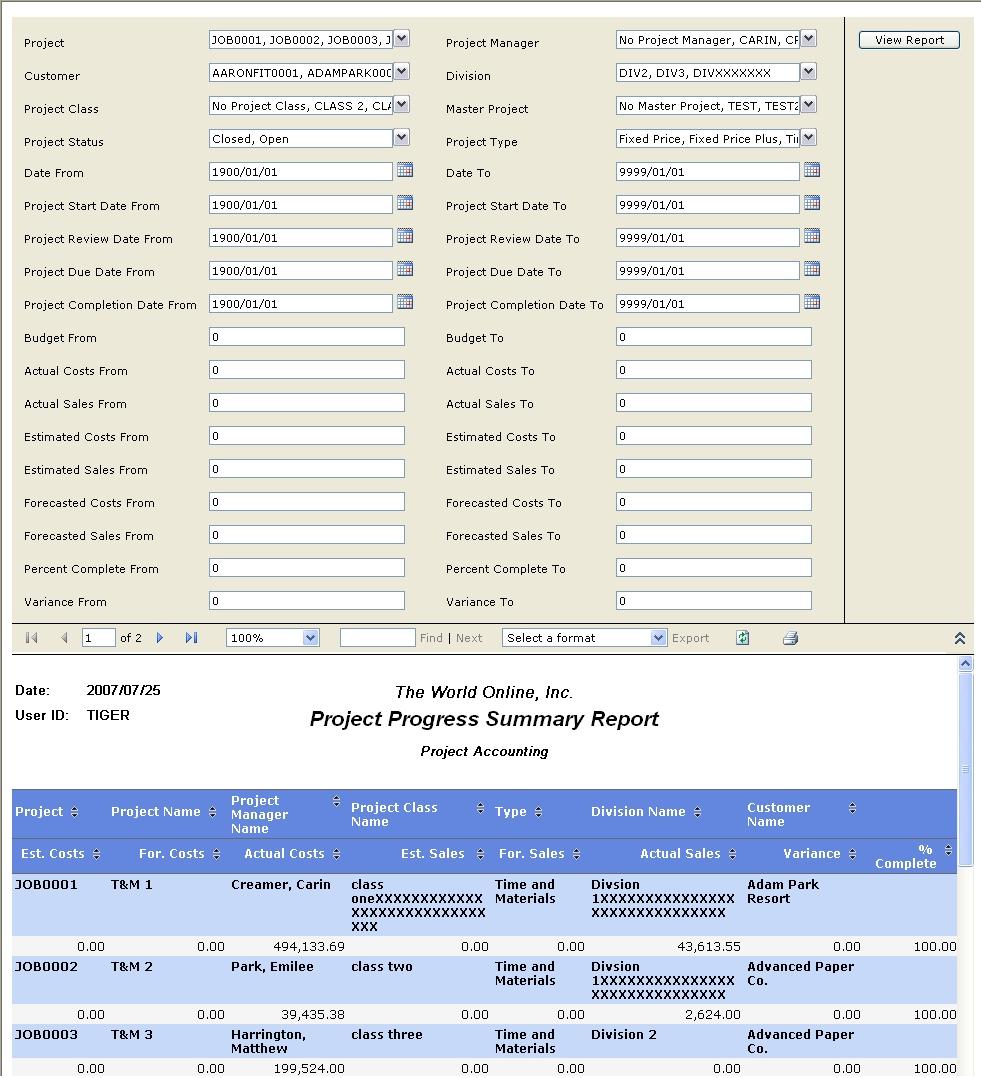
Select to restrict by Project, Project Manager, Customer, Division, Project Class, Master Project, Project Status, Project Type, Actual Costs, Actual Sales, Estimated Costs, Estimated Sales, Forecasted Costs, Forecasted Sales, Variance, Percent Complete, Budget, Date, Project Start Date, Project Review Date, Project Due Date, and/or Project Completion Date.
Select the View Report button to view the report.
Reports can be printed to the printer or exported to a variety of different file types.
The Project Progress Detail Report displays a detailed report of your project's progress. This report is useful to determine how complete your projects, phases, and tasks are and to find out if your project is within its budget.
From the Main Menu, select Project Progress Detail.
For Style Sheets:
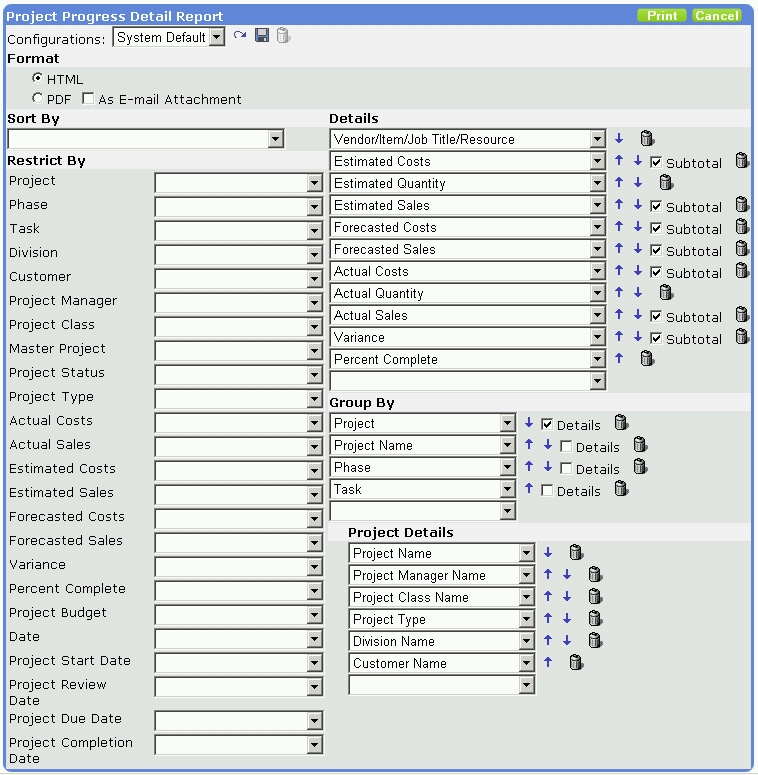
Select to restrict by Project, Phase, Task, Division, Customer, Project Manager, Project Class, Master Project, Project Status, Project Type, Actual Costs, Actual Sales, Estimated Costs, Estimated Sales, Forecasted Costs, Forecasted Sales, Variance, Percent Complete, Project Budget, Date, Project Start Date, Project Review Date, Project Due Date, and/or Project Completion Date. Choose either HTML or PDF format to view the report. The HTML version normally prints faster than the PDF format. Mark the 'As E-mail Attachment' checkbox to e-mail the report in PDF format.
If you have access to the Report Configuration section, you can add and remove fields that display on the report. Refer to Appendix G (Project Progress Detail Report Configuration Options) for the available options.
Modify the details on the report by selecting new fields from the drop-down lists, deleting fields by clicking on the Delete icon, and moving fields up and down by clicking on the up and down arrows.
Modify the grouping on the report in the same way. You can also mark the Details checkbox, which will allow you to select corresponding details to print on the same line on the report.
Modify the sorting on the report by selecting new fields to sort by, deleting fields by clicking on the Delete icon, changing the sort order by moving fields up and down using the up and down arrows and also by marking either Asc (ascending) or Desc (descending).
Previously saved configurations can be accessed by clicking on the drop-down list next to Configurations. New configurations that you set up can be saved by clicking on the Save icon at the top of the window.
Select the Print button to view the report in the selected format.
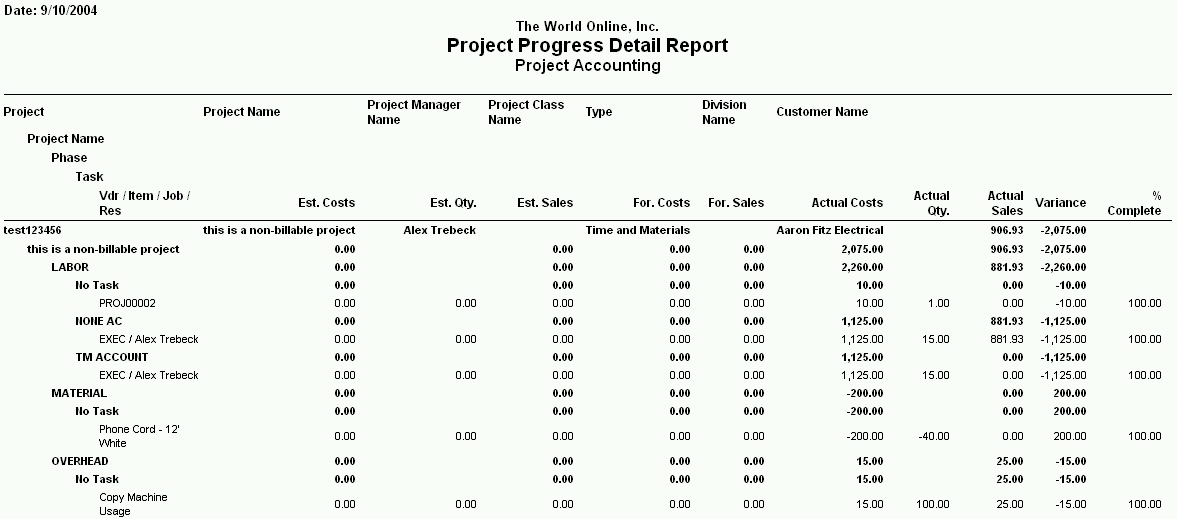
For Reporting Services:
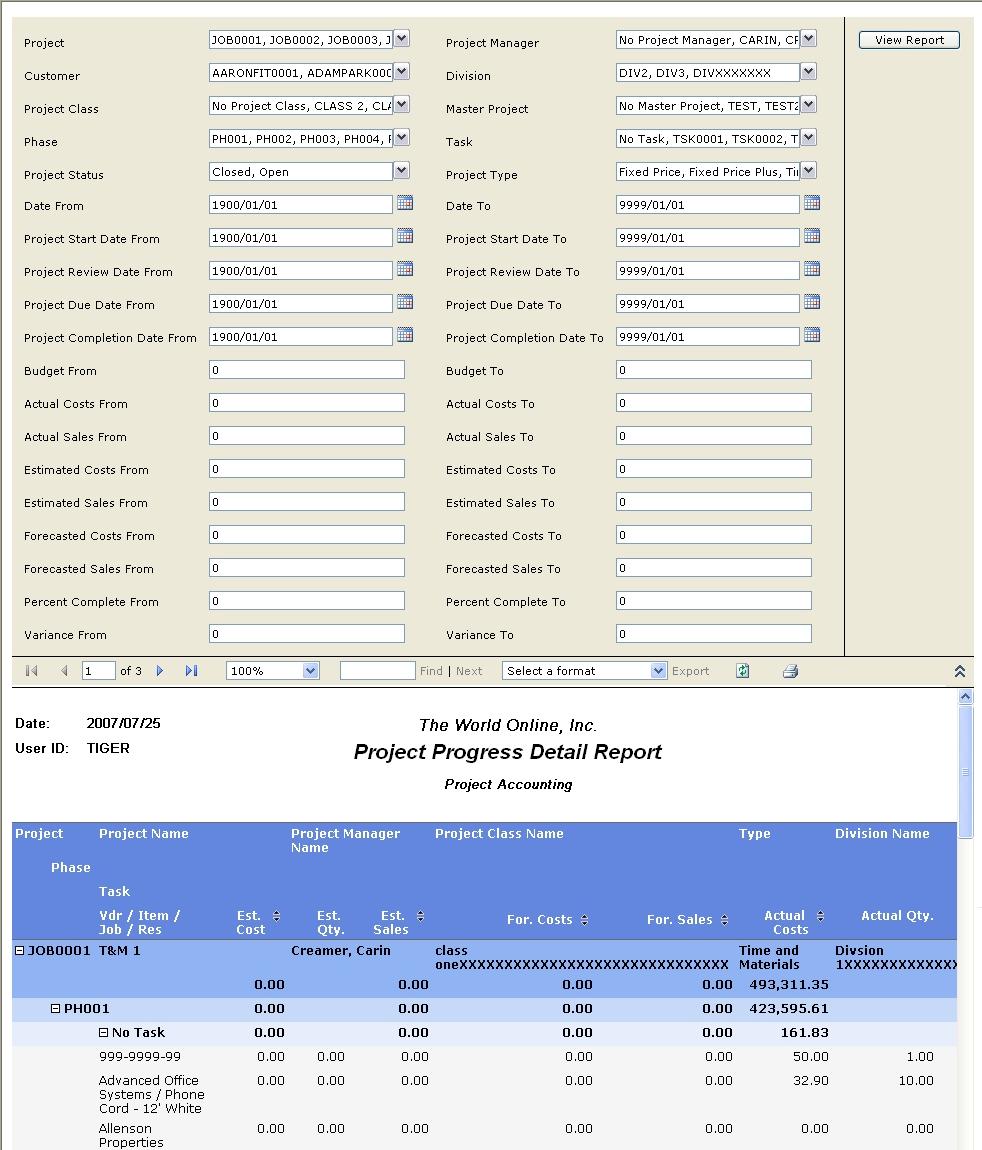
Select to restrict by Project, Phase, Task, Division, Customer, Project Manager, Project Class, Master Project, Project Status, Project Type, Actual Costs, Actual Sales, Estimated Costs, Estimated Sales, Forecasted Costs, Forecasted Sales, Variance, Percent Complete, Project Budget, Date, Project Start Date, Project Review Date, Project Due Date, and/or Project Completion Date.
Select the View Report button to view the report.
Reports can be printed to the printer or exported to a variety of different file types.
The Project P&L Summary Report provides project managers with the ability to monitor a project's profitability at the phase level based upon a date range. If you do not enter a date range, the Amount (Date Range) and PTD Amount colmuns of the report will be the same.
From the Main Menu, select Project P&L Summary.
For Style Sheets:
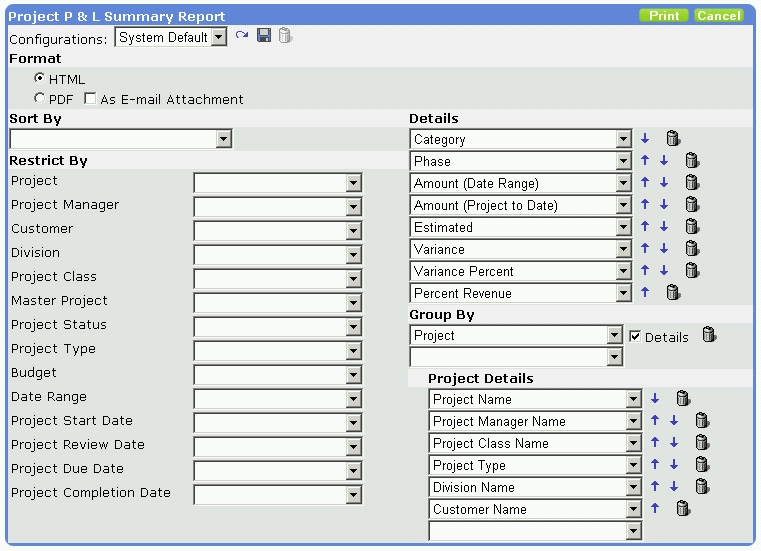
Select to restrict by Project, Project Manager, Customer, Division, Project Class, Master Project, Project Status, Project Type, Budget, Date Range, Project Start Date, Project Review Date, Project Due Date, and/or Project Completion Date. Choose either HTML or PDF format to view the report. The HTML version normally prints faster than the PDF format. Mark the 'As E-mail Attachment' checkbox to e-mail the report in PDF format.
If you have access to the Report Configuration section, you can add and remove fields that display on the report. Refer to Appendix H (Project P&L Summary Report Configuration Options) for the available options.
Modify the details on the report by selecting new fields from the drop-down lists, deleting fields by clicking on the Delete icon, and moving fields up and down by clicking on the up and down arrows.
Modify the grouping on the report in the same way. You can also mark the Details checkbox, which will allow you to select corresponding details to print on the same line on the report.
Modify the sorting on the report by selecting new fields to sort by, deleting fields by clicking on the Delete icon, changing the sort order by moving fields up and down using the up and down arrows and also by marking either Asc (ascending) or Desc (descending).
Previously saved configurations can be accessed by clicking on the drop-down list next to Configurations. New configurations that you set up can be saved by clicking on the Save icon at the top of the window.
Select the Print button to view the report in the selected format.
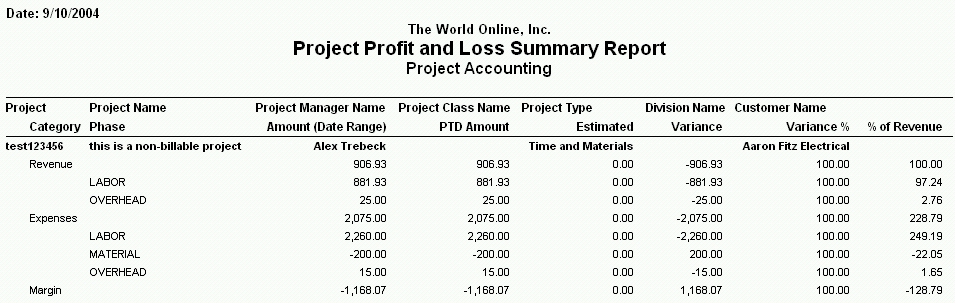
For Reporting Services:
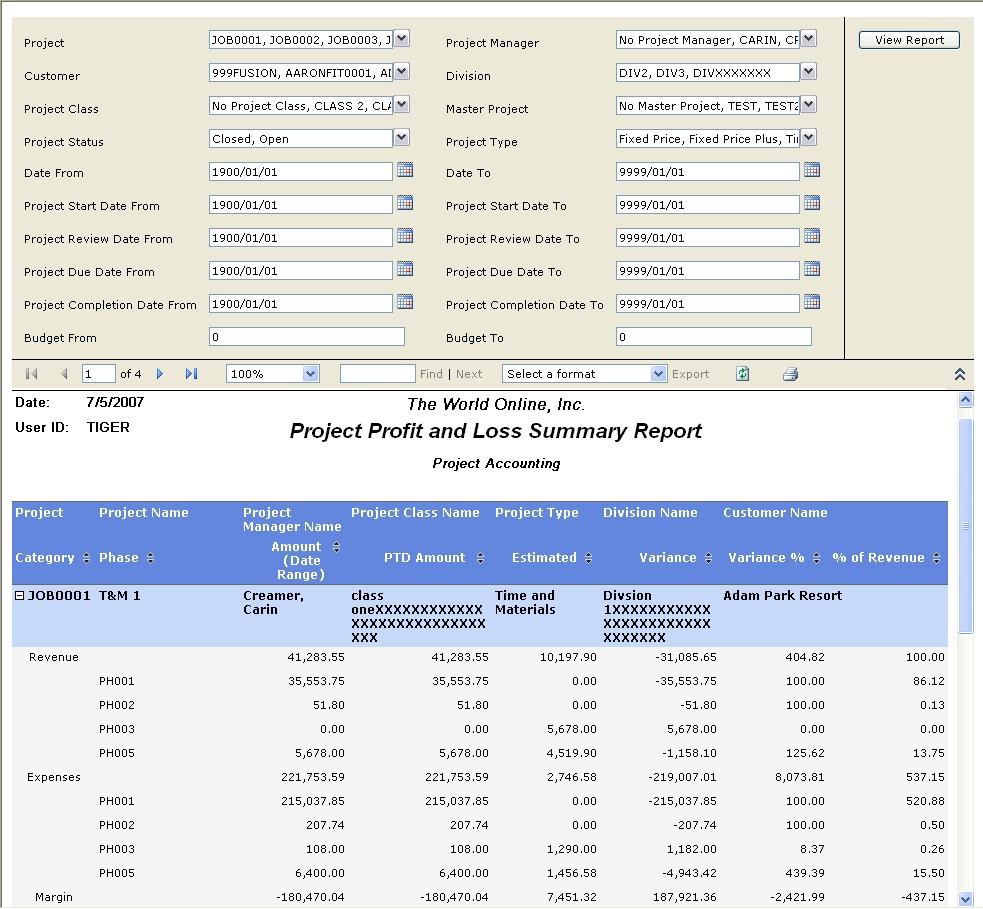
Select to restrict by Project, Project Manager, Customer, Division, Project Class, Master Project, Project Status, Project Type, Budget, Date Range, Project Start Date, Project Review Date, Project Due Date, and/or Project Completion Date.
Select the View Report button to view the report.
Reports can be printed to the printer or exported to a variety of different file types.
The Project P&L Detail Report provides project managers with the ability to monitor a project's profitability at the task level based upon a date range. If you do not enter a date range, the Amount (Date Range) and PTD Amount colmuns of the report will be the same.
From the Main Menu, select Project P&L Detail.
For Style Sheets:
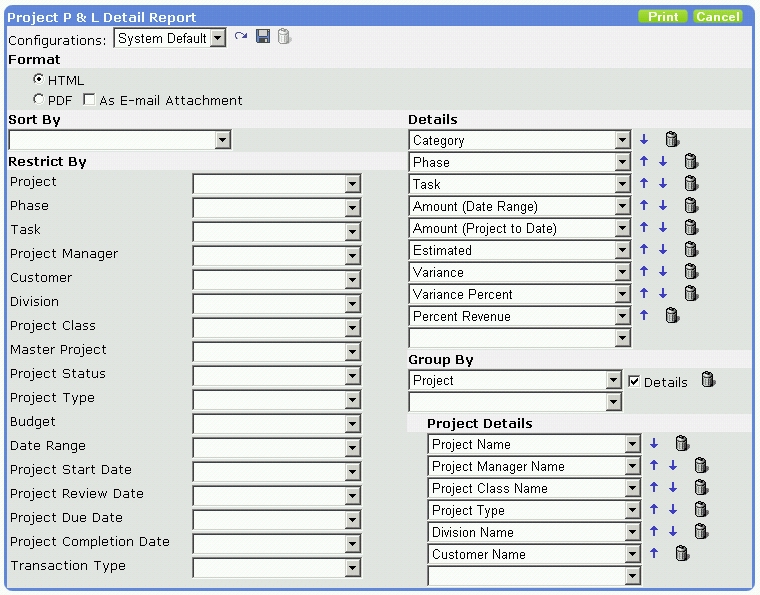
Select to restrict by Project, Phase, Task, Project Manager, Customer, Division, Project Class, Master Project, Project Status, Project Type, Budget, Date Range, Project Start Date, Project Review Date, Project Due Date, Project Completion Date, and/or Transaction Type. Choose either HTML or PDF format to view the report. The HTML version normally prints faster than the PDF format. Mark the 'As E-mail Attachment' checkbox to e-mail the report in PDF format.
If you have access to the Report Configuration section, you can add and remove fields that display on the report. Refer to Appendix I (Project P&L Detail Report Configuration Options) for the available options.
Modify the details on the report by selecting new fields from the drop-down lists, deleting fields by clicking on the Delete icon, and moving fields up and down by clicking on the up and down arrows.
Modify the grouping on the report in the same way. You can also mark the Details checkbox, which will allow you to select corresponding details to print on the same line on the report.
Modify the sorting on the report by selecting new fields to sort by, deleting fields by clicking on the Delete icon, changing the sort order by moving fields up and down using the up and down arrows and also by marking either Asc (ascending) or Desc (descending).
Previously saved configurations can be accessed by clicking on the drop-down list next to Configurations. New configurations that you set up can be saved by clicking on the Save icon at the top of the window.
Select the Print button to view the report in the selected format.
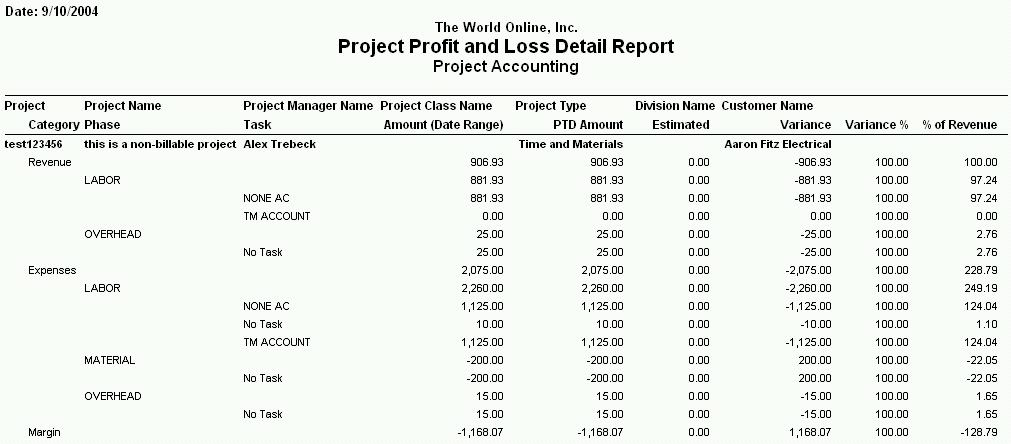
For Reporting Services:
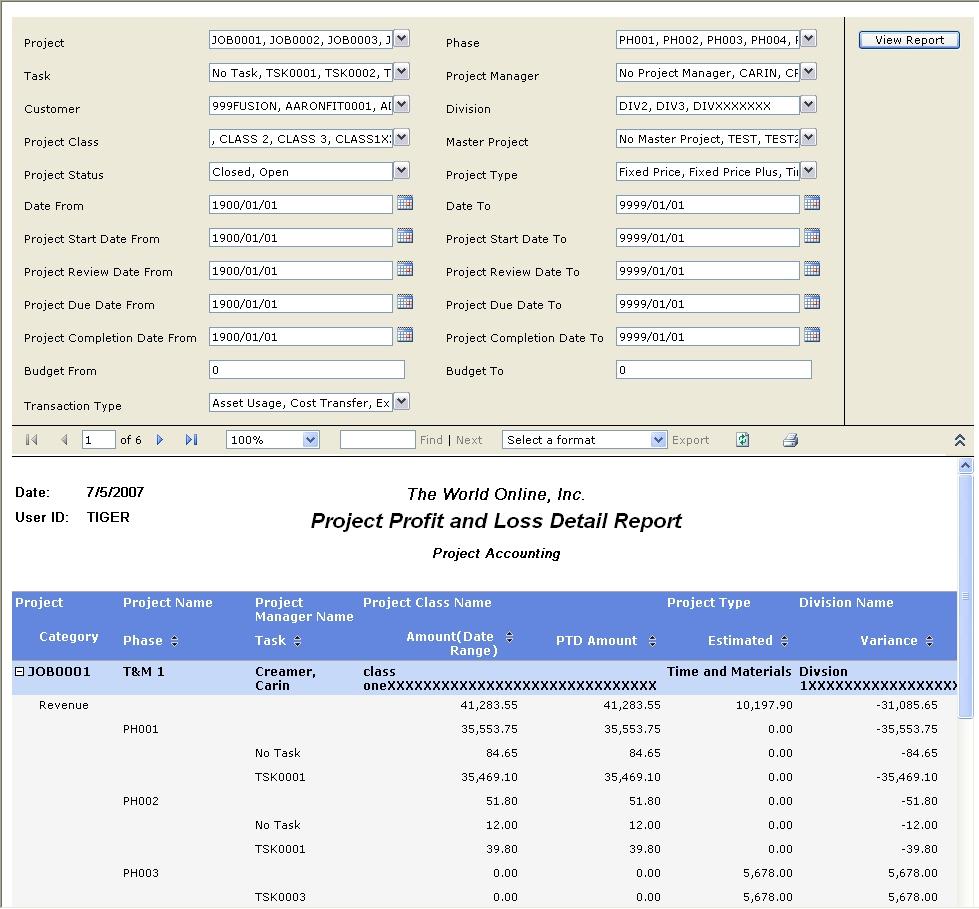
Select to restrict by Project, Phase, Task, Project Manager, Customer, Division, Project Class, Master Project, Project Status, Project Type, Budget, Date Range, Project Start Date, Project Review Date, Project Due Date, Project Completion Date, and/or Transaction Type.
Select the View Report button to view the report.
Reports can be printed to the printer or exported to a variety of different file types.
The Cost Transactions Report displays all the cost transactions associated with a project.
From the Main Menu, select Cost Transactions.
For Style Sheets:
Select to restrict by Project, Phase, Task, Project Manager, Customer, Division, Project Class, Master Project, Project Status, Project Type, Actual Costs, Date, Project Start Date, Project Review Date, Project Due Date, and/or Project Completion Date. Choose either HTML or PDF format to view the report. The HTML version normally prints faster than the PDF format. Mark the 'As E-mail Attachment' checkbox to e-mail the report in PDF format.
If you have access to the Report Configuration section, you can add and remove fields that display on the report. Refer to Appendix J (Cost Transactions Report Configuration Options) for the available options.
Modify the details on the report by selecting new fields from the drop-down lists, deleting fields by clicking on the Delete icon, and moving fields up and down by clicking on the up and down arrows.
Modify the grouping on the report in the same way. You can also mark the Details checkbox, which will allow you to select corresponding details to print on the same line on the report.
Modify the sorting on the report by selecting new fields to sort by, deleting fields by clicking on the Delete icon, changing the sort order by moving fields up and down using the up and down arrows and also by marking either Asc (ascending) or Desc (descending).
Previously saved configurations can be accessed by clicking on the drop-down list next to Configurations. New configurations that you set up can be saved by clicking on the Save icon at the top of the window.
Select the Print button to view the report in the selected format.
For Reporting Services:
Select to restrict by Project, Phase, Task, Project Manager, Customer, Division, Project Class, Master Project, Project Status, Project Type, Actual Costs, Date, Project Start Date, Project Review Date, Project Due Date, and/or Project Completion Date.
Select the View Report button to view the report.
Reports can be printed to the printer or exported to a variety of different file types.
The Resource Utilization Report displays how many actual hours a resource has been utilized based upon productive hours and actual hours. Resource Management must be registered in order to view this report.
From the Main Menu, select Resource Utilization.
For Style Sheets:
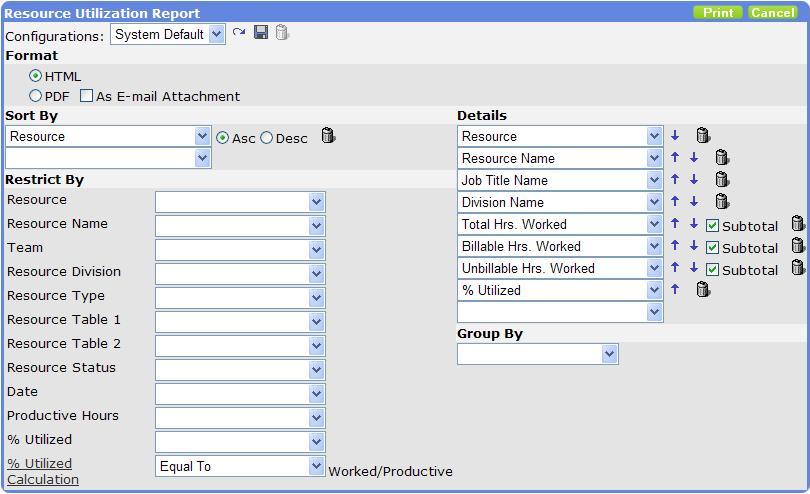
Select to restrict by Team, Resource Type, Resource ID, Resource Name, Resource Division, Resource Table 1, Resource Table 2, Productive Hours, Resource Status, Date, Utilized % and % Utilized Calculation. Choose either HTML or PDF format to view the report. The HTML version normally prints faster than the PDF format. Mark the 'As E-mail Attachment' checkbox to e-mail the report in PDF format.
If you have access to the Report Configuration section, you can add and remove fields that display on the report. Refer to Appendix K (Resource Utilization Report Configuration Options) for the available options.
Modify the details on the report by selecting new fields from the drop-down lists, deleting fields by clicking on the Delete icon, and moving fields up and down by clicking on the up and down arrows.
Modify the grouping on the report in the same way. You can also mark the Details checkbox, which will allow you to select corresponding details to print on the same line on the report.
Modify the sorting on the report by selecting new fields to sort by, deleting fields by clicking on the Delete icon, changing the sort order by moving fields up and down using the up and down arrows and also by marking either Asc (ascending) or Desc (descending).
Previously saved configurations can be accessed by clicking on the drop-down list next to Configurations. New configurations that you set up can be saved by clicking on the Save icon at the top of the window.
Select the Print button to view the report in the selected format.
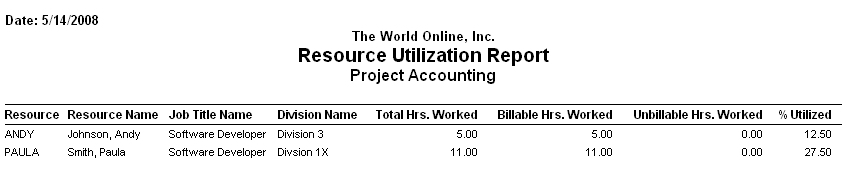
For Reporting Services:
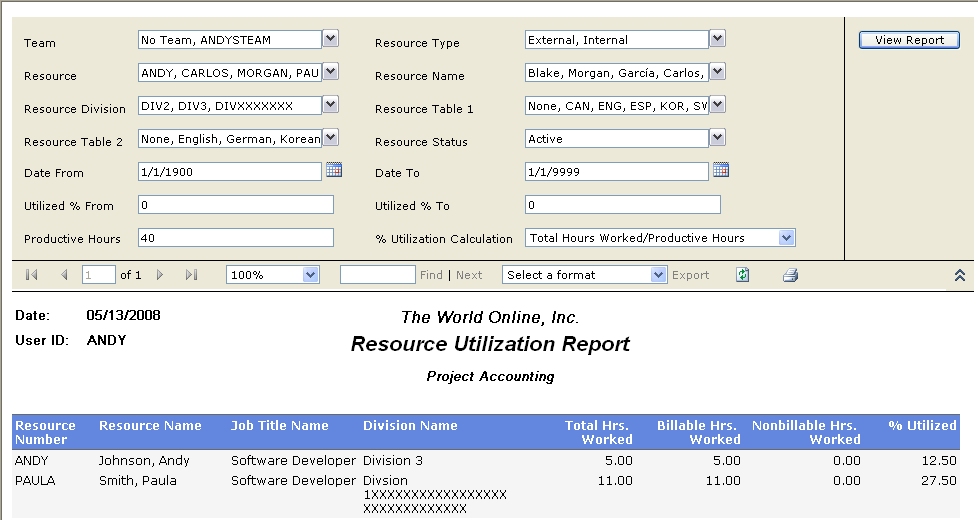
Select to restrict by Team, Resource Type, Resource ID, Resource Name, Resource Division, Resource Table 1, Resource Table 2, Productive Hours, Resource Status, Date, Utilized % and Utilized Calculation.
Select the View Report button to view the report.
Reports can be printed to the printer or exported to a variety of different file types.
The Scheduled Utilization Report displays how many hours a resource has been utilized based upon productive hours and scheduled hours. This report is a summary of each resource's general utilization for a date range. Resource Management must be registered in order to view this report.
From the Main Menu, select Scheduled Utilization.
For Style Sheets:

Select to restrict by Schedule, Creator, Week, Project ID, Resource ID, Resource Name, Phase, Task, Utilized %, Productive Hours and Scheduled Status. Choose either HTML or PDF format to view the report. The HTML version normally prints faster than the PDF format. Mark the 'As E-mail Attachment' checkbox to e-mail the report in PDF format.
If you have access to the Report Configuration section, you can add and remove fields that display on the report. Refer to Appendix L (Scheduled Utilization Report Configuration Options) for the available options.
Modify the details on the report by selecting new fields from the drop-down lists, deleting fields by clicking on the Delete icon, and moving fields up and down by clicking on the up and down arrows.
Modify the grouping on the report in the same way. You can also mark the Details checkbox, which will allow you to select corresponding details to print on the same line on the report.
Modify the sorting on the report by selecting new fields to sort by, deleting fields by clicking on the Delete icon, changing the sort order by moving fields up and down using the up and down arrows and also by marking either Asc (ascending) or Desc (descending).
Previously saved configurations can be accessed by clicking on the drop-down list next to Configurations. New configurations that you set up can be saved by clicking on the Save icon at the top of the window.
Select the Print button to view the report in the selected format.
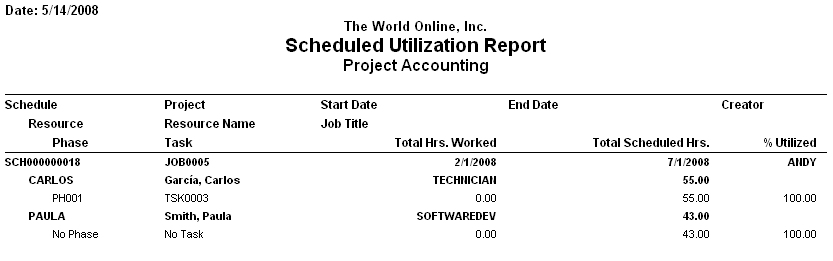
For Reporting Services:
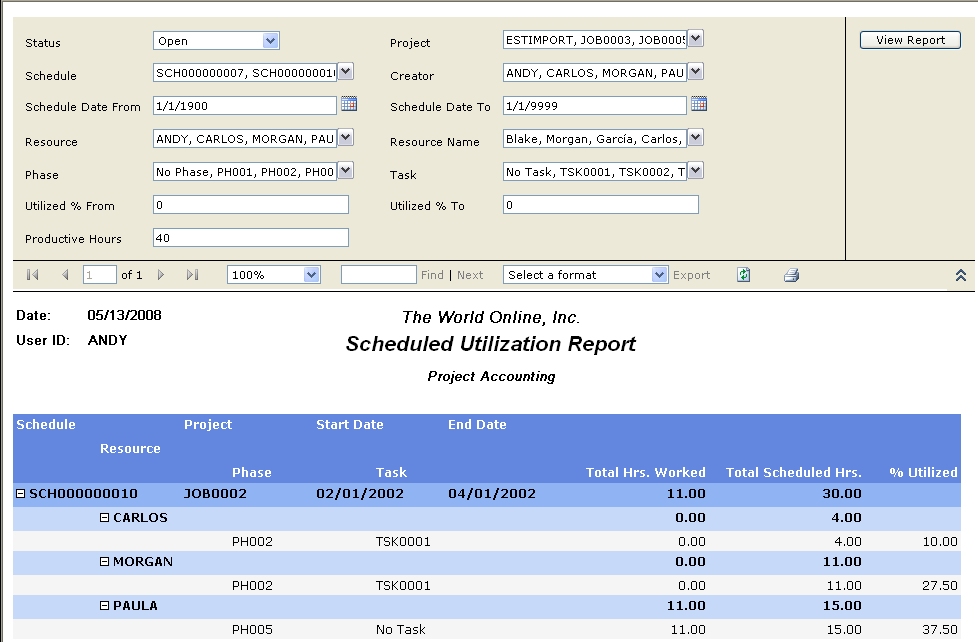
Select to restrict by Schedule, Creator, Schedule Date From, Schedule Date To, Project ID, Resource ID, Resource Name, Phase, Task, Utilized %, Productive Hours and Scheduled Status.
Select the View Report button to view the report.
Reports can be printed to the printer or exported to a variety of different file types.
The Project Schedule Report displays project schedule information. This report is a summary of each resource's general utilization for a date range. Resource Management must be registered in order to view this report.
From the Main Menu, select Project Schedule.
For Style Sheets:
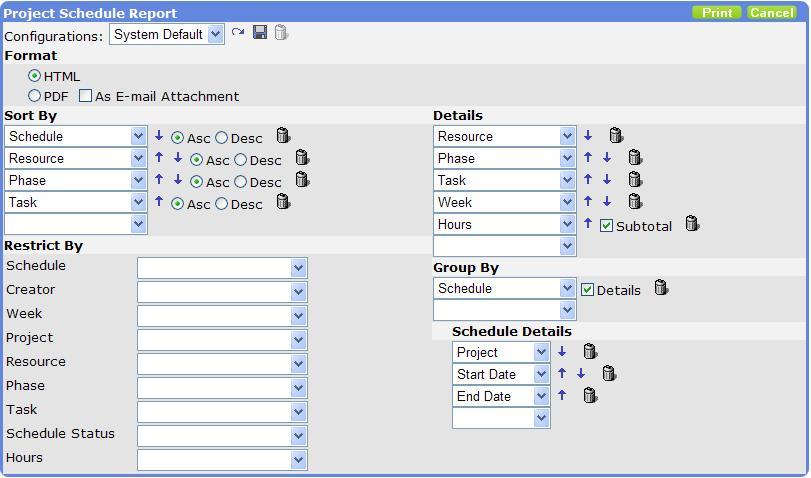
Select to restrict by Schedule, Creator, Week, Project ID, Resource ID, Resource Name, Phase, Task, Hours and Scheduled Status. Choose either HTML or PDF format to view the report. The HTML version normally prints faster than the PDF format. Mark the 'As E-mail Attachment' checkbox to e-mail the report in PDF format.
If you have access to the Report Configuration section, you can add and remove fields that display on the report. Refer to Appendix M (Project Schedule Report Configuration Options) for the available options.
Modify the details on the report by selecting new fields from the drop-down lists, deleting fields by clicking on the Delete icon, and moving fields up and down by clicking on the up and down arrows.
Modify the grouping on the report in the same way. You can also mark the Details checkbox, which will allow you to select corresponding details to print on the same line on the report.
Modify the sorting on the report by selecting new fields to sort by, deleting fields by clicking on the Delete icon, changing the sort order by moving fields up and down using the up and down arrows and also by marking either Asc (ascending) or Desc (descending).
Previously saved configurations can be accessed by clicking on the drop-down list next to Configurations. New configurations that you set up can be saved by clicking on the Save icon at the top of the window.
Select the Print button to view the report in the selected format.
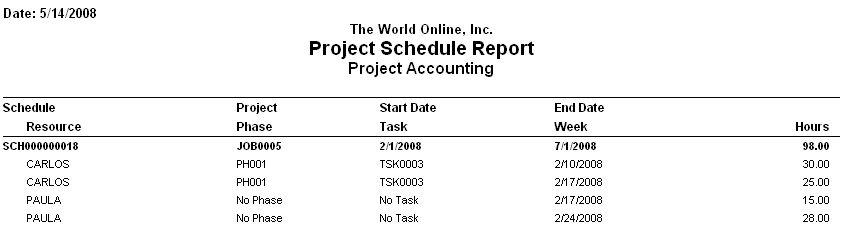
For Reporting Services:
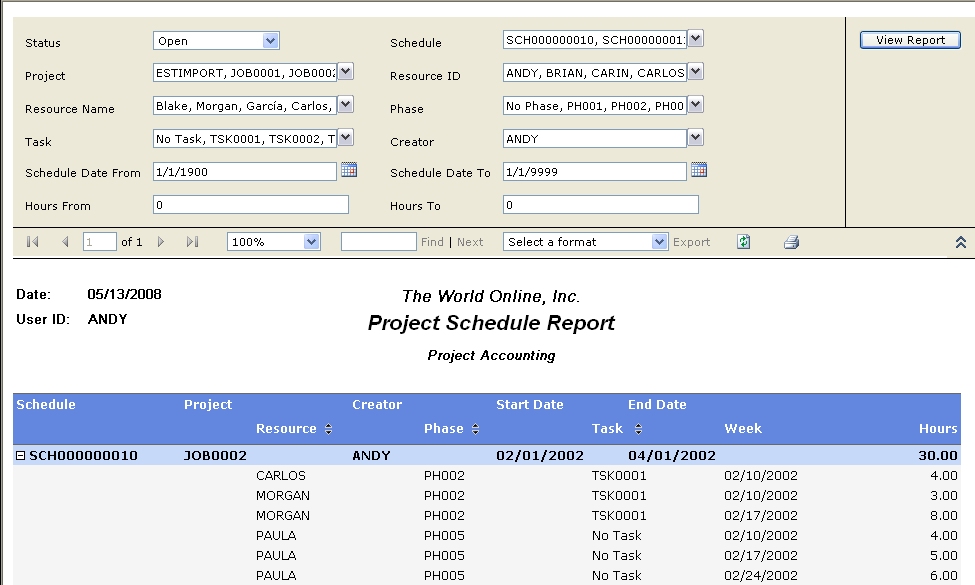
Select to restrict by Schedule, Creator, Schedule Date From, Schedule Date To, Project ID, Resource ID, Resource Name, Phase, Task, Hours and Scheduled Status.
Select the View Report button to view the report.
Reports can be printed to the printer or exported to a variety of different file types.
The Skill Load Report displays how many hours a resource has been scheduled to work on a project based upon a specific skill. This report is a summary of each resource's general utilization for a date range. Resource Management must be registered in order to view this report.
From the Main Menu, select Skill Load.
For Style Sheets:
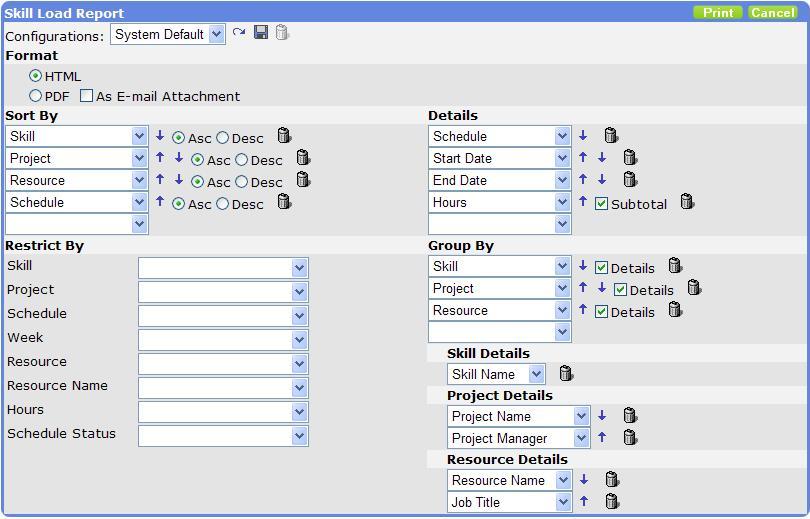
Select to restrict by Skill, Project, Schedule, Week, Resource, Resource Name, Hours and Schedule Status. Choose either HTML or PDF format to view the report. The HTML version normally prints faster than the PDF format. Mark the 'As E-mail Attachment' checkbox to e-mail the report in PDF format.
If you have access to the Report Configuration section, you can add and remove fields that display on the report. Refer to Appendix N (Skill Load Report Configuration Options) for the available options.
Modify the details on the report by selecting new fields from the drop-down lists, deleting fields by clicking on the Delete icon, and moving fields up and down by clicking on the up and down arrows.
Modify the grouping on the report in the same way. You can also mark the Details checkbox, which will allow you to select corresponding details to print on the same line on the report.
Modify the sorting on the report by selecting new fields to sort by, deleting fields by clicking on the Delete icon, changing the sort order by moving fields up and down using the up and down arrows and also by marking either Asc (ascending) or Desc (descending).
Previously saved configurations can be accessed by clicking on the drop-down list next to Configurations. New configurations that you set up can be saved by clicking on the Save icon at the top of the window.
Select the Print button to view the report in the selected format.
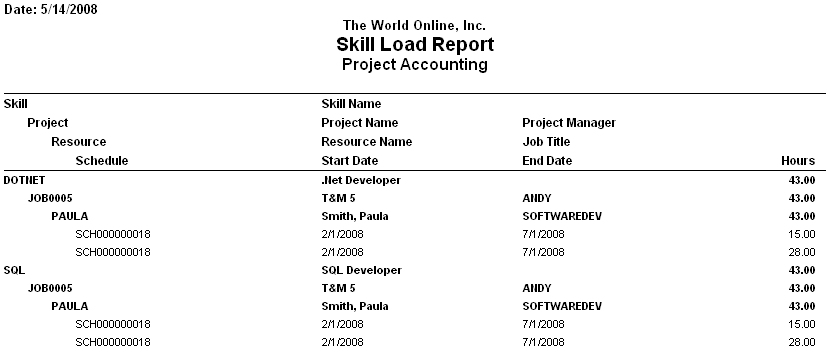
For Reporting Services:
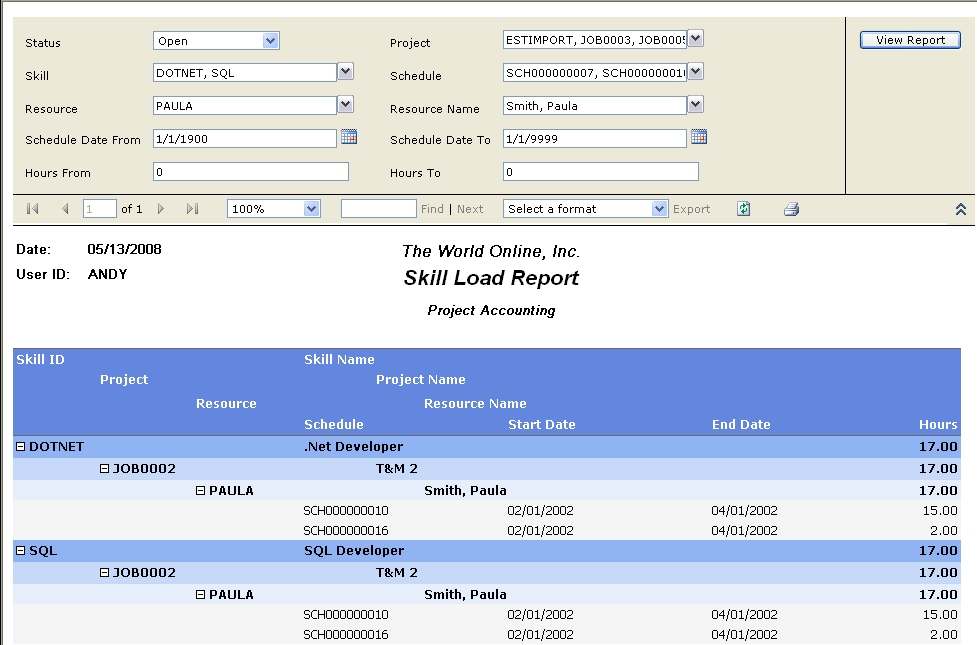
Select to restrict by Skill, Project, Schedule, Schedule Date From, Schedule Date To, Resource, Resource Name, Hours and Schedule Status.
Select the View Report button to view the report.
Reports can be printed to the printer or exported to a variety of different file types.
The Resource Load Report displays how many hours a resource has been scheduled based upon a specific date range. This report is a summary of each resource's general utilization for a date range. Resource Management must be registered in order to view this report.
From the Main Menu, select Resource Load.
For Style Sheets:
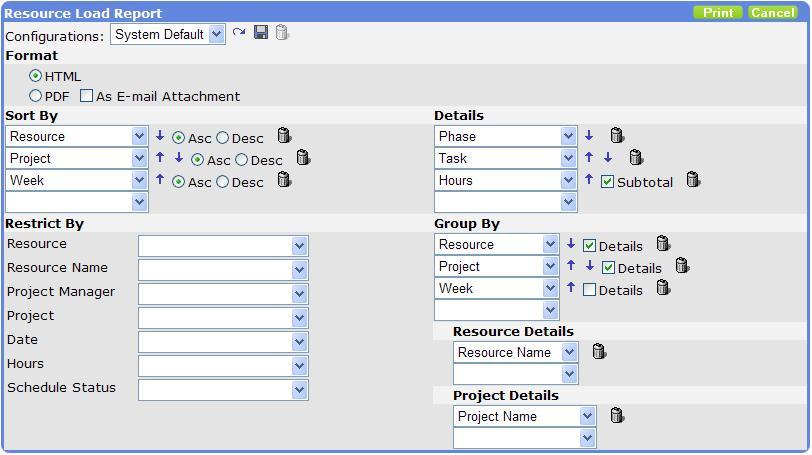
Select to restrict by Resource, Resource Name, Project Manager, Project, Week, Hours and Schedule Status. Choose either HTML or PDF format to view the report. The HTML version normally prints faster than the PDF format. Mark the 'As E-mail Attachment' checkbox to e-mail the report in PDF format.
If you have access to the Report Configuration section, you can add and remove fields that display on the report. Refer to Appendix O (Resource Load Report Configuration Options) for the available options.
Modify the details on the report by selecting new fields from the drop-down lists, deleting fields by clicking on the Delete icon, and moving fields up and down by clicking on the up and down arrows.
Modify the grouping on the report in the same way. You can also mark the Details checkbox, which will allow you to select corresponding details to print on the same line on the report.
Modify the sorting on the report by selecting new fields to sort by, deleting fields by clicking on the Delete icon, changing the sort order by moving fields up and down using the up and down arrows and also by marking either Asc (ascending) or Desc (descending).
Previously saved configurations can be accessed by clicking on the drop-down list next to Configurations. New configurations that you set up can be saved by clicking on the Save icon at the top of the window.
Select the Print button to view the report in the selected format.
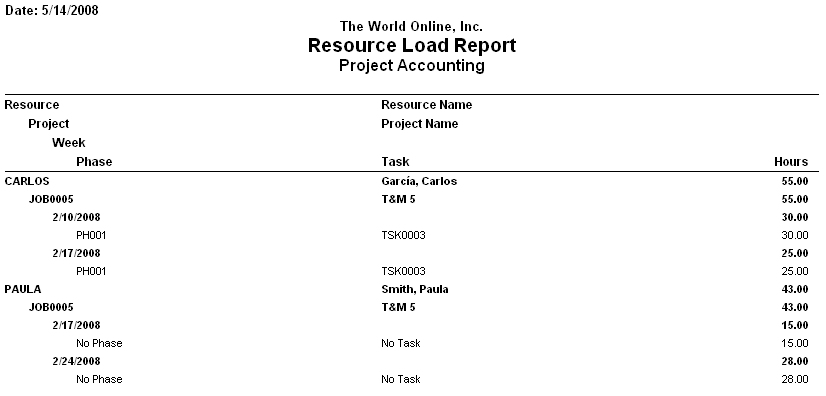
For Reporting Services:
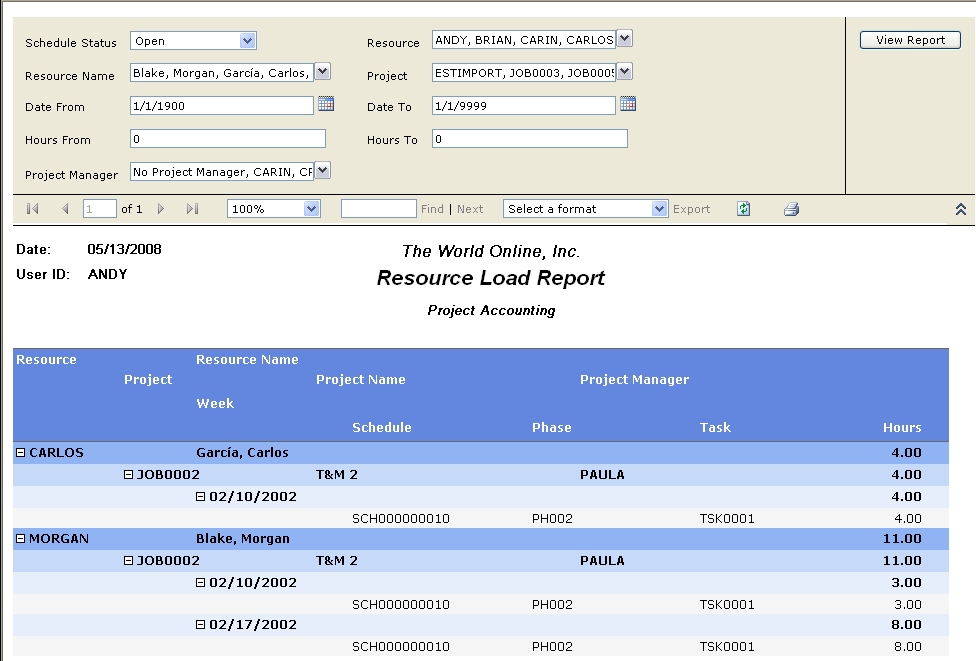
Select to restrict by Resource, Resource Name, Project Manager, Project, Date, Hours and Schedule Status.
Select the View Report button to view the report.
Reports can be printed to the printer or exported to a variety of different file types.
The Schedule Analysis Report allows you to compare scheduled hours versus actual hours. This report is a summary of each resource's general utilization for a date range. Resource Management must be registered in order to view this report.
From the Main Menu, select Schedule Analysis.
For Style Sheets:
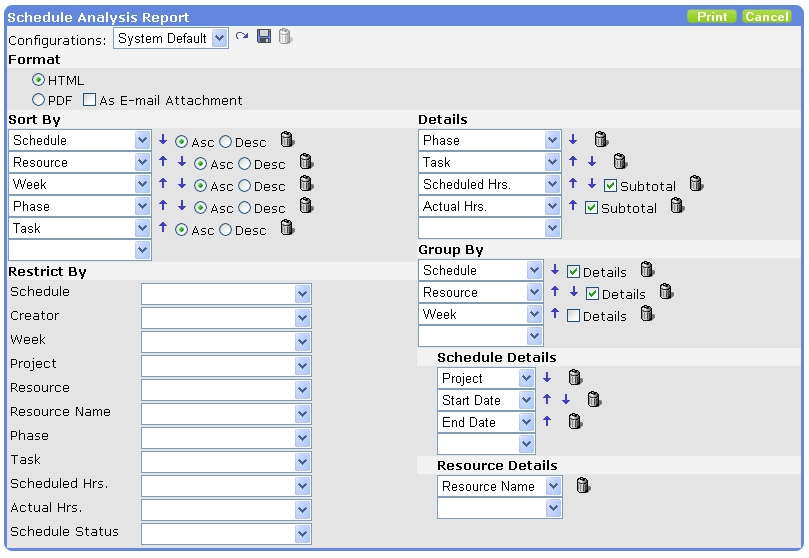
Select to restrict by Schedule, Creator, Week, Project, Resource, Resource Name, Phase, Task, Scheduled Hours, Actual Hours and Schedule Status. Choose either HTML or PDF format to view the report. The HTML version normally prints faster than the PDF format. Mark the 'As E-mail Attachment' checkbox to e-mail the report in PDF format.
If you have access to the Report Configuration section, you can add and remove fields that display on the report. Refer to Appendix P (Schedule Analysis Report Configuration Options) for the available options.
Modify the details on the report by selecting new fields from the drop-down lists, deleting fields by clicking on the Delete icon, and moving fields up and down by clicking on the up and down arrows.
Modify the grouping on the report in the same way. You can also mark the Details checkbox, which will allow you to select corresponding details to print on the same line on the report.
Modify the sorting on the report by selecting new fields to sort by, deleting fields by clicking on the Delete icon, changing the sort order by moving fields up and down using the up and down arrows and also by marking either Asc (ascending) or Desc (descending).
Previously saved configurations can be accessed by clicking on the drop-down list next to Configurations. New configurations that you set up can be saved by clicking on the Save icon at the top of the window.
Select the Print button to view the report in the selected format.
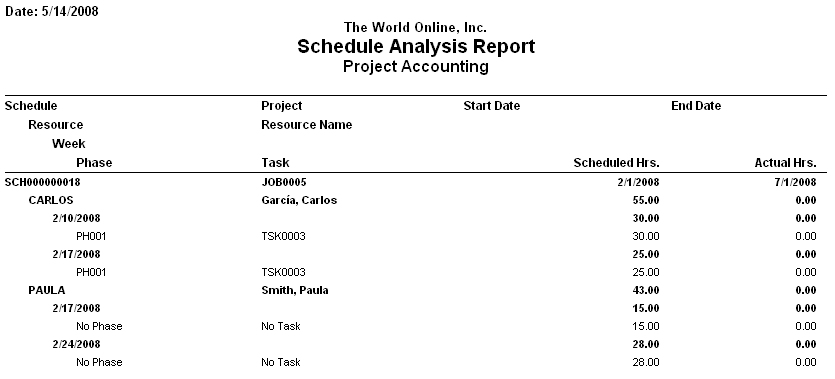
For Reporting Services:
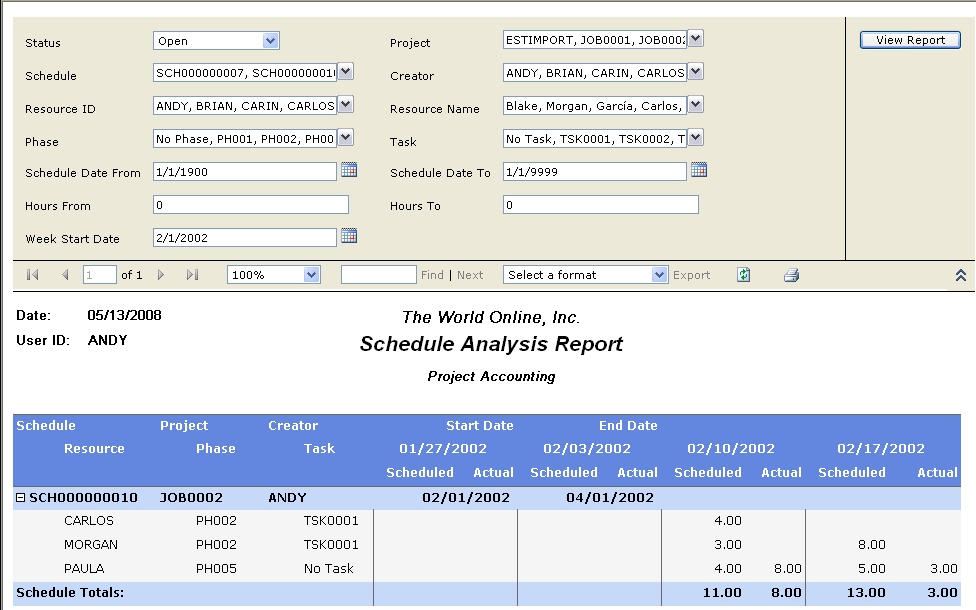
Select to restrict by Schedule, Creator, Schedule Date From, Schedule Date To, Project, Resource, Resource Name, Phase, Task, Scheduled Hours, Actual Hours and Schedule Status.
Select the View Report button to view the report.
Reports can be printed to the printer or exported to a variety of different file types.
Table A.1. Timesheet Report Sorting Options
Style Sheets Only: The report will automatically sort by the first grouping option, but you can still specify to sort the report by additional fields. You also have the ability to specify ascending or descending order. The Default column indicates that the field will automatically default in the Report Configuration window when selecting the System Default configuration.
| Sort By Options | Default |
|---|---|
Batch | |
Charge Out Rate | |
Cost Rate | |
Date | |
Header Approved/Rejected By | |
Header Status | |
Hours Billable | |
Hours Worked | |
Job Title | |
Line Approved/Rejected By | |
Line Status | |
Phase | |
Phase Name | |
Project | |
Project Manager | |
Project Manager Name | |
Project Name | |
Resource | Yes |
Resource Name | |
Task | |
Task Name | |
Timesheet |
Table A.2. Timesheet Report Restriction Options
The report will automatically restrict by Timesheet when printing the report from the Timesheet Entry window. You can specify additional restrictions before printing the report.
| Restrict By Options |
|---|
Resource |
Resource Name |
Job Title |
Batch |
Posting Status |
Timesheet |
Project |
Phase |
Task |
Hours Worked |
Hours Billable |
Period Start Date |
Period End Date |
Charge Out Rate |
Cost Rate |
Team |
Line Status |
Resource Type |
Table A.3. Timesheet Report Details
The Timesheet Report Details are the fields available to add to the report or remove from the report. The Details consist of both line level and header level details. The Default column indicates that the field will automatically default in the Report Configuration window when selecting the System Default configuration.
| Details | Default |
|---|---|
Batch | |
Charge Out Rate | Yes |
Comment | Yes |
Cost Rate | Yes |
Date | Yes |
Header Approved/Rejected By | |
Header Date Approved/Rejected | |
Header Status | |
Hours Billable | Yes |
Hours Worked | Yes |
Job Title | |
Line Approved/Rejected By | |
Line Date Approved/Rejected | |
Line Status | |
Pay Code | |
Pay Code Name | |
Period End Date | |
Period Start Date | |
Phase | Yes |
Phase Name | |
Project | Yes |
Project Manager | |
Project Manager Name | |
Project Name | |
Resource | |
Resource Name | |
Task | Yes |
Task Name | |
Timesheet | |
Worksheet Number |
Table A.4. Timesheet Report Grouping Options
Style Sheets Only: The Timesheet Report Grouping Options indicate how you wish to group the details on the report. The first grouping option you select will also be the field by which the report is initially sorted. When you select a Group By option, the Details checkbox will become available. If you mark the Details checkbox, some fields will allow you to select additional Detail fields specific to that grouping option. The Default column indicates that the field will automatically default in the Report Configuration window when selecting the System Default configuration.
| Group By | Default | Details | Default |
|---|---|---|---|
Batch | Yes | Period End Date | Yes |
| Period Start Date | Yes | ||
Date | N/A | ||
Header Approved/Rejected By | N/A | ||
Header Date Approved/Rejected | N/A | ||
Header Status | N/A | ||
Job Title | N/A | ||
Line Approved/Rejected By | N/A | ||
Line Status | N/A | ||
Pay Code | N/A | ||
Period End Date | N/A | ||
Period Start Date | N/A | ||
Phase | Phase Name | ||
Phase Name | Phase | ||
Project | Project Manager | ||
| Project Name | |||
Project Manager | Project Manager Name | ||
Project Manager Name | Project Manager | ||
Project Name | Project | ||
| Project Manager | |||
Resource | Yes | Job Title | Yes |
| Resource Name | Yes | ||
Resource Name | Job Title | ||
| Resource | |||
Task | Task Name | ||
Task Name | Task | ||
Timesheet | Yes | Batch | |
| Header Approved/Rejected By | |||
| Header Status | |||
| Job Title | |||
| Period End Date | |||
| Period Start Date | |||
| Resource | |||
| Resource Name |
Table B.1. Timesheet Status Report Sorting Options
Style Sheets Only: The report will automatically sort by the first grouping option, but you can still specify to sort the report by additional fields. You also have the ability to specify ascending or descending order. The Default column indicates that the field will automatically default in the Report Configuration window when selecting the System Default configuration.
| Sort By Options | Default |
|---|---|
Header Approved/Rejected By | |
Job Title | |
Period End Date | |
Resource | Yes |
Resource Name | |
Status | Yes |
Timesheet | |
Total Hours Worked |
Table B.2. Timesheet Status Report Restriction Options
You can specify restrictions before printing the report.
| Restrict By Options |
|---|
Resource |
Resource Name |
Job Title |
Team |
Resource Division |
Batch |
Status |
Total Hours Worked |
Resource Type |
Resource Table 1 |
Resource Table 2 |
Table B.3. Timesheet Status Report Details
The Timesheet Status Report Details are the fields available to add to the report or remove from the report. The Details consist of header level details. The Default column indicates that the field will automatically default in the Report Configuration window when selecting the System Default configuration.
| Details | Default |
|---|---|
Batch | |
Header Approved/Rejected By | Yes |
Job Title | |
Period End Date | |
Resource | Yes |
Resource Name | Yes |
Status | |
Timesheet | Yes |
Total Hours Worked | Yes |
Table B.4. Timesheet Status Report Grouping Options
Style Sheets Only: The Timesheet Status Report Grouping Options indicate how you wish to group the details on the report. The first grouping option you select will also be the field by which the report is initially sorted. When you select a Group By option, the Details checkbox will become available. If you mark the Details checkbox, some fields will allow you to select additional Detail fields specific to that grouping option. The Default column indicates that the field will automatically default in the Report Configuration window when selecting the System Default configuration.
| Group By | Default | Details | Default |
|---|---|---|---|
Batch | Yes | Period End Date | Yes |
| Period Start Date | Yes | ||
Status | Yes | N/A | |
Team | N/A |
Table C.1. Expense Claim Report Sorting Options
Style Sheets Only: The report will automatically sort by the first grouping option, but you can still specify to sort the report by additional fields. You also have the ability to specify ascending or descending order. The Default column indicates that the field will automatically default in the Report Configuration window when selecting the System Default configuration.
| Sort By Options | Default |
|---|---|
Account Description | |
Account Number | |
Approver/Rejector | |
Batch | |
Cost | |
Credit Card | |
Expense Claim | Yes |
Expense Claim Date | |
Header Status | |
Item | |
Line Date | |
Payment Type | |
Phase | |
Project | |
Quantity | |
Resource | |
Resource Name | |
Task | |
Total Cost | |
Vendor |
Table C.2. Expense Claim Report Restriction Options
The report will automatically restrict by Expense Claim when printing the report from the Expense Claim Entry window. You can specify additional restrictions before printing the report.
| Restrict By Options |
|---|
Resource |
Resource Name |
Job Title |
Batch |
Posting Status |
Expense Claim |
Expense Claim Date |
Item |
Project |
Phase |
Task |
Quantity |
Cost |
Payment Type |
Resource Type |
Vendor |
Team |
Table C.3. Expense Claim Report Details
The Expense Claim Report Details are the fields available to add to the report or remove from the report. The Details consist of both line level and header level details. The Default column indicates that the field will automatically default in the Report Configuration window when selecting the System Default configuration.
| Details | Default |
|---|---|
Account Description | |
Account Number | |
Approver/Rejector | |
Batch | |
Billing Type | |
Comment | Yes |
Cost | Yes |
Credit Card | |
Expense Claim | |
Expense Claim Date | |
Header Date Approved/Rejected | |
Header Status | |
Item | Yes |
Item Description | |
Job Title | |
Line Date | Yes |
Line Date Approved/Rejected | |
Line Status | |
Merchant | |
Payment Type | Yes |
Phase | Yes |
Phase Name | |
Project | Yes |
Project Manager | |
Project Manager Name | |
Project Name | |
Quantity | Yes |
Reference | |
Resource | |
Resource Name | |
Task | Yes |
Task Name | |
Total Cost | Yes |
Vendor | |
Vendor Name |
Table C.4. Expense Claim Report Grouping Options
Style Sheets Only: The Expense Claim Report Grouping Options indicate how you wish to group the details on the report. The first grouping option you select will also be the field by which the report is initially sorted. When you select a Group By option, the Details checkbox will become available. If you mark the Details checkbox, some fields will allow you to select additional Detail fields specific to that grouping option. The Default column indicates that the field will automatically default in the Report Configuration window when selecting the System Default configuration.
| Group By | Default | Details | Default |
|---|---|---|---|
Account Description | Account Number | ||
Account Number | Account Description | ||
Approver/Rejector | N/A | ||
Batch | N/A | ||
Billing Type | N/A | ||
Credit Card | N/A | ||
Expense Claim | Yes | Approver/Rejector | |
| Batch | |||
| Expense Claim Date | Yes | ||
| Header Status | |||
| Job Title | |||
| Resource | |||
| Resource Name | |||
Expense Claim Date | N/A | ||
Header Date Approved/Rejected | N/A | ||
Header Status | N/A | ||
Item | Item Description | ||
Item Description | Item | ||
Job Title | N/A | ||
Line Date | N/A | ||
Line Status | N/A | ||
Merchant | N/A | ||
Payment Type | N/A | ||
Phase | Phase Name | ||
Phase Name | Phase | ||
Project | Project Manager | ||
| Project Name | |||
Project Manager | Project Manager Name | ||
Project Manager Name | Project Manager | ||
Project Name | Project | ||
| Project Manager | |||
Resource | Yes | Job Title | |
| Resource Name | Yes | ||
Resource Name | Job Title | ||
| Resource | |||
Task | Task Name | ||
Task Name | Task | ||
Vendor | Vendor Name | ||
Vendor Name | Vendor |
Table D.1. Project Summary Report Sorting Options
Style Sheets Only: The report will automatically sort by the first grouping option, but you can still specify to sort the report by additional fields. You also have the ability to specify ascending or descending order. The Default column indicates that the field will automatically default in the Report Configuration window when selecting the System Default configuration.
| Sort By Options | Default |
|---|---|
Actual Costs | |
Actual Sales | |
Budget | |
Committed Costs | |
Customer | |
Customer Name | |
Division | |
Division Name | |
Estimated Costs | |
Estimated Sales | |
Margin | |
Master Project | |
Master Project Name | |
Project | Yes |
Project Class | |
Project Class Name | |
Project Manager | |
Project Manager Name | |
Project Name | |
Project Percent Complete | |
Project Status | |
Project Type | |
Unbilled Amount | |
Write Off |
Table D.2. Project Summary Report Restriction Options
You can specify restrictions before printing the report.
| Restrict By Options |
|---|
Project |
Project Manager |
Customer |
Division |
Project Class |
Master Project |
Project Status |
Project Type |
Actual Costs |
Actual Sales |
Estimated Costs |
Estimated Sales |
Committed Costs |
Margin |
Project Percent Complete |
Budget |
Unbilled Amount |
Write Off |
Date |
Project Start Date |
Project Review Date |
Project Due Date |
Project Completion Date |
Table D.3. Project Summary Report Details
The Project Summary Report Details are the fields available to add to the report or remove from the report. The Details consist of both line level and header level details. The Default column indicates that the field will automatically default in the Report Configuration window when selecting the System Default configuration.
| Details | Default |
|---|---|
Actual Costs | Yes |
Actual Quantity | Yes |
Actual Sales | Yes |
Budget | |
Committed Costs | Yes |
Customer | |
Customer Name | |
Division | |
Division Name | |
Estimated Costs | Yes |
Estimated Quantity | Yes |
Estimated Sales | Yes |
Margin | Yes |
Master Project | |
Master Project Name | |
Project | Yes |
Project Class | |
Project Class Name | |
Project Manager | |
Project Manager Name | |
Project Name | |
Project Status | |
Project Type | |
Unbilled Amount | Yes |
Write Off | Yes |
Table D.4. Project Summary Report Grouping Options
Style Sheets Only: The Project Summary Report Grouping Options indicate how you wish to group the details on the report. The first grouping option you select will also be the field by which the report is initially sorted. When you select a Group By option, the Details checkbox will become available. If you mark the Details checkbox, some fields will allow you to select additional Detail fields specific to that grouping option. The Default column indicates that the field will automatically default in the Report Configuration window when selecting the System Default configuration.
| Group By | Default | Details | Default |
|---|---|---|---|
Customer | Customer Name | ||
Customer Name | Customer | ||
Division | Division Name | ||
Division Name | Division | ||
Master Project | Master Project Name | ||
Master Project Name | Master Project | ||
Project | Customer | ||
| Customer Name | |||
| Division | |||
| Division Name | |||
| Master Project | |||
| Master Project Name | |||
| Project Class | |||
| Project Class Name | |||
| Project Manager | |||
| Project Name | |||
| Project Status | |||
| Project Type | |||
Project Class | Project Class Name | ||
Project Class Name | Project Class | ||
Project Manager | Project Manager Name | ||
Project Manager Name | Project Manager | ||
Project Name | Customer | ||
| Customer Name | |||
| Division | |||
| Division Name | |||
| Master Project | |||
| Master Project Name | |||
| Project | |||
| Project Class | |||
| Project Class Name | |||
| Project Manager | |||
| Project Status | |||
| Project Type | |||
Project Status | N/A | ||
Project Type | N/A | ||
Report Total | Yes | N/A |
Table E.1. Project Detail Report Sorting Options
Style Sheets Only: The report will automatically sort by the first grouping option, but you can still specify to sort the report by additional fields. You also have the ability to specify ascending or descending order. The Default column indicates that the field will automatically default in the Report Configuration window when selecting the System Default configuration.
| Sort By Options | Default |
|---|---|
Actual Costs | |
Actual Sales | |
Budget | |
Committed Costs | |
Customer | |
Customer Name | |
Division | |
Division Name | |
Estimated Costs | |
Estimated Sales | |
Margin | |
Master Project | |
Master Project Name | |
Phase | |
Phase Name | |
Project | Yes |
Project Class | |
Project Class Name | |
Project Manager | |
Project Manager Name | |
Project Name | |
Project Status | |
Project Type | |
Task | |
Task Name | |
Unbilled Amount | |
Write Off |
Table E.2. Project Detail Report Restriction Options
You can specify restrictions before printing the report.
| Restrict By Options |
|---|
Project |
Phase |
Task |
Project Manager |
Customer |
Division |
Project Class |
Master Project |
Project Status |
Project Type |
Actual Costs |
Actual Sales |
Estimated Costs |
Estimated Sales |
Committed Costs |
Margin |
Budget |
Unbilled Amount |
Write Off |
Date |
Project Start Date |
Project Review Date |
Project Due Date |
Project Completion Date |
Table E.3. Project Detail Report Details
The Project Detail Report Details are the fields available to add to the report or remove from the report. The Details consist of both line level and header level details. The Default column indicates that the field will automatically default in the Report Configuration window when selecting the System Default configuration.
| Details | Default |
|---|---|
Actual Costs | Yes |
Actual Quantity | Yes |
Actual Sales | Yes |
Budget | |
Committed Costs | Yes |
Customer | |
Customer Name | |
Division | |
Division Name | |
Estimated Costs | Yes |
Estimated Quantity | Yes |
Estimated Sales | Yes |
Master Project | |
Master Project Name | |
Phase | |
Phase Name | |
Project | |
Project Class | |
Project Class Name | |
Project Manager | |
Project Manager Name | |
Project Name | |
Project Status | |
Project Type | |
Task | Yes |
Task Name | |
Unbilled Amount | Yes |
Write Off | Yes |
Table E.4. Project Detail Report Grouping Options
Style Sheets Only: The Project Detail Report Grouping Options indicate how you wish to group the details on the report. The first grouping option you select will also be the field by which the report is initially sorted. When you select a Group By option, the Details checkbox will become available. If you mark the Details checkbox, some fields will allow you to select additional Detail fields specific to that grouping option. The Default column indicates that the field will automatically default in the Report Configuration window when selecting the System Default configuration.
| Group By | Default | Details | Default |
|---|---|---|---|
Customer | Customer Name | ||
Customer Name | Customer | ||
Division | Division Name | ||
Division Name | Division | ||
Margin | N/A | ||
Master Project | Master Project Name | ||
Master Project Name | Master Project | ||
Phase | Yes | Phase Name | |
Phase Name | Phase | ||
Project | Yes | Customer | |
| Customer Name | Yes | ||
| Division | |||
| Division Name | Yes | ||
| Margin | |||
| Master Project | |||
| Master Project Name | |||
| Project Class | |||
| Project Class Name | Yes | ||
| Project Completion Date | |||
| Project Due Date | |||
| Project Manager | |||
| Project Manager Name | Yes | ||
| Project Name | Yes | ||
| Project Review Date | |||
| Project Start Date | |||
| Project Status | |||
| Project Type | Yes | ||
Project Class | Project Class Name | ||
Project Class Name | Project Class | ||
Project Completion Date | N/A | ||
Project Due Date | N/A | ||
Project Manager | Project Manager Name | ||
Project Manager Name | Project Manager | ||
Project Name | Yes | Customer | |
| Customer Name | |||
| Division | |||
| Division Name | |||
| Margin | |||
| Master Project | |||
| Master Project Name | |||
| Project | |||
| Project Class | |||
| Project Class Name | |||
| Project Completion Date | |||
| Project Due Date | |||
| Project Manager | |||
| Project Manager Name | |||
| Project Review Date | |||
| Project Start Date | |||
| Project Status | |||
| Project Type | |||
Project Review Date | N/A | ||
Project Start Date | N/A | ||
Project Status | N/A | ||
Project Type | N/A | ||
Task | Task Name | ||
Task Name | Task |
Table F.1. Project Progress Summary Report Sorting Options
Style Sheets Only: The report will automatically sort by the first grouping option, but you can still specify to sort the report by additional fields. You also have the ability to specify ascending or descending order. The Default column indicates that the field will automatically default in the Report Configuration window when selecting the System Default configuration.
| Sort By Options | Default |
|---|---|
Actual Costs | |
Actual Sales | |
Budget | |
Customer | |
Customer Name | |
Division | |
Division Name | |
Estimated Costs | |
Estimated Sales | |
Forecasted Costs | |
Forecasted Sales | |
Master Project | |
Master Project Name | |
Percent Complete | |
Project | Yes |
Project Class | |
Project Class Name | |
Project Manager | |
Project Manager Name | |
Project Name | |
Project Status | |
Project Type | |
Variance |
Table F.2. Project Progress Summary Report Restriction Options
You can specify restrictions before printing the report.
| Restrict By Options |
|---|
Project |
Project Manager |
Customer |
Division |
Project Class |
Master Project |
Project Status |
Project Type |
Actual Costs |
Actual Sales |
Estimated Costs |
Estimated Sales |
Forecasted Costs |
Forecasted Sales |
Variance |
Percent Complete |
Budget |
Date |
Project Start Date |
Project Review Date |
Project Due Date |
Project Completion Date |
Table F.3. Project Progress Summary Report Details
The Project Progress Summary Report Details are the fields available to add to the report or remove from the report. The Details consist of both line level and header level details. The Default column indicates that the field will automatically default in the Report Configuration window when selecting the System Default configuration.
| Details | Default |
|---|---|
Actual Costs | Yes |
Actual Sales | Yes |
Budget | |
Customer | |
Customer Name | |
Division | |
Division Name | |
Estimated Costs | Yes |
Estimated Sales | Yes |
Forecasted Costs | Yes |
Forecasted Sales | Yes |
Master Project | |
Master Project Name | |
Percent Complete | Yes |
Project | |
Project Class | |
Project Class Name | |
Project Manager | |
Project Manager Name | |
Project Name | |
Project Status | |
Project Type | |
Variance | Yes |
Table F.4. Project Progress Summary Report Grouping Options
Style Sheets Only: The Project Progress Summary Report Grouping Options indicate how you wish to group the details on the report. The first grouping option you select will also be the field by which the report is initially sorted. When you select a Group By option, the Details checkbox will become available. If you mark the Details checkbox, some fields will allow you to select additional Detail fields specific to that grouping option. The Default column indicates that the field will automatically default in the Report Configuration window when selecting the System Default configuration.
| Group By | Default | Details | Default |
|---|---|---|---|
Customer | Customer Name | ||
Customer Name | Customer | ||
Division | Division Name | ||
Division Name | Division | ||
Master Project | Master Project Name | ||
Master Project Name | Master Project | ||
Project | Yes | Customer | |
| Customer Name | Yes | ||
| Division | |||
| Division Name | Yes | ||
| Project Class | |||
| Project Class Name | Yes | ||
| Project Manager | |||
| Project Manager Name | Yes | ||
| Project Name | Yes | ||
| Project Type | Yes | ||
Project Class | Project Class Name | ||
Project Class Name | Project Class | ||
Project Manager | Project Manager Name | ||
Project Manager Name | Project Manager | ||
Project Name | Customer | ||
| Customer Name | |||
| Division | |||
| Division Name | |||
| Project | |||
| Project Class | |||
| Project Class Name | |||
| Project Manager | |||
| Project Manager Name | |||
| Project Type | |||
Project Status | N/A | ||
Project Type | N/A |
Table G.1. Project Progress Detail Report Sorting Options
Style Sheets Only: The report will automatically sort by the first grouping option, but you can still specify to sort the report by additional fields. You also have the ability to specify ascending or descending order. The Default column indicates that the field will automatically default in the Report Configuration window when selecting the System Default configuration.
| Sort By Options | Default |
|---|---|
Actual Costs | |
Actual Sales | |
Customer | |
Customer Name | |
Division | |
Division Name | |
Estimated Costs | |
Estimated Sales | |
Forecasted Costs | |
Forecasted Sales | |
Master Project | |
Master Project Name | |
Percent Complete | |
Phase | |
Phase Name | |
Project | Yes |
Project Budget | |
Project Class | |
Project Class Name | |
Project Manager | |
Project Manager Name | |
Project Name | |
Project Status | |
Project Type | |
Task | |
Task Name | |
Variance | |
Vendor/Item/Job Title/Resource |
Table G.2. Project Progress Detail Report Restriction Options
You can specify restrictions before printing the report.
| Restrict By Options |
|---|
Project |
Phase |
Task |
Division |
Customer |
Project Manager |
Project Class |
Master Project |
Project Status |
Project Type |
Actual Costs |
Actual Sales |
Estimated Costs |
Estimated Sales |
Forecasted Costs |
Forecasted Sales |
Variance |
Percent Complete |
Project Budget |
Date |
Project Start Date |
Project Review Date |
Project Due Date |
Project Completion Date |
Table G.3. Project Progress Detail Report Details
The Project Progress Detail Report Details are the fields available to add to the report or remove from the report. The Details consist of both line level and header level details. The Default column indicates that the field will automatically default in the Report Configuration window when selecting the System Default configuration.
| Details | Default |
|---|---|
Actual Costs | Yes |
Actual Quantity | Yes |
Actual Sales | Yes |
Customer | |
Customer Name | |
Division | |
Division Name | |
Estimated Costs | Yes |
Estimated Quantity | Yes |
Estimated Sales | Yes |
Forecasted Costs | Yes |
Forecasted Sales | Yes |
Master Project | |
Master Project Name | |
Percent Complete | Yes |
Phase | |
Phase Name | |
Project | |
Project Budget | |
Project Class | |
Project Class Name | |
Project Manager | |
Project Manager Name | |
Project Name | |
Project Status | |
Project Type | |
Task | |
Task Name | |
Variance | Yes |
Vendor/Item/Job Title/Resource | Yes |
Table G.4. Project Progress Detail Report Grouping Options
Style Sheets Only: The Project Progress Detail Report Grouping Options indicate how you wish to group the details on the report. The first grouping option you select will also be the field by which the report is initially sorted. When you select a Group By option, the Details checkbox will become available. If you mark the Details checkbox, some fields will allow you to select additional Detail fields specific to that grouping option. The Default column indicates that the field will automatically default in the Report Configuration window when selecting the System Default configuration.
| Group By | Default | Details | Default |
|---|---|---|---|
Customer | Customer Name | ||
Customer Name | Customer | ||
Division | Division Name | ||
Division Name | Division | ||
Master Project | Master Project Name | ||
Master Project Name | Master Project | ||
Phase | Yes | Phase Name | |
Phase Name | Phase | ||
Project | Yes | Customer | |
| Customer Name | Yes | ||
| Division | |||
| Division Name | Yes | ||
| Master Project | |||
| Master Project Name | |||
| Project Class | |||
| Project Class Name | Yes | ||
| Project Manager | |||
| Project Manager Name | Yes | ||
| Project Name | Yes | ||
| Project Status | |||
| Project Type | Yes | ||
Project Class | Project Class Name | ||
Project Class Name | Project Class | ||
Project Manager | Project Manager Name | ||
Project Manager Name | Project Manager | ||
Project Name | Yes | Customer | |
| Customer Name | |||
| Division | |||
| Division Name | |||
| Master Project | |||
| Master Project Name | |||
| Project | |||
| Project Class | |||
| Project Class Name | |||
| Project Manager | |||
| Project Manager Name | |||
| Project Status | |||
| Project Type | |||
Project Status | N/A | ||
Project Type | N/A | ||
Task | Yes | Task Name | |
Task Name | Task |
Table H.1. Project P&L Summary Report Sorting Options
Style Sheets Only: The report will automatically sort by the first grouping option, but you can still specify to sort the report by additional fields. You also have the ability to specify ascending or descending order. The Default column indicates that the field will automatically default in the Report Configuration window when selecting the System Default configuration.
| Sort By Options | Default |
|---|---|
Amount (Date Range) | |
Amount (Project to Date) | |
Estimated | |
Percent Revenue | |
Project | Yes |
Project Name | |
Variance | |
Variance Percent |
Table H.2. Project P&L Summary Report Restriction Options
You can specify restrictions before printing the report.
| Restrict By Options |
|---|
Project |
Project Manager |
Customer |
Division |
Project Class |
Master Project |
Project Status |
Project Type |
Budget |
Date Range |
Project Start Date |
Project Review Date |
Project Due Date |
Project Completion Date |
Table H.3. Project P&L Summary Report Details
The Project P&L Summary Report Details are the fields available to add to the report or remove from the report. The Details consist of both line level and header level details. The Default column indicates that the field will automatically default in the Report Configuration window when selecting the System Default configuration.
| Details | Default |
|---|---|
Amount (Date Range) | Yes |
Amount (Project to Date) | Yes |
Category | Yes |
Estimated | Yes |
Percent Revenue | Yes |
Phase | Yes |
Variance | Yes |
Variance Percent | Yes |
Table H.4. Project P&L Summary Report Grouping Options
Style Sheets Only: The Project P&L Summary Report Grouping Options indicate how you wish to group the details on the report. The first grouping option you select will also be the field by which the report is initially sorted. When you select a Group By option, the Details checkbox will become available. If you mark the Details checkbox, some fields will allow you to select additional Detail fields specific to that grouping option. The Default column indicates that the field will automatically default in the Report Configuration window when selecting the System Default configuration.
| Group By | Default | Details | Default |
|---|---|---|---|
Customer | Customer Name | ||
Customer Name | Customer | ||
Division | Division Name | ||
Division Name | Division | ||
Master Project | Master Project Name | ||
Master Project Name | Master Project | ||
Project | Yes | Customer | |
| Customer Name | Yes | ||
| Division | |||
| Division Name | Yes | ||
| Master Project | |||
| Master Project Name | |||
| Project Class | |||
| Project Class Name | Yes | ||
| Project Completion Date | |||
| Project Due Date | |||
| Project Manager | |||
| Project Manager Name | Yes | ||
| Project Name | Yes | ||
| Project Review Date | |||
| Project Start Date | |||
| Project Status | |||
| Project Type | Yes | ||
Project Class | Project Class Name | ||
Project Class Name | Project Class | ||
Project Completion Date | N/A | ||
Project Due Date | N/A | ||
Project Manager | Project Manager Name | ||
Project Manager Name | Project Manager | ||
Project Name | Customer | ||
| Customer Name | |||
| Division | |||
| Division Name | |||
| Master Project | |||
| Master Project Name | |||
| Project | |||
| Project Class | |||
| Project Class Name | |||
| Project Completion Date | |||
| Project Due Date | |||
| Project Manager | |||
| Project Manager Name | |||
| Project Review Date | |||
| Project Start Date | |||
| Project Status | |||
| Project Type | |||
Project Review Date | N/A | ||
Project Start Date | N/A | ||
Project Status | N/A | ||
Project Type | N/A |
Table I.1. Project P&L Detail Report Sorting Options
Style Sheets Only: The report will automatically sort by the first grouping option, but you can still specify to sort the report by additional fields. You also have the ability to specify ascending or descending order. The Default column indicates that the field will automatically default in the Report Configuration window when selecting the System Default configuration.
| Sort By Options | Default |
|---|---|
Amount (Date Range) | |
Amount (Project to Date) | |
Estimated | |
Percent Revenue | |
Project | Yes |
Project Name | |
Variance | |
Variance Percent |
Table I.2. Project P&L Detail Report Restriction Options
You can specify restrictions before printing the report.
| Restrict By Options |
|---|
Project |
Phase |
Task |
Project Manager |
Customer |
Division |
Project Class |
Master Project |
Project Status |
Project Type |
Budget |
Date Range |
Project Start Date |
Project Review Date |
Project Due Date |
Project Completion Date |
Transaction Type |
Table I.3. Project P&L Detail Report Details
The Project P&L Detail Report Details are the fields available to add to the report or remove from the report. The Details consist of both line level and header level details. The Default column indicates that the field will automatically default in the Report Configuration window when selecting the System Default configuration.
| Details | Default |
|---|---|
Amount (Date Range) | Yes |
Amount (Project to Date) | Yes |
Category | Yes |
Date Range | |
Estimated | Yes |
Percent Revenue | Yes |
Phase | Yes |
Phase Name | |
Project | |
Project Name | |
Task | Yes |
Task Name | |
Variance | Yes |
Variance Percent | Yes |
Table I.4. Project P&L Detail Report Grouping Options
Style Sheets Only: The Project P&L Detail Report Grouping Options indicate how you wish to group the details on the report. The first grouping option you select will also be the field by which the report is initially sorted. When you select a Group By option, the Details checkbox will become available. If you mark the Details checkbox, some fields will allow you to select additional Detail fields specific to that grouping option. The Default column indicates that the field will automatically default in the Report Configuration window when selecting the System Default configuration.
| Group By | Default | Details | Default |
|---|---|---|---|
Customer | Customer Name | ||
Customer Name | Customer | ||
Division | Division Name | ||
Division Name | Division | ||
Master Project | Master Project Name | ||
Master Project Name | Master Project | ||
Project | Yes | Customer | |
| Customer Name | Yes | ||
| Division | |||
| Division Name | Yes | ||
| Master Project | |||
| Master Project Name | |||
| Project Class | |||
| Project Class Name | Yes | ||
| Project Completion Date | |||
| Project Due Date | |||
| Project Manager | |||
| Project Manager Name | Yes | ||
| Project Name | Yes | ||
| Project Review Date | |||
| Project Start Date | |||
| Project Status | |||
| Project Type | Yes | ||
Project Class | Project Class Name | ||
Project Class Name | Project Class | ||
Project Completion Date | N/A | ||
Project Due Date | N/A | ||
Project Manager | Project Manager Name | ||
Project Manager Name | Project Manager | ||
Project Name | Customer | ||
| Customer Name | |||
| Division | |||
| Division Name | |||
| Master Project | |||
| Master Project Name | |||
| Project | |||
| Project Class | |||
| Project Class Name | |||
| Project Completion Date | |||
| Project Due Date | |||
| Project Manager | |||
| Project Manager Name | |||
| Project Review Date | |||
| Project Start Date | |||
| Project Status | |||
| Project Type | |||
Project Review Date | N/A | ||
Project Start Date | N/A | ||
Project Status | N/A | ||
Project Type | N/A |
Table J.1. Cost Transactions Report Sorting Options
Style Sheets Only: The report will automatically sort by the first grouping option, but you can still specify to sort the report by additional fields. You also have the ability to specify ascending or descending order. The Default column indicates that the field will automatically default in the Report Configuration window when selecting the System Default configuration.
| Sort By Options | Default |
|---|---|
Actual Costs | |
Customer | |
Customer Name | |
Date | |
Division | |
Division Name | |
Document Number | |
Master Project | |
Master Project Name | |
Phase | |
Phase Name | |
Project | Yes |
Project Class | |
Project Class Name | |
Project Manager | |
Project Manager Name | |
Project Name | |
Project Status | |
Project Type | |
Task | |
Task Name | |
Transaction Type | |
Vendor/Item/Job Title/Resource |
Table J.2. Cost Transactions Report Restriction Options
You can specify restrictions before printing the report.
| Restrict By Options |
|---|
Project |
Phase |
Task |
Project Manager |
Customer |
Division |
Project Class |
Master Project |
Project Status |
Project Type |
Actual Costs |
Transaction Type |
Date |
Project Start Date |
Project Review Date |
Project Due Date |
Project Completion Date |
Table J.3. Cost Transactions Report Details
The Cost Transactions Report Details are the fields available to add to the report or remove from the report. The Details consist of both line level and header level details. The Default column indicates that the field will automatically default in the Report Configuration window when selecting the System Default configuration.
| Details | Default |
|---|---|
Actual Costs | Yes |
Actual Quantity | Yes |
Customer | |
Customer Name | |
Date | |
Division | |
Division Name | |
Document Number | Yes |
Master Project | |
Master Project Name | |
Phase | |
Phase Name | |
Project | |
Project Class | |
Project Class Name | |
Project Manager | |
Project Manager Name | |
Project Name | |
Project Status | |
Project Type | |
Task | |
Task Name | |
Transaction Type | Yes |
U of M | Yes |
Vendor/Item/Job Title/Resource | Yes |
Table J.4. Cost Transactions Report Grouping Options
Style Sheets Only: The Cost Transactions Report Grouping Options indicate how you wish to group the details on the report. The first grouping option you select will also be the field by which the report is initially sorted. When you select a Group By option, the Details checkbox will become available. If you mark the Details checkbox, some fields will allow you to select additional Detail fields specific to that grouping option. The Default column indicates that the field will automatically default in the Report Configuration window when selecting the System Default configuration.
| Group By | Default | Details | Default |
|---|---|---|---|
Customer | Customer Name | ||
Customer Name | Customer | ||
Date | N/A | ||
Division | Division Name | ||
Division Name | Division | ||
Master Project | Master Project Name | ||
Master Project Name | Master Project | ||
Phase | Yes | Phase Name | |
Phase Name | Phase | ||
Project | Yes | Customer | |
| Customer Name | Yes | ||
| Division | |||
| Division Name | Yes | ||
| Master Project Name | |||
| Project Class | |||
| Project Class Name | Yes | ||
| Project Completion Date | |||
| Project Due Date | |||
| Project Manager | |||
| Project Manager Name | Yes | ||
| Project Name | Yes | ||
| Project Review Date | |||
| Project Start Date | |||
| Project Status | |||
| Project Type | Yes | ||
Project Class | Project Class Name | ||
Project Class Name | Project Class | ||
Project Completion Date | N/A | ||
Project Due Date | N/A | ||
Project Manager | Project Manager Name | ||
Project Manager Name | Project Manager | ||
Project Name | Customer | ||
| Customer Name | |||
| Division | |||
| Division Name | |||
| Master Project | |||
| Master Project Name | |||
| Project | |||
| Project Class | |||
| Project Class Name | |||
| Project Completion Date | |||
| Project Due Date | |||
| Project Manager | |||
| Project Manager Name | |||
| Project Review Date | |||
| Project Start Date | |||
| Project Status | |||
| Project Type | |||
Project Review Date | N/A | ||
Project Start Date | N/A | ||
Project Status | N/A | ||
Project Type | N/A | ||
Task | Yes | Task Name | |
Task Name | Task | ||
Transaction Type | N/A |
Table K.1. Resource Utilization Report Sorting Options
Style Sheets Only: The report will automatically sort by the first grouping option, but you can still specify to sort the report by additional fields. You also have the ability to specify ascending or descending order. The Default column indicates that the field will automatically default in the Report Configuration window when selecting the System Default configuration.
| Sort By Options | Default |
|---|---|
% Utilized | |
Billable Hrs. Worked | |
Division Name | |
Job Title | |
Job Title Name | |
Resource | Yes |
Resource Division | |
Resource Name | |
Total Hours Worked | |
Unbillable Hours Worked |
Table K.2. Resource Utilization Report Restriction Options
You can specify restrictions before printing the report.
| Restrict By Options |
|---|
Resource |
Resource Name |
Team |
Resource Division |
Resource Type |
Resource Table 1 |
Resource Table 2 |
Resource Status |
Date |
Productive Hours |
% Utilized |
% Utilized Calculation |
Table K.3. Resource Utilization Report Details
The Resource Utilization Report Details are the fields available to add to the report or remove from the report. The Details consist of both line level and header level details. The Default column indicates that the field will automatically default in the Report Configuration window when selecting the System Default configuration.
| Details | Default |
|---|---|
% Utilized | Yes |
Billable Hrs. Worked | Yes |
Division Name | Yes |
Job Title | |
Job Title Name | Yes |
Resource | Yes |
Resource Division | |
Resource Name | Yes |
Total Hrs. Worked | Yes |
Unbillable Hrs. Worked | Yes |
Table K.4. Resource Utilization Report Grouping Options
Style Sheets Only: The Resource Utilization Report Grouping Options indicate how you wish to group the details on the report. The first grouping option you select will also be the field by which the report is initially sorted. When you select a Group By option, the Details checkbox will become available. If you mark the Details checkbox, some fields will allow you to select additional Detail fields specific to that grouping option.
| Details | Default |
|---|---|
Division Name | |
Job Title | |
Job Title Name | |
Resource | Yes |
Resource Division |
Table L.1. Scheduled Utilization Report Sorting Options
Style Sheets Only: The report will automatically sort by the first grouping option, but you can still specify to sort the report by additional fields. You also have the ability to specify ascending or descending order. The Default column indicates that the field will automatically default in the Report Configuration window when selecting the System Default configuration.
| Sort By Options | Default |
|---|---|
% Utilized | |
End Date | |
Phase | Yes |
Phase Name | |
Project | |
Project Name | |
Resource | Yes |
Resource Name | |
Schedule | Yes |
Scheduled Status | |
Start Date | |
Task | Yes |
Task Name | |
Total Hrs. Worked | |
Total Scheduled Hrs. |
Table L.2. Scheduled Utilization Report Restriction Options
You can specify restrictions before printing the report.
| Restrict By Options |
|---|
Schedule |
Creator |
Week |
Project |
Resource |
Resource Name |
Phase |
Task |
% Utilized |
Productive Hours |
Schedule Status |
Table L.3. Scheduled Utilization Report Details
The Scheduled Utilization Report Details are the fields available to add to the report or remove from the report. The Details consist of both line level and header level details. The Default column indicates that the field will automatically default in the Report Configuration window when selecting the System Default configuration.
| Details | Default |
|---|---|
% Utilized | Yes |
Billable Hrs. Worked | Yes |
Creator | |
End Date | |
Phase | Yes |
Phase Name | |
Project | |
Project Name | |
Resource | Yes |
Resource Name | |
Schedule | |
Schedule Status | |
Start Date | |
Task | Yes |
Task Name | |
Total Hrs. Worked | Yes |
Total Scheduled Hrs. | Yes |
Table L.4. Scheduled Utilization Report Grouping Options
Style Sheets Only: The Scheduled Utilization Report Grouping Options indicate how you wish to group the details on the report. The first grouping option you select will also be the field by which the report is initially sorted. When you select a Group By option, the Details checkbox will become available. If you mark the Details checkbox, some fields will allow you to select additional Detail fields specific to that grouping option.
| Details | Default |
|---|---|
Phase | |
Phase Name | |
Project | |
Project Name | |
Resource | Yes |
Resource Name | |
Schedule | Yes |
Schedule Status | |
Task | |
Task Name |
Table M.1. Project Schedule Report Sorting Options
Style Sheets Only: The report will automatically sort by the first grouping option, but you can still specify to sort the report by additional fields. You also have the ability to specify ascending or descending order. The Default column indicates that the field will automatically default in the Report Configuration window when selecting the System Default configuration.
| Sort By Options | Default |
|---|---|
Creator | |
End Date | |
Hours | |
Phase | Yes |
Phase Name | |
Project Name | |
Resource | Yes |
Resource Name | |
Schedule | Yes |
Schedule Status | |
Start Date | |
Task | Yes |
Task Name | |
Week |
Table M.2. Project Schedule Report Restriction Options
You can specify restrictions before printing the report.
| Restrict By Options |
|---|
Schedule |
Creator |
Week |
Project |
Resource |
Phase |
Task |
Schedule Status |
Hours |
Table M.3. Project Schedule Report Details
The Project Schedule Report Details are the fields available to add to the report or remove from the report. The Details consist of both line level and header level details. The Default column indicates that the field will automatically default in the Report Configuration window when selecting the System Default configuration.
| Details | Default |
|---|---|
Creator | |
End Date | |
Hours | Yes |
Phase | Yes |
Phase Name | |
Project | |
Project Name | |
Resource | Yes |
Schedule | |
Schedule Status | |
Start Date | |
Task | Yes |
Task Name | |
Week | Yes |
Table M.4. Project Schedule Report Grouping Options
Style Sheets Only: The Project Schedule Report Grouping Options indicate how you wish to group the details on the report. The first grouping option you select will also be the field by which the report is initially sorted. When you select a Group By option, the Details checkbox will become available. If you mark the Details checkbox, some fields will allow you to select additional Detail fields specific to that grouping option.
| Details | Default |
|---|---|
Phase | |
Phase Name | |
Project | |
Project Name | |
Resource | |
Resource Name | |
Schedule | Yes |
Schedule Status | |
Task | |
Task Name | |
Week |
Table N.1. Skill Load Report Sorting Options
Style Sheets Only: The report will automatically sort by the first grouping option, but you can still specify to sort the report by additional fields. You also have the ability to specify ascending or descending order. The Default column indicates that the field will automatically default in the Report Configuration window when selecting the System Default configuration.
| Sort By Options | Default |
|---|---|
End Date | |
Hours | |
Project | Yes |
Project Name | |
Resource | Yes |
Resource Name | |
Schedule | Yes |
Schedule Status | |
Skill | Yes |
Skill Name | |
Start Date |
Table N.2. Skill Load Report Restriction Options
You can specify restrictions before printing the report.
| Restrict By Options |
|---|
Skill |
Project |
Schedule |
Week |
Resource |
Resource Name |
Hours |
Schedule Status |
Table N.3. Skill Load Report Details
The Skill Load Report Details are the fields available to add to the report or remove from the report. The Details consist of both line level and header level details. The Default column indicates that the field will automatically default in the Report Configuration window when selecting the System Default configuration.
| Details | Default |
|---|---|
End Date | Yes |
Hours | Yes |
Project | |
Project Name | |
Resource | |
Resource Name | |
Schedule | Yes |
Schedule Status | |
Skill | |
Skill Name | |
Start Date | Yes |
Table N.4. Skill Load Report Grouping Options
Style Sheets Only: The Skill Load Report Grouping Options indicate how you wish to group the details on the report. The first grouping option you select will also be the field by which the report is initially sorted. When you select a Group By option, the Details checkbox will become available. If you mark the Details checkbox, some fields will allow you to select additional Detail fields specific to that grouping option. The Default column indicates that the field will automatically default in the Report Configuration window when selecting the System Default configuration.
| Details | Default |
|---|---|
Project | Yes |
Project Name | |
Resource | Yes |
Resource Name | |
Schedule | |
Schedule Status | |
Skill | Yes |
Skill Name |
Table O.1. Resource Load Report Sorting Options
Style Sheets Only: The report will automatically sort by the first grouping option, but you can still specify to sort the report by additional fields. You also have the ability to specify ascending or descending order. The Default column indicates that the field will automatically default in the Report Configuration window when selecting the System Default configuration.
| Sort By Options | Default |
|---|---|
Hours | |
Phase | |
Phase Name | |
Project | Yes |
Project Manager | |
Project Name | |
Resource | Yes |
Resource Name | |
Schedule | |
Task | |
Task Name | |
Week | Yes |
Table O.2. Resource Load Report Restriction Options
You can specify restrictions before printing the report.
| Restrict By Options |
|---|
Resource |
Resource Name |
Project Manager |
Project |
Date |
Hours |
Schedule Status |
Table O.3. Resource Load Report Details
The Resource Load Report Details are the fields available to add to the report or remove from the report. The Details consist of both line level and header level details. The Default column indicates that the field will automatically default in the Report Configuration window when selecting the System Default configuration.
| Details | Default |
|---|---|
Hours | Yes |
Phase | Yes |
Phase Name | |
Project | |
Project Manager | |
Project Name | |
Resource | |
Resource Name | |
Schedule | |
Schedule Status | |
Task | Yes |
Task Name | |
Week |
Table O.4. Resource Load Report Grouping Options
Style Sheets Only: The Resource Load Report Grouping Options indicate how you wish to group the details on the report. The first grouping option you select will also be the field by which the report is initially sorted.
| Details | Default |
|---|---|
Phase | |
Phase Name | |
Project | Yes |
Project Name | |
Resource | Yes |
Resource Name | |
Schedule | |
Task | |
Task Name | |
Week | Yes |
Table P.1. Schedule Analysis Report Sorting Options
Style Sheets Only: The report will automatically sort by the first grouping option, but you can still specify to sort the report by additional fields. You also have the ability to specify ascending or descending order. The Default column indicates that the field will automatically default in the Report Configuration window when selecting the System Default configuration.
| Sort By Options | Default |
|---|---|
Actual Hrs. | |
Creator | |
Phase | Yes |
Phase Name | |
Project | |
Project Manager | |
Project Name | |
Resource | Yes |
Resource Name | |
Schedule | Yes |
Scheduled Hrs. | |
Task | Yes |
Task Name | |
Week | Yes |
Table P.2. Schedule Analysis Report Restriction Options
You can specify restrictions before printing the report.
| Restrict By Options |
|---|
Schedule |
Creator |
Date |
Project |
Resource |
Resource Name |
Phase |
Task |
Scheduled Hrs. |
Actual Hrs. |
Schedule Status |
Table P.3. Schedule Analysis Report Details
The Schedule Analysis Report Details are the fields available to add to the report or remove from the report. The Details consist of both line level and header level details. The Default column indicates that the field will automatically default in the Report Configuration window when selecting the System Default configuration.
| Details | Default |
|---|---|
Actual Hrs. | Yes |
Phase | Yes |
Phase Name | |
Project | |
Project Manager | |
Project Name | |
Resource | Yes |
Resource Name | Yes |
Schedule | Yes |
Schedule Status | |
Scheduled Hrs. | Yes |
Task | Yes |
Task Name | |
Week | Yes |
Table P.4. Schedule Analysis Report Grouping Options
Style Sheets Only: The Schedule Analysis Report Grouping Options indicate how you wish to group the details on the report. The first grouping option you select will also be the field by which the report is initially sorted. When you select a Group By option, the Details checkbox will become available. If you mark the Details checkbox, some fields will allow you to select additional Detail fields specific to that grouping option.
| Details | Default |
|---|---|
Phase | |
Phase Name | |
Project | |
Project Name | |
Resource | Yes |
Resource Name | |
Schedule | Yes |
Task | |
Task Name | |
Week | Yes |
Version 11.0.0.0.
Contact information for Marcil Technologies.
Marcil Technologies LLC
1405 Prairie Parkway Suite B
West Fargo, ND 58078
USA
Contact by Phone or Fax:
Toll Free: 800-577-9746
Local: 701-478-7080
Fax: 701-478-5005
Marcil Technologies Website: http://www.marciltechnologies.com
Contact by E-mail:
Sales: <sales@marciltechnologies.com>
Consulting: <consulting@marciltechnologies.com>
Support: <support@marciltechnologies.com>